• Saltar a la navegación principal
  • Saltar al contenido principal
  • Saltar al pie de página
Bluetab

Bluetab

an IBM Company

  • Soluciones
    • DATA STRATEGY
    • DATA READINESS
    • DATA PRODUCTS AI
  • Assets
    • TRUEDAT
    • FASTCAPTURE
    • Spark Tune
  • Conócenos
  • Oficinas
    • España
    • Mexico
    • Perú
    • Colombia
  • talento
    • España
    • TALENT HUB BARCELONA
    • TALENT HUB BIZKAIA
    • TALENT HUB ALICANTE
    • TALENT HUB MÁLAGA
  • Blog
  • English

Practices

Boost Your Business with GenAI and GCP: Simple and for Everyone

marzo 27, 2024 by Bluetab

Alfonso Zamora
Cloud Engineer

Introduction

The main goal of this article is to present a solution for data analysis and engineering from a business perspective, without requiring specialized technical knowledge.

Companies have a large number of data engineering processes to extract the most value from their business, and sometimes, very complex solutions for the required use case. From here, we propose to simplify the operation so that a business user, who previously could not carry out the development and implementation of the technical part, will now be self-sufficient, and will be able to implement their own technical solutions with natural language.

To fulfill our goal, we will make use of various services from the Google Cloud platform to create both the necessary infrastructure and the different technological components to extract all the value from business information.

Before we begin

Before we begin with the development of the article, let’s explain some basic concepts about the services and different frameworks we will use for implementation:

  1. Cloud Storage[1]: It is a cloud storage service provided by Google Cloud Platform (GCP) that allows users to securely and scalably store and retrieve data.
  2. BigQuery[2]: It is a fully managed data analytics service that allows you to run SQL queries on massive datasets in GCP. It is especially effective for large-scale data analysis.
  3. Terraform[3]: It is an infrastructure as code (IaC) tool developed by HashiCorp. It allows users to describe and manage infrastructure using configuration files in the HashiCorp Configuration Language (HCL). With Terraform, you can define resources and providers declaratively, making it easier to create and manage infrastructure on platforms like AWS, Azure, and Google Cloud.
  4. PySpark[4]: It is a Python interface for Apache Spark, an open-source distributed processing framework. PySpark makes it easy to develop parallel and distributed data analysis applications using the power of Spark.
  5. Dataproc[5]: It is a cluster management service for Apache Spark and Hadoop on GCP that enables efficient execution of large-scale data analysis and processing tasks. Dataproc supports running PySpark code, making it easy to perform distributed operations on large datasets in the Google Cloud infrastructure.

What is an LLM?

An LLM (Large Language Model) is a type of artificial intelligence (AI) algorithm that utilizes deep learning techniques and massive datasets to comprehend, summarize, generate, and predict new content. An example of an LLM could be ChatGPT, which makes use of the GPT model developed by OpenAI.

In our case, we will be using the Codey model (code-bison), which is a model implemented by Google that is optimized for generating code as it has been trained specifically for this specialization, which is part of the VertexAI stack.

However, it’s not only important which model we are going to use, but also how we are going to use it. By this, I mean it’s necessary to understand the input parameters that directly affect the responses our model will provide, among which we can highlight the following:

  • Temperature: This parameter controls the randomness in the model’s predictions. A low temperature, such as 0.1, generates more deterministic and focused results, while a high temperature, such as 0.8, introduces more variability and creativity in the model’s responses.
  • Prefix (Prompt): The prompt is the input text provided to the model to initiate text generation. The choice of prompt is crucial as it guides the model on the specific task expected to be performed. The formulation of the prompt can influence the quality and relevance of the model’s responses, although the length should be considered to meet the maximum number of input tokens, which is 6144.
  • Output Tokens (max_output_tokens): This parameter limits the maximum number of tokens that will be generated in the output. Controlling this value is useful for avoiding excessively long responses or for adjusting the output length according to the specific requirements of the application.
  • Candidate Count: This parameter controls the number of candidate responses the model generates before selecting the best option. A higher value can be useful for exploring various potential responses, but it will also increase computational cost.

Development of the prompt

Once we have defined the parameters and understand well what each of them is for, and we comprehend what a prompt is, let’s focus on how to use it and implement one that can adapt to our needs.

As mentioned earlier, the goal is to generate both PySpark code and Terraform in order to perform infrastructure creation and data processing tasks. Since these are completely different tasks, as a first important decision for our prompt, we have chosen to divide it into two specific parts so that each prompt is trained with examples to generate one language or the other.

For each prompt, an introduction is made to specify what the objective will be and what requests will be made, followed by a series of examples in which input in natural language is given simulating a request, and then the desired output is also given to assign the text to the specific code. The goal is to generate a structured prompt that can be efficiently processed by the model so that in the following cases, it can associate the available examples with appropriate responses.

Let’s put these small tips into practice to see one of the entries to the Terraform prompt:


input: I need to read a file named `myfile.csv` inside the folder `data/input` in a bucket called `application-data-input`, and I need to create a new dataset and table in BigQuery called `tst_tf_ai`. The process has to read the file, remove the first three characters of the name, and write the result in BigQuery. The schema of the table will be ‘name’ of String type and ‘surname’ of String type. The infrastructure has to be deployed in the project `project-cloud-223` in GCP, and region `europe-southwest1`.
output: «`hcl
terraform {
 required_version = «>= 0.15»
 required_providers {
  google = «~> 5.0»
 }
}

resource «google_storage_bucket» «temporary_files» { 
 project       = «project-cloud-223» 
 name          = «temporary-files-dataproc» 
 location      = «europe-southwest1» 
 force_destroy = true 
} 

resource «google_storage_bucket» «bucket1» { 
 project       = «project-cloud-223» 
 name          = «application-data-input» 
 location      = «europe-southwest1» 
 force_destroy = true 
} 

resource «google_storage_bucket_object» «folder1» {
 name    = «data/input/»
 bucket  = google_storage_bucket.bucket1.name
 content = » «
}

resource «google_bigquery_dataset» «dataset» { 
 project       = «project-cloud-223» 
 dataset_id    = «tst_tf_ai» 
 friendly_name = «tst_tf_ai» 
 description   = «Description» 
 location      = «europe-southwest1» 
} 

resource «google_bigquery_table» «table» { 
 project              = «project-cloud-223» 
 dataset_id           = google_bigquery_dataset.dataset.dataset_id 
 deletion_protection  = false
 table_id             = «tst_tf_ai» 
 schema               = <<EOF
[ 
 { 
  «name»: «name», 
  «type»: «STRING», 
  «mode»: «NULLABLE», 
  «description»: «The name» 
 }, 
 { 
  «name»: «surname», 
  «type»: «STRING», 
  «mode»: «NULLABLE», 
  «description»: «The surname» 
 }
] 
EOF 
} 
«`
Author Name

It’s important to implement examples as closely as possible to your use case so that the responses are more accurate, and also to have plenty of examples with a variety of requests to make it smarter when returning responses. One of the practices to make the prompt implementation more interactive could be to try different requests, and if it’s unable to do what’s been asked, the instructions should be modified.

As we have observed, developing the prompt does require technical knowledge to translate requests into code, so this task should be tackled by a technical person to subsequently empower the business user. In other words, we need a technical person to generate the initial knowledge base so that business users can then make use of these types of tools.

It has also been noticed that generating code in Terraform is more complex than generating code in PySpark, so more input examples were required in creating the Terraform prompt to tailor it to our use case. For example, we have applied in the examples that in Terraform it always creates a temporary bucket (temporary-files-dataproc) so that it can be used by Dataproc.

Practical Cases

Three examples have been carried out with different requests, requiring more or less infrastructure and transformations to see if our prompt is robust enough.

In the file ai_gen.py, we see the necessary code to make the requests and the three examples, in which it is worth highlighting the configuration chosen for the model parameters:

  • It has been decided to set the value of candidate_count to 1 so that it has no more than one valid final response to return. Additionally, as mentioned, increasing this number also entails increased costs.
  • The max_output_tokens has been set to 2048, which is the highest number of tokens for this model, as if it needs to generate a response with various transformations, it won’t fail due to this limitation.
  • The temperature has been varied between the Terraform and PySpark code. For Terraform, we have opted for 0 so that it always gives the response that is considered closest to our prompt, ensuring it doesn’t generate more than strictly necessary for our objective. In contrast, for PySpark, we have opted for 0.2, which is a low temperature to prevent excessive creativity, yet still allowing it to provide diverse responses with each call, enabling performance testing among them.

We are going to carry out an example of a request that is available in the following GitHub repository, where it is detailed step by step in the README to be able to execute it yourself. The request is as follows:


In the realm of ‘customer_table,’ my objective is the seamless integration of pivotal fields such as ‘customer_id’, ‘name’, and ‘email’. These components promise to furnish crucial insights into the essence of our valued customer base.

Conversely, when delving into the nuances of ‘sales_table,’ the envisioned tapestry includes essential elements like ‘order_id’ ‘product’ ‘price’, ‘amount’ and ‘customer_id’. Theseattributes, meticulously curated, will play a pivotal role in the nuanced exploration and analysis of sales-related data.

The ‘bigtable_info’ table will have all the fields resulting from the union of the two tables, ‘customer_table’ and ‘sales_table.’ Here, the outcome of joining the two tables by the ‘customer_id’ numeric field will be stored.

Furthermore, as part of our meticulous data collection strategy, I plan to inaugurate a dedicated Google Cloud Storage bucket christened ‘sales-etl-bucket.’ This repository is strategically designed to serve as a robust container for collating data, particularly hailing from CSV files. This endeavor is set to enhance the efficiency and organizational prowess of our data management processes.

To enhance the structure, two distinct subfolders, ‘input/sales’ and ‘input/customers’ have been ingeniously incorporated within the ‘sales-etl-bucket,’ ensuring a refined organization of the incoming data streams.

You will need to read the CSV files within the ‘input/sales’ folder to write the data into the ‘sales_table’. Additionally, you should perform the same operation with the files from the ‘input/customers’ folder to write the data into the ‘customer_table’. Finally, you are required to perform a join between the sales and customers information based on the ‘customer_id’ number field and write the merged information into the ‘bigtable_info’.
Author Name

We execute and will analyze the outputs generated in the folders generated/customers/python/etl.py and generated/terraform/main.tf.

terraform {
 required_version = ">= 0.15"
 required_providers {
   google = "~> 5.0"
 }
}


resource "google_storage_bucket" "temporary_files" {
 project       = "my-cloud-project"
 name          = "temporary-files-dataproc"
 location      = "europe-southwest1"
 force_destroy = true
}


resource "google_storage_bucket" "sales_etl_bucket" {
 project       = "my-cloud-project"
 name          = "sales-etl-bucket"
 location      = "europe-southwest1"
 force_destroy = true
}


resource "google_storage_bucket_object" "sales_folder" {
 name    = "input/sales/"
 bucket  = google_storage_bucket.sales_etl_bucket.name
 content = " "
}


resource "google_storage_bucket_object" "customers_folder" {
 name    = "input/customers/"
 bucket  = google_storage_bucket.sales_etl_bucket.name
 content = " "
}


resource "google_bigquery_dataset" "raw_sales_data" {
 project       = "my-cloud-project"
 dataset_id    = "raw_sales_data"
 friendly_name = "Raw Sales Data"
 description   = "This dataset contains the raw sales data."
 location      = "europe-southwest1"
}


resource "google_bigquery_table" "customer_table" {
 project              = "my-cloud-project"
 dataset_id           = google_bigquery_dataset.raw_sales_data.dataset_id
 deletion_protection  = false
 table_id             = "customer_table"
 schema               = <<EOF
[
 {
   "name": "customer_id",
   "type": "INT64",
   "mode": "REQUIRED",
   "description": "The customer ID."
 },
 {
   "name": "name",
   "type": "STRING",
   "mode": "NULLABLE",
   "description": "The customer's name."
 },
 {
   "name": "email",
   "type": "STRING",
   "mode": "NULLABLE",
   "description": "The customer's email address."
 }
]
EOF
}


resource "google_bigquery_table" "sales_table" {
 project              = "my-cloud-project"
 dataset_id           = google_bigquery_dataset.raw_sales_data.dataset_id
 deletion_protection  = false
 table_id             = "sales_table"
 schema               = <<EOF
[
 {
   "name": "order_id",
   "type": "INT64",
   "mode": "REQUIRED",
   "description": "The order ID."
 },
 {
   "name": "product",
   "type": "STRING",
   "mode": "NULLABLE",
   "description": "The product name."
 },
 {
   "name": "price",
   "type": "FLOAT64",
   "mode": "NULLABLE",
   "description": "The product price."
 },
 {
   "name": "amount",
   "type": "INT64",
   "mode": "NULLABLE",
   "description": "The product amount."
 },
 {
   "name": "customer_id",
   "type": "INT64",
   "mode": "REQUIRED",
   "description": "The customer ID."
 }
]
EOF
}


resource "google_bigquery_dataset" "master_sales_data" {
 project       = "my-cloud-project"
 dataset_id    = "master_sales_data"
 friendly_name = "Master Sales Data"
 description   = "This dataset contains the master sales data."
 location      = "europe-southwest1"
}


resource "google_bigquery_table" "bigtable_info" {
 project              = "my-cloud-project"
 dataset_id           = google_bigquery_dataset.master_sales_data.dataset_id
 deletion_protection  = false
 table_id             = "bigtable_info"
 schema               = <<EOF
[
 {
   "name": "customer_id",
   "type": "INT64",
   "mode": "REQUIRED",
   "description": "The customer ID."
 },
 {
   "name": "name",
   "type": "STRING",
   "mode": "NULLABLE",
   "description": "The customer's name."
 },
 {
   "name": "email",
   "type": "STRING",
   "mode": "NULLABLE",
   "description": "The customer's email address."
 },
 {
   "name": "order_id",
   "type": "INT64",
   "mode": "REQUIRED",
   "description": "The order ID."
 },
 {
   "name": "product",
   "type": "STRING",
   "mode": "NULLABLE",
   "description": "The product name."
 },
 {
   "name": "price",
   "type": "FLOAT64",
   "mode": "NULLABLE",
   "description": "The product price."
 },
 {
   "name": "amount",
   "type": "INT64",
   "mode": "NULLABLE",
   "description": "The product amount."
 }
]
EOF
}


We see that it will add a bucket with two folders to upload the data to the corresponding folder depending on whether it is sales or customer data. It has also created two datasets, one for the raw layer to have the data as it came from the source with the tables of customers and sales, and the second dataset for the final table that will store the result of joining the information from both tables.

Let’s review the PySpark code:

from pyspark.sql import SparkSession
from pyspark.sql import functions as F


# Configure Spark session
spark = SparkSession.builder.appName("SalesETL").getOrCreate()


# Define file paths
sales_path = "gs://sales-etl-bucket/input/sales/*.csv"
customers_path = "gs://sales-etl-bucket/input/customers/*.csv"


# Read CSV files into DataFrames
sales_df = spark.read.csv(sales_path, header=True, inferSchema=True)
customers_df = spark.read.csv(customers_path, header=True, inferSchema=True)


# Write tables to BigQuery
sales_df.write.format("bigquery") \
   .option("temporaryGcsBucket", "temporary-files-dataproc") \
   .option("table",  "raw_sales_data.sales_table") \
   .mode("overwrite") \
   .save()
customers_df.write.format("bigquery") \
   .option("temporaryGcsBucket", "temporary-files-dataproc") \
   .option("table",  "raw_sales_data.customer_table") \
   .mode("overwrite") \
   .save()


# Join sales and customers tables
bigtable_info_df = sales_df.join(customers_df, on="customer_id", how="inner")


# Write joined table to BigQuery
bigtable_info_df.write.format("bigquery") \
   .option("temporaryGcsBucket", "temporary-files-dataproc") \
   .option("table",  "master_sales_data.bigtable_info") \
   .mode("overwrite") \
   .save()


# Stop the Spark session
spark.stop()

It can be observed that the generated code reads from each of the folders and inserts each data into its corresponding table.

Para poder asegurarnos de que el ejemplo está bien realizado, podemos seguir los pasos del README en el repositorio GitHub[8] para aplicar los cambios en el código terraform, subir los ficheros de ejemplo que tenemos en la carpeta example_data y a ejecutar un Batch en Dataproc. 

Finally, we check if the information stored in BigQuery is correct:

  • Table customer:
  • Tabla sales:
  • Final table:

This way, we have managed to have a fully operational functional process through natural language. There is another example that can be executed, although I also encourage creating more examples, or even improving the prompt, to incorporate more complex examples and also adapt it to your use case.

Conclusions and Recommendations

As the examples are very specific to particular technologies, any change in the prompt in any example can affect the results, or also modifying any word in the input request. This means that the prompt is not robust enough to assimilate different expressions without affecting the generated code. To have a productive prompt and system, more training and different variety of solutions, requests, expressions, etc., are needed. With all this, we will finally be able to have a first version to present to our business user so that they can be autonomous.

Specifying the maximum possible detail to an LLM is crucial for obtaining precise and contextual results. Here are several tips to keep in mind to achieve appropriate results:

  • Clarity and Conciseness:
    • Be clear and concise in your prompt, avoiding long and complicated sentences.
    • Clearly define the problem or task you want the model to address.
  • Specificity:
    • Provide specific details about what you are looking for. The more precise you are, the better results you will get.
  • Variability and Diversity:
    • Consider including different types of examples or cases to assess the model’s ability to handle variability.
  • Iterative Feedback:
    • If possible, iterate on your prompt based on the results obtained and the model’s feedback.
  • Testing and Adjustment:
    • Before using the prompt extensively, test it with examples and adjust as needed to achieve desired results.

Future Perspectives

In the field of LLMs, future lines of development focus on improving the efficiency and accessibility of language model implementation. Here are some key improvements that could significantly enhance user experience and system effectiveness:

1. Use of different LLM models:

The inclusion of a feature that allows users to compare the results generated by different models would be essential. This feature would provide users with valuable information about the relative performance of the available models, helping them select the most suitable model for their specific needs in terms of accuracy, speed, and required resources.

2. User feedback capability:

Implementing a feedback system that allows users to rate and provide feedback on the generated responses could be useful for continuously improving the model’s quality. This information could be used to adjust and refine the model over time, adapting to users’ changing preferences and needs.

3. RAG (Retrieval-augmented generation)

RAG (Retrieval-augmented generation) is an approach that combines text generation and information retrieval to enhance the responses of language models. It involves using retrieval mechanisms to obtain relevant information from a database or textual corpus, which is then integrated into the text generation process to improve the quality and coherence of the generated responses.

Links of Interest

Cloud Storage[1]: https://cloud.google.com/storage/docs

BigQuery[2]: https://cloud.google.com/bigquery/docs

Terraform[3]: https://developer.hashicorp.com/terraform/docs

PySpark[4]: https://spark.apache.org/docs/latest/api/python/index.html

Dataproc[5]: https://cloud.google.com/dataproc/docs

Codey[6]: https://cloud.google.com/vertex-ai/generative-ai/docs/model-reference/code-generation

VertexAI[7]: https://cloud.google.com/vertex-ai/docs

GitHub[8]: https://github.com/alfonsozamorac/etl-genai

Tabla de contenidos
  1. Introduction
  2. Before we begin
  3. What is an LLM?
  4. Development of the prompt
  5. Practical Cases

Publicado en: Blog, Practices, Tech

Container vulnerability scanning with Trivy

marzo 22, 2024 by Bluetab

Container vulnerability scanning
with Trivy

Ángel Maroco

AWS Cloud Architect

Within the framework of security in container, the build phase is of vital importance as we need to select the base image on which applications will run. Not having automatic mechanisms for vulnerability scanning can lead to production environments with insecure applications with the risks that involves.

In this article we will cover vulnerability scanning using Aqua Security’s Trivy solution, but before we begin, we need to explain what the basis is for these types of solutions for identifying vulnerabilities in Docker images.

Introduction to CVE (Common Vulnerabilities and Exposures)

CVE is a list of information maintained by MITRE Corporation which is aimed at centralising the records of known security vulnerabilities, where each reference has a CVE-ID number, description of the vulnerability, which versions of the software are affected, possible fix for the flaw (if any) or how to configure to mitigate the vulnerability and references to publications or posts in forums or blogs where the vulnerability has been made public or its exploitation is demonstrated.

The CVE-ID provides a standard naming convention for uniquely identifying a vulnerability. They are classified into 5 typologies, which we will look at in the Interpreting the analysis section. These types are assigned based on different metrics (if you are curious, see CVSS Calculator v3).

CVE has become the standard for vulnerability recording, so it is used by the great majority of technology companies and individuals.

There are various channels for keeping informed of all the news related to vulnerabilities: official blog, Twitter, cvelist on GitHub and LinkedIn.

If you want more detailed information about a vulnerability, you can also consult the NIST website, specifically the NVD (National Vulnerability Database).

We invite you to search for one of the following critical vulnerabilities. It is quite possible that they have affected you directly or indirectly. We should forewarn you that they have been among the most discussed data-src=

  • CVE-2017-5753
  • CVE-2017-5754

If you detect a vulnerability, we encourage you to register it using the form below.

Aqua Security – Trivy

Trivy is an open source tool focused on detecting vulnerabilities in OS-level packages and dependency files for various languages:

  • OS packages: (Alpine, Red Hat Universal Base Image, Red Hat Enterprise Linux, CentOS, Oracle Linux, Debian, Ubuntu, Amazon Linux, openSUSE Leap, SUSE Enterprise Linux, Photon OS and Distroless)

  • Application dependencies: (Bundler, Composer, Pipenv, Poetry, npm, yarn and Cargo)

Aqua Security, a company specialising in development of security solutions, acquired Trivy in 2019. Together with a substantial number of collaborators, they are responsible for developing and maintaining it.

Installation

Trivy has installers for most Linux and MacOS systems. For our tests, we will use the generic installer:

curl -sfL https://raw.githubusercontent.com/aquasecurity/trivy/master/contrib/install.sh | sudo sh -s -- -b /usr/local/bin 

If we do not want to persist the binary on our system, we have a Docker image:

docker run --rm -v /var/run/docker.sock:/var/run/docker.sock -v /tmp/trivycache:/root/.cache/ aquasec/trivy python:3.4-alpine 

Basic operations

  • Local images

Trivy has installers for most Linux and MacOS systems. For our tests, we will use the generic installer:

#!/bin/bash
docker build -t cloud-practice/alpine:latest -<<EOF
FROM alpine:latest
RUN echo "hello world"
EOF

trivy image cloud-practice/alpine:latest 
  • Remote images
#!/bin/bash
trivy image python:3.4-alpine 
  • Local projects:
    Enable you to analyse dependency files (outputs):
    • Pipfile.lock: Python
    • package-lock_react.json: React
    • Gemfile_rails.lock: Rails
    • Gemfile.lock: Ruby
    • Dockerfile: Docker
    • composer_laravel.lock: PHP Lavarel
    • Cargo.lock: Rust
#!/bin/bash
git clone https://github.com/knqyf263/trivy-ci-test
trivy fs trivy-ci-test 
  • Public repositories:
#!/bin/bash
trivy repo https://github.com/knqyf263/trivy-ci-test 
  • Private image repositories:
    • Amazon ECR (Elastic Container Registry)
    • Docker Hub
    • GCR (Google Container Registry)
    • Private repositories with BasicAuth
  • Cache database
    The vulnerability database is hosted on GitHub. To avoid downloading this database in each analysis operation, you can use the --cache-dir <dir> parameter:
#!/bin/bash trivy –cache-dir .cache/trivy image python:3.4-alpine3.9 
  • Filter by severity
#!/bin/bash
trivy image --severity HIGH,CRITICAL ruby:2.4.0 
  • Filter unfixed vulnerabilities
#!/bin/bash
trivy image --ignore-unfixed ruby:2.4.0 
  • Specify output code
    This option is very useful in the continuous integration process, as we can specify that your pipeline ends in error when vulnerabilities of the critical type are found, but medium and high types finish properly.
#!/bin/bash
trivy image --exit-code 0 --severity MEDIUM,HIGH ruby:2.4.0
trivy image --exit-code 1 --severity CRITICAL ruby:2.4.0 
  • Ignore specific vulnerabilities
    You can specify those CVEs you want to ignore by using the .trivyignore file. This can be useful if the image contains a vulnerability that does not affect your development.
#!/bin/bash
cat .trivyignore
# Accept the risk
CVE-2018-14618

# No impact in our settings
CVE-2019-1543 
  • Export output in JSON format:
    This option is useful if you want to automate a process before an output, display the results in a custom front end, or persist the output in a structured format.
#!/bin/bash
trivy image -f json -o results.json golang:1.12-alpine
cat results.json | jq 
  • Export output in SARIF format:
    There is a standard called SARIF (Static Analysis Results Interchange Format) that defines the format for outputs that any vulnerability analysis tool should have.
#!/bin/bash
wget https://raw.githubusercontent.com/aquasecurity/trivy/master/contrib/sarif.tpl
trivy image --format template --template "@sarif.tpl" -o report-golang.sarif  golang:1.12-alpine
cat report-golang.sarif   

VS Code has the sarif-viewer extension for viewing vulnerabilities.

Continuous integration processes

Trivy has templates for the leading CI/CD solutions:

  • GitHub Actions
  • Travis CI
  • CircleCI
  • GitLab CI
  • AWS CodePipeline
#!/bin/bash
$ cat .gitlab-ci.yml
stages:
  - test

trivy:
  stage: test
  image: docker:stable-git
  before_script:
    - docker build -t trivy-ci-test:${CI_COMMIT_REF_NAME} .
    - export VERSION=$(curl --silent "https://api.github.com/repos/aquasecurity/trivy/releases/latest" | grep '"tag_name":' | sed -E 's/.*"v([^"]+)".*/\1/')
    - wget https://github.com/aquasecurity/trivy/releases/download/v${VERSION}/trivy_${VERSION}_Linux-64bit.tar.gz
    - tar zxvf trivy_${VERSION}_Linux-64bit.tar.gz
  variables:
    DOCKER_DRIVER: overlay2
  allow_failure: true
  services:
    - docker:stable-dind
  script:
    - ./trivy --exit-code 0 --severity HIGH --no-progress --auto-refresh trivy-ci-test:${CI_COMMIT_REF_NAME}
    - ./trivy --exit-code 1 --severity CRITICAL --no-progress --auto-refresh trivy-ci-test:${CI_COMMIT_REF_NAME} 

Interpreting the analysis

#!/bin/bash
trivy image httpd:2.2-alpine
2020-10-24T09:46:43.186+0200    INFO    Need to update DB
2020-10-24T09:46:43.186+0200    INFO    Downloading DB...
18.63 MiB / 18.63 MiB [---------------------------------------------------------] 100.00% 8.78 MiB p/s 3s
2020-10-24T09:47:08.571+0200    INFO    Detecting Alpine vulnerabilities...
2020-10-24T09:47:08.573+0200    WARN    This OS version is no longer supported by the distribution: alpine 3.4.6
2020-10-24T09:47:08.573+0200    WARN    The vulnerability detection may be insufficient because security updates are not provided

httpd:2.2-alpine (alpine 3.4.6)
===============================
Total: 32 (UNKNOWN: 0, LOW: 0, MEDIUM: 15, HIGH: 14, CRITICAL: 3)

+-----------------------+------------------+----------+-------------------+------------------+--------------------------------+
|        LIBRARY        | VULNERABILITY ID | SEVERITY | INSTALLED VERSION |  FIXED VERSION   |             TITLE              |
+-----------------------+------------------+----------+-------------------+------------------+--------------------------------+
| libcrypto1.0          | CVE-2018-0732    | HIGH     | 1.0.2n-r0         | 1.0.2o-r1        | openssl: Malicious server can  |
|                       |                  |          |                   |                  | send large prime to client     |
|                       |                  |          |                   |                  | during DH(E) TLS...            |
+-----------------------+------------------+----------+-------------------+------------------+--------------------------------+
| postgresql-dev        | CVE-2018-1115    | CRITICAL | 9.5.10-r0         | 9.5.13-r0        | postgresql: Too-permissive     |
|                       |                  |          |                   |                  | access control list on         |
|                       |                  |          |                   |                  | function pg_logfile_rotate()   |
+-----------------------+------------------+----------+-------------------+------------------+--------------------------------+
| libssh2-1             | CVE-2019-17498   | LOW      | 1.8.0-2.1         |                  | libssh2: integer overflow in   |
|                       |                  |          |                   |                  | SSH_MSG_DISCONNECT logic in    |
|                       |                  |          |                   |                  | packet.c                       |
+-----------------------+------------------+----------+-------------------+------------------+--------------------------------+ 
  • Library: the library/package identifying the vulnerability.

  • Vulnerability ID: vulnerability identifier (according to CVE standard).

  • Severity: there is a classification with 5 typologies [source] which are assigned a CVSS (Common Vulnerability Scoring System) score:

    • Critical (CVSS Score 9.0-10.0): flaws that could be easily exploited by a remote unauthenticated attacker and lead to system compromise (arbitrary code execution) without requiring user interaction.

    • High (CVSS score 7.0-8.9): flaws that can easily compromise the confidentiality, integrity or availability of resources.

    • Medium (CVSS score 4.0-6.9): flaws that may be more difficult to exploit but could still lead to some compromise of the confidentiality, integrity or availability of resources under certain circumstances.

    • Low (CVSS score 0.1-3.9): all other issues that may have a security impact. These are the types of vulnerabilities that are believed to require unlikely circumstances to be able to be exploited, or which would give minimal consequences.

    • Unknown (CVSS score 0.0): allocated to vulnerabilities with no assigned score.

  • Installed version: the version installed in the system analysed.

  • Fixed version: the version in which the issue is fixed. If the version is not reported, this means the fix is pending.

  • Title: A short description of the vulnerability. For further information, see the NVD.

Now you know how to interpret at the analysis information at a high level. So, what actions should you take? We give you some pointers in the Recommendations section.

Recommendations

  • This section describes some of the most important aspects within the scope of vulnerabilities in containers:

    • Avoid (wherever possible) using images in which critical and high severity vulnerabilities have been identified.
    • Include image analysis in CI processes
      Security in development is not optional; automate your testing and do not rely on manual processes.
    • Use lightweight images, fewer exposures:
      Images of the Alpine / BusyBox type are built with as few packages as possible (the base image is 5 MB), resulting in reduced attack vectors. They support multiple architectures and are updated quite frequently.
REPOSITORY  TAG     IMAGE ID      CREATED      SIZE
alpine      latest  961769676411  4 weeks ago  5.58MB
ubuntu      latest  2ca708c1c9cc  2 days ago   64.2MB
debian      latest  c2c03a296d23  9 days ago   114MB
centos      latest  67fa590cfc1c  4 weeks ago  202MB 

If for a dependencies reason, you cannot customise an Alpine base image, look for slim-type images from trusted software vendors. Apart from the security component, people who share a network with you will appreciate not having to download 1 GB images.

  • Get images from official repositories: Using DockerHub is recommended, and preferably images from official publishers. DockerHub and CVEs

  • Keep images up to date: the following example shows an analysis of two different Apache versions:

    Image published in 11/2018

httpd:2.2-alpine (alpine 3.4.6)
 Total: 32 (UNKNOWN: 0, LOW: 0, MEDIUM: 15, **HIGH: 14, CRITICAL: 3**) 

Image published in 01/2020

httpd:alpine (alpine 3.12.1)
 Total: 0 (UNKNOWN: 0, LOW: 0, MEDIUM: 0, **HIGH: 0, CRITICAL: 0**) 

As you can see, if a development was completed in 2018 and no maintenance was performed, you could be exposing a relatively vulnerable Apache. This is not an issue resulting from the use of containers. However, because of the versatility Docker provides for testing new product versions, we now have no excuse.

  • Pay special attention to vulnerabilities affecting the application layer:
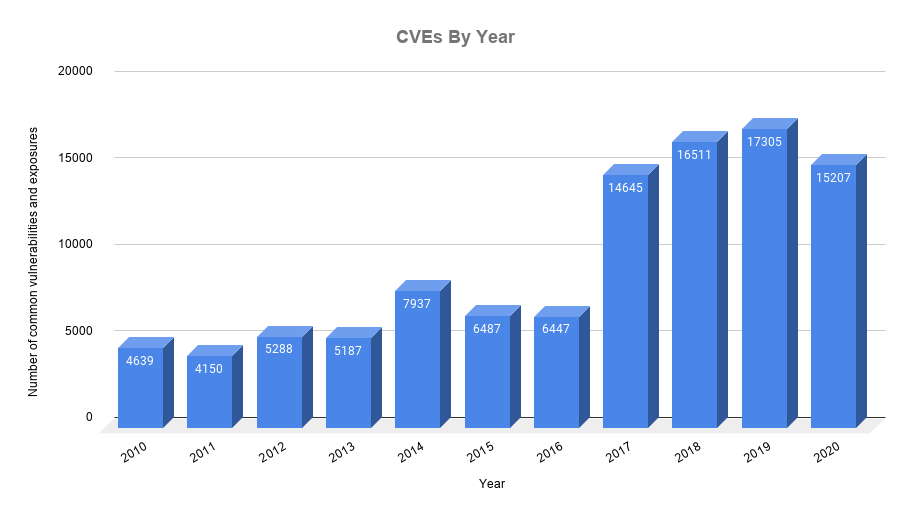
    According to the study conducted by the company edgescan, 19% of vulnerabilities detected in 2018 were associated with Layer 7 (OSI Model), with XSS (Cross-site Scripting) type attacks standing out above all.

  • Select latest images with special care:
    Although this advice is closely related to the use of lightweight images, we consider it worth inserting a note on latest images:

Latest Apache image (Alpine base 3.12)

httpd:alpine (alpine 3.12.1)
 Total: 0 (UNKNOWN: 0, LOW: 0, MEDIUM: 0, HIGH: 0, CRITICAL: 0) 

Latest Apache image (Debian base 10.6)

httpd:latest (debian 10.6)
 Total: 119 (UNKNOWN: 0, LOW: 87, MEDIUM: 10, HIGH: 22, CRITICAL: 0) 

We are using the same version of Apache (2.4.46) in both cases, the difference is in the number of critical vulnerabilities.
Does this mean that the Debian base 10 image makes the application running on that system vulnerable? It may or may not be. You need to assess whether the vulnerabilities could compromise your application. The recommendation is to use the Alpine image.

  • Evaluate the use of Docker distroless images
    The distroless concept is from Google and consists of Docker images based on Debian9/Debian10, without package managers, shells or utilities. The images are focused on programming languages (Java, Python, Golang, Node.js, dotnet and Rust), containing only what is required to run the applications. As they do not have package managers, you cannot install your own dependencies, which can be a big advantage or in other cases a big obstacle. Do testing and if it fits your project requirements, go ahead; it is always useful to have alternatives. Maintenance is Google’s responsibility, so the security aspect will be well-defined.

Container vulnerability scanner ecosystem

In our case we have used Trivy as it is a reliable, stable, open source tool that is being developed continually, but there are numerous tools for container analysis:
  • Clair
  • Snyk
  • Anchore Cloud
  • Docker Bench
  • Docker Scan
Do you want to know more about what we offer and to see other success stories?
DISCOVER BLUETAB
Ángel Maroco
AWS Cloud Architect

My name is Ángel Maroco and I have been working in the IT sector for over a decade. I started my career in web development and then moved on for a significant period to IT platforms in banking environments and have been working on designing solutions in AWS environments for the last 5 years.

I now combine my role as an architect with being head of /bluetab Cloud Practice, with the mission of fostering Cloud culture within the company.

SOLUTIONS, WE ARE EXPERTS

DATA STRATEGY
DATA FABRIC
AUGMENTED ANALYTICS

You may be interested in

Databricks sobre Azure – Una perspectiva de Arquitectura (parte 2)

marzo 24, 2022
READ MORE

Algunas de las capacidades de Matillion ETL en Google Cloud

julio 11, 2022
READ MORE

El futuro del Cloud y GenIA en el Next ’23

septiembre 19, 2023
READ MORE

KubeCon 2023: Una mirada hacia el futuro de Kubernetes

abril 26, 2023
READ MORE

Data-Drive Agriculture; Big Data, Cloud & AI aplicados

noviembre 4, 2020
READ MORE

MICROSOFT FABRIC: Una nueva solución de análisis de datos, todo en uno

octubre 16, 2023
READ MORE

Publicado en: Blog, Practices, Tech

Using Large Language Models on Private Information

marzo 11, 2024 by Bluetab

Roger Pou Lopez
Data Scientist

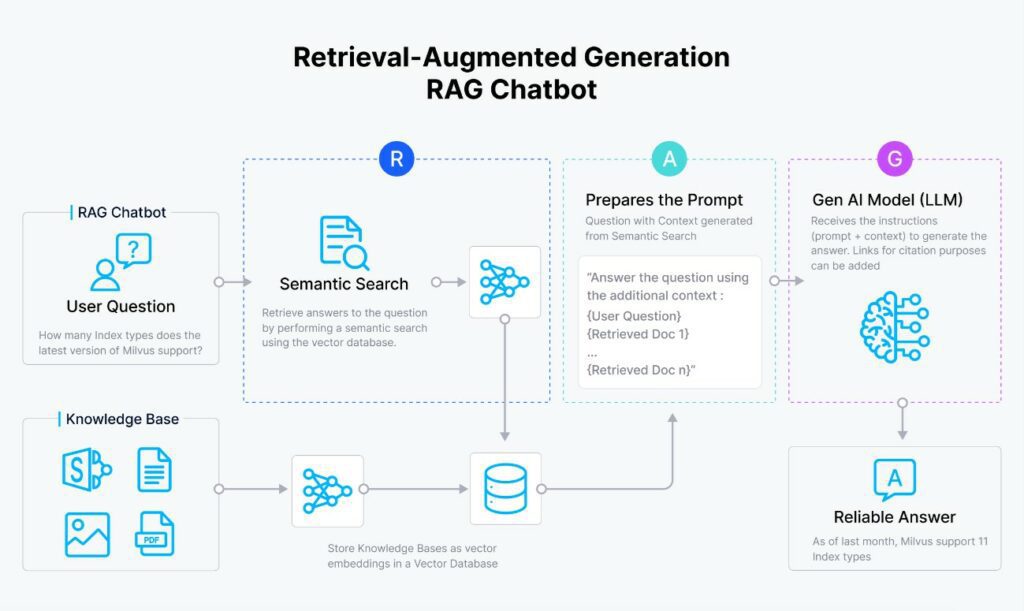
A RAG, acronym for ‘Retrieval Augmented Generation,’ represents an innovative strategy within natural language processing. It integrates with Large Language Models (LLMs), such as those used by ChatGPT internally (GPT-3.5-turbo or GPT-4), with the aim of enhancing response quality and reducing certain undesired behaviors, such as hallucinations.

https://www.superannotate.com/blog/rag-explained

These systems combine the concepts of vectorization and semantic search, along with LLMs, to augment their knowledge with external information that was not included during their training phase and thus remains unknown to them.

There are certain points in favor of using RAGs:

  • They allow for reducing the level of hallucinations exhibited by the models. Often, LLMs respond with incorrect (or invented) information, although semantically their response makes sense. This is referred to as hallucination. One of the main objectives of RAG is to try to minimize these types of situations as much as possible, especially when asking about specific things. This is highly useful if one wants to use an LLM productively.
  • Using a RAG, it is no longer necessary to retrain the LLM. This process can become economically costly, as it would require GPUs for training, in addition to the complexity that training may entail.
  • They are economical, fast (utilizing indexed information), and furthermore, they do not depend on the model being used (at any time, we can switch from GPT-3.5 to Llama-2-70B).

Drawbacks:

  • Assistance with code, mathematics, and it won’t be as straightforward as launching a simple modified prompt will be required.
  • In the evaluation of RAGs (we will see later in the article), we will need powerful models like GPT-4.

Example Use Case

There are several examples where RAGs are being utilized. The most typical example is their use with chatbots to inquire about very specific business information.

  • In call centers, agents are starting to use a chatbot with information about rates to respond quickly and effectively to the calls they receive.
  • In chatbots, as sales assistants where they are gaining popularity. Here, RAGs help respond to product comparisons or when specifically asked about a service, making recommendations for similar products.

Components of a RAG

https://zilliz.com/learn/Retrieval-Augmented-Generation

Let’s discuss in detail the different components that make up a RAG to have a rough idea, and then we’ll talk about how these elements interact with each other.

Knowledge Base

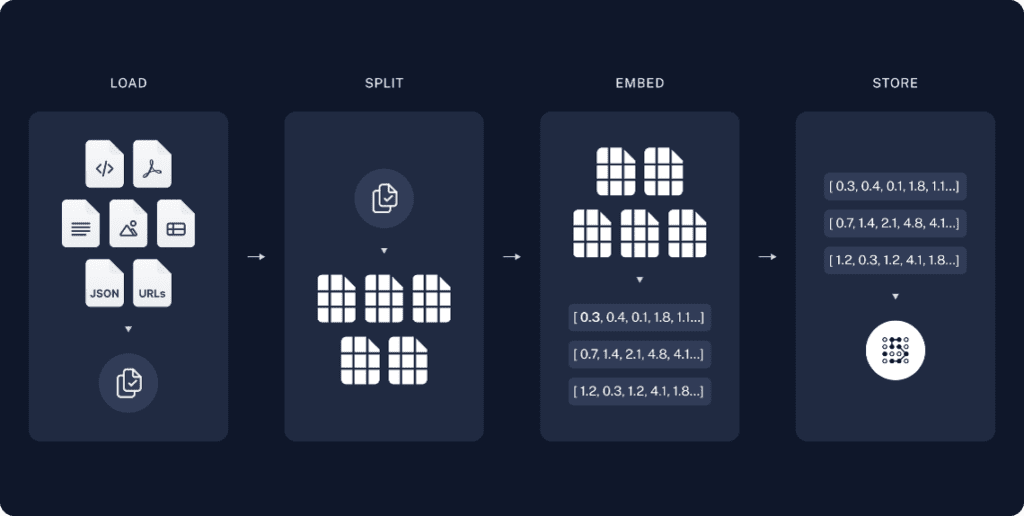
This element is a somewhat open but also logical concept: it refers to objective knowledge of which we know that the LLM is not aware and that has a high risk of hallucination. This knowledge, in text format, can come in many formats: PDF, Excel, Word, etc… Advanced RAGs are also capable of detecting knowledge in images and tables.

In general, all content will be in text format and will need to be indexed. Since human texts are often unstructured, we resort to subdividing the texts using strategies called chunking.

Embedding Model

An embedding is the vector representation generated by a neural network trained on a dataset (text, images, sound, etc.) that is capable of summarizing the information of an object of that same type into a vector within a specific vector space.

For example, in the case of a text referring to ‘I like blue rubber ducks’ and another that says ‘I love yellow rubber ducks,’ when converted into vectors, they will be closer in distance to each other than a text referring to ‘The cars of the future are electric cars.’

This component is what will subsequently allow us to index the different chunks of text information correctly.

Vector Database

This is the place where we are going to store and index the vector information of the chunks through the embeddings. It is a very important and complex component where, fortunately, there are already several open-source solutions that are very valid to deploy it ‘easily,’ such as Milvus or Chroma.

LLM

It is logical, since the RAG is a solution that allows us to help respond more accurately to these LLMs. We don’t have to restrict ourselves to very large and efficient models (but not economical like GPT-4), but they can be smaller and more ‘simple’ models in terms of response quality and number of parameters.

Below we can see a representative image of the process of loading information into the vector database.

https://python.langchain.com/docs/use_cases/question_answering/

High-Level Operation

Now that we have a clearer understanding of the puzzle pieces, some questions arise:

  • How do these components interact with each other?
  • Why is a vector database necessary?

Let’s try to clarify the matter a bit.

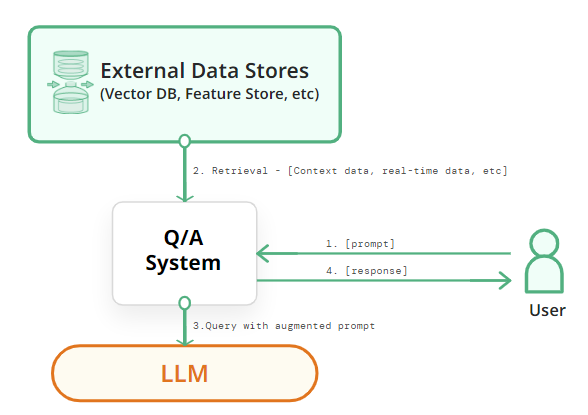
https://www.hopsworks.ai/dictionary/retrieval-augmented-generation-llm

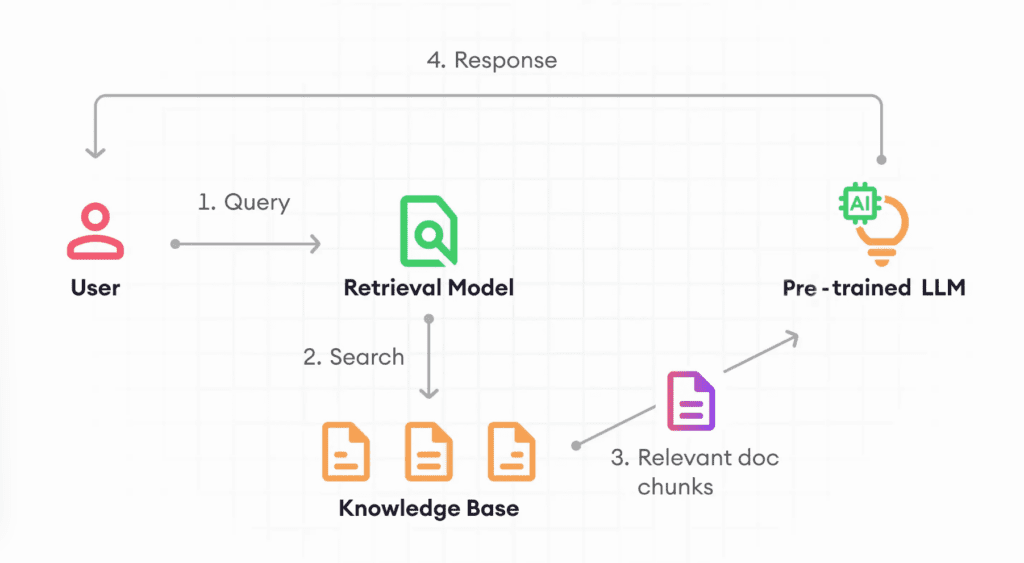
The intuitive idea of how a RAG works is as follows:

  1. The user asks a question. We transform the question into a vector using the same embedding system we used to store the chunks. This allows us to compare our question with all the information we have indexed in our vector database.
  2. We calculate the distances between the question and all the vectors we have in the database. Using a strategy, we select some of the chunks and add all this information within the prompt as context. The simplest strategy is to select a number (K) of vectors closest to the question.
  3. We pass it to the LLM to generate the response based on the contexts. That is, the prompt contains instructions + question + context returned by the Retrieval system. This is why the ‘Augmentation’ part in the RAG acronym, as we are doing prompt augmentation.
  4. The LLM generates a response based on the question we ask and the context we have passed. This will be the response that the user will see.

This is why we need an embedding and a vector database. That’s where the trick lies. If you are able to find very similar information to your question in your vector database, then you can detect content that may be useful for your question. But for all this, we need an element that allows us to compare texts objectively, and we cannot have this information stored in an unstructured way if we need to ask questions frequently.

Also, ultimately all this ends up in the prompt, which allows it to be independent of the LLM model we are going to use.

Evaluation of RAGs

In the same way as classical statistical or data science models, we have a need to quantify how a model is performing before using it productively.

The most basic strategy (for example, to measure the effectiveness of a linear regression) involves dividing the dataset into different parts such as train and test (80 and 20% respectively), training the model on train and evaluating on test with metrics like root-mean-square error, since the test set contains data that the model hasn’t seen. However, a RAG does not involve training but rather a system composed of different elements where one of its parts is using a text generation model.

Beyond this, here we don’t have quantitative data (i.e., numbers) and the nature of the data consists of generated text that can vary depending on the question asked, the context detected by the Retrieval system, and even the non-deterministic behavior of neural network models.

One basic strategy we can think of is to manually analyze how well our system is performing, based on asking questions and observing how the responses and contexts returned are working. But this approach becomes impractical when we want to evaluate all the possibilities of questions in very large documents and recurrently.

So, how can we do this evaluation?

The trick: Leveraging the LLMs themselves. With them, we can build a synthetic dataset that simulates the same action of asking questions to our system, just as if a human had done it. We can even add a higher level of sophistication: using a smarter model than the previous one that functions as a critic, indicating whether what is happening makes sense or not.

Example of Evaluation Dataset

https://docs.ragas.io/en/stable/getstarted/evaluation.html

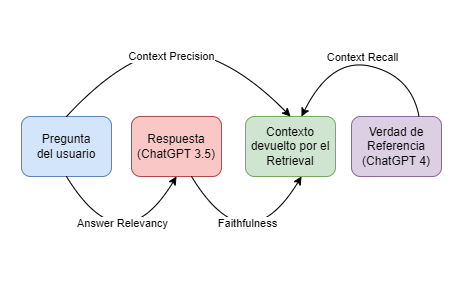
What we have here are samples of Question-Answer pairs showing how our RAG system would have performed, simulating the questions a human might ask in comparison to the model we are evaluating. To do this, we need two models: the LLM we would use in our RAG, for example, GPT-3.5-turbo (Answer), and another model with better performance to generate a ‘truth’ (Ground Truth), such as GPT-4.

In other words, in ChatGPT 3.5 would be the question generation system, and ChatGPT 4 would serve as the critical part.

Once we have generated our evaluation dataset, the next step is to quantify it numerically using some form of metric.

Evaluation Metrics

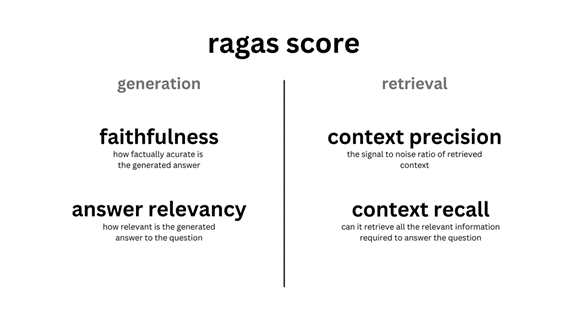
The evaluation of responses is something new, but there are already open-source projects that effectively quantify the quality of RAGs. These evaluation systems allow measuring the ‘Retrieval’ and ‘Generation’ parts separately.

https://docs.ragas.io/en/stable/concepts/metrics/index.html

Faitfulness Score

It measures the accuracy of our responses given a context. That is, what percentage of the question is true based on the context obtained through our system. This metric serves to try to control the hallucinations that LLMs may have. A very low value in this metric would imply that the model is making things up, even when given a context. Therefore, it is a metric that should be as close to one as possible.

Answer Relevancy Score

It quantifies the relevance of the response based on the question asked to our system. If the response is not relevant to what we asked, it is not answering us properly. Therefore, the higher this metric is, the better.

Context Precision Score

It evaluates whether all the elements of our ground-truth items within the contexts are ranked in priority or not.

Context Recall Score

It quantifies if the returned context aligns with the annotated response. In other words, how relevant the context is to the question we ask. A low value would indicate that the returned context is not very relevant and does not help us answer the question.

How all these metrics are being evaluated is a bit more complex, but we can find well-explained examples in the RAGAS documentation.

Practical Example using LangChain, OpenAI, and ChromaDB

We are going to use the LangChain framework, which allows us to build a RAG very easily.

The dataset we will use is an essay by Paul Graham, a typical and small dataset in terms of size.

The vector database we will use is Chroma, open-source and fully integrated with LangChain. Its use will be completely transparent, using the default parameters.

NOTE: Each call to an associated model incurs a monetary cost, so it’s advisable to review the pricing of OpenAI. We will be working with a small dataset of 10 questions, but if scaled, the cost could increase.

import os
from dotenv import load_dotenv  

load_dotenv() # Configurar OpenAI API Key

from langchain_community.document_loaders import TextLoader
from langchain.text_splitter import RecursiveCharacterTextSplitter
from langchain_openai import OpenAIEmbeddings
from langchain_community.vectorstores import Chroma
from langchain.prompts import ChatPromptTemplate

embeddings = OpenAIEmbeddings(
    model="text-embedding-ada-002"
)

text_splitter = RecursiveCharacterTextSplitter(
    chunk_size = 700,
    chunk_overlap = 50
)

loader = TextLoader('paul_graham/paul_graham_essay.txt')
text = loader.load()
documents = text_splitter.split_documents(text)
print(f'Número de chunks generados gracias al documento: {len(documents)}')

vector_store = Chroma.from_documents(documents, embeddings)
retriever = vector_store.as_retriever()
Número de chunks generados gracias al documento: 158

Since the text of the book is in English, our prompt template must be in English.

from langchain.prompts import ChatPromptTemplate

template = """Answer the question based only on the following context. If you cannot answer the question with the context, please respond with 'I don't know':

Context:
{context}

Question:
{question}
"""

prompt = ChatPromptTemplate.from_template(template)

Now we are going to define our RAG using LCEL. The model we will use to respond to the questions of our RAG will be GPT-3.5-turbo. It’s important that the temperature parameter is set to 0 so that the model is not creative.

from operator import itemgetter

from langchain_openai import ChatOpenAI
from langchain_core.output_parsers import StrOutputParser
from langchain_core.runnables import RunnablePassthrough 

primary_qa_llm = ChatOpenAI(model_name="gpt-3.5-turbo", temperature=0)

retrieval_augmented_qa_chain = (
    {"context": itemgetter("question") | retriever, "question": itemgetter("question")}
    | RunnablePassthrough.assign(context=itemgetter("context"))
    | {"response": prompt | primary_qa_llm, "context": itemgetter("context")}
)

.. and now it is possible to start asking questions to our RAG system.

question = "What was doing the author before collegue? "

result = retrieval_augmented_qa_chain.invoke({"question" : question}) 

print(f' Answer the question based: {result["response"].content}')
Answer the question based: The author was working on writing and programming before college.

We can also investigate which contexts have been returned by our retriever. As mentioned, the Retrieval strategy is the default and will return the top 4 contexts to answer a question.

display(retriever.get_relevant_documents(question))
[Document(page_content="What I Worked On\n\nFebruary 2021\n\nBefore college the two main things I worked on, outside of school, were writing and programming. I didn't write essays. I wrote what beginning writers were supposed to write then, and probably still are: short stories. My stories were awful. They had hardly any plot, just characters with strong feelings, which I imagined made them deep.", metadata={'source': 'paul_graham/paul_graham_essay.txt'}),
 Document(page_content="Over the next several years I wrote lots of essays about all kinds of different topics. O'Reilly reprinted a collection of them as a book, called Hackers & Painters after one of the essays in it. I also worked on spam filters, and did some more painting. I used to have dinners for a group of friends every thursday night, which taught me how to cook for groups. And I bought another building in Cambridge, a former candy factory (and later, twas said, porn studio), to use as an office.", metadata={'source': 'paul_graham/paul_graham_essay.txt'}),
 Document(page_content="In the print era, the channel for publishing essays had been vanishingly small. Except for a few officially anointed thinkers who went to the right parties in New York, the only people allowed to publish essays were specialists writing about their specialties. There were so many essays that had never been written, because there had been no way to publish them. Now they could be, and I was going to write them. [12]\n\nI've worked on several different things, but to the extent there was a turning point where I figured out what to work on, it was when I started publishing essays online. From then on I knew that whatever else I did, I'd always write essays too.", metadata={'source': 'paul_graham/paul_graham_essay.txt'}),
 Document(page_content="Wow, I thought, there's an audience. If I write something and put it on the web, anyone can read it. That may seem obvious now, but it was surprising then. In the print era there was a narrow channel to readers, guarded by fierce monsters known as editors. The only way to get an audience for anything you wrote was to get it published as a book, or in a newspaper or magazine. Now anyone could publish anything.", metadata={'source': 'paul_graham/paul_graham_essay.txt'})]

Evaluating our RAG

Now that we have our RAG set up thanks to LangChain, we still need to evaluate it.

It seems that both LangChain and LlamaIndex are beginning to have easy ways to evaluate RAGs without leaving the framework. However, for now, the best option is to use RAGAS, a library that we had mentioned earlier and is specifically designed for that purpose. Internally, it will use GPT-4 as the critical model, as we mentioned earlier.

from ragas.testset.generator import TestsetGenerator
from ragas.testset.evolutions import simple, reasoning, multi_context
text = loader.load()
text_splitter = RecursiveCharacterTextSplitter(
    chunk_size = 1000,
    chunk_overlap = 200
)
documents = text_splitter.split_documents(text)

generator = TestsetGenerator.with_openai()
testset = generator.generate_with_langchain_docs(
    documents, 
    test_size=10, 
    distributions={simple: 0.5, reasoning: 0.25, multi_context: 0.25}
)
test_df = testset.to_pandas()
display(test_df)
question contexts ground_truth evolution_type episode_done
0 What is the batch model and how does it relate… [The most distinctive thing about YC is the ba… The batch model is a method used by YC (Y Comb… simple True
1 How did the use of Scheme in the new version o… [In the summer of 2006, Robert and I started w… The use of Scheme in the new version of Arc co… simple True
2 How did learning Lisp expand the author’s conc… [There weren’t any classes in AI at Cornell th… Learning Lisp expanded the author’s concept of… simple True
3 How did Moore’s Law contribute to the downfall… [[4] You can of course paint people like still… Moore’s Law contributed to the downfall of com… simple True
4 Why did the creators of Viaweb choose to make … [There were a lot of startups making ecommerce… The creators of Viaweb chose to make their eco… simple True
5 During the author’s first year of grad school … [I applied to 3 grad schools: MIT and Yale, wh… reasoning True
6 What suggestion from a grad student led to the… [McCarthy didn’t realize this Lisp could even … reasoning True
7 What makes paintings more realistic than photos? [life interesting is that it’s been through a … By subtly emphasizing visual cues, paintings c… multi_context True
8 «What led Jessica to compile a book of intervi… [Jessica was in charge of marketing at a Bosto… Jessica’s realization of the differences betwe… multi_context True
9 Why did the founders of Viaweb set their price… [There were a lot of startups making ecommerce… The founders of Viaweb set their prices low fo… simple True
test_questions = test_df["question"].values.tolist()
test_groundtruths = test_df["ground_truth"].values.tolist()
answers = []
contexts = []
for question in test_questions:
  response = retrieval_augmented_qa_chain.invoke({"question" : question})
  answers.append(response["response"].content)
  contexts.append([context.page_content for context in response["context"]])

from datasets import Dataset # HuggingFace
response_dataset = Dataset.from_dict({
    "question" : test_questions,
    "answer" : answers,
    "contexts" : contexts,
    "ground_truth" : test_groundtruths
})
from ragas import evaluate
from ragas.metrics import (
    faithfulness,
    answer_relevancy,
    context_recall,
    context_precision,
)

metrics = [
    faithfulness,
    answer_relevancy,
    context_recall,
    context_precision,
]

results = evaluate(response_dataset, metrics)
results_df = results.to_pandas().dropna()
question answer contexts ground_truth faithfulness answer_relevancy context_recall context_precision
0 What is the batch model and how does it relate… The batch model is a system where YC funds a g… [The most distinctive thing about YC is the ba… The batch model is a method used by YC (Y Comb… 0.750000 0.913156 1.0 1.000000
1 How did the use of Scheme in the new version o… The use of Scheme in the new version of Arc co… [In the summer of 2006, Robert and I started w… The use of Scheme in the new version of Arc co… 1.000000 0.910643 1.0 1.000000
2 How did learning Lisp expand the author’s conc… Learning Lisp expanded the author’s concept of… [So I looked around to see what I could salvag… Learning Lisp expanded the author’s concept of… 1.000000 0.924637 1.0 1.000000
3 How did Moore’s Law contribute to the downfall… Moore’s Law contributed to the downfall of com… [[5] Interleaf was one of many companies that … Moore’s Law contributed to the downfall of com… 1.000000 0.940682 1.0 1.000000
4 Why did the creators of Viaweb choose to make … The creators of Viaweb chose to make their eco… [There were a lot of startups making ecommerce… The creators of Viaweb chose to make their eco… 0.666667 0.960447 1.0 0.833333
5 What suggestion from a grad student led to the… The suggestion from grad student Steve Russell… [McCarthy didn’t realize this Lisp could even … The suggestion from a grad student, Steve Russ… 1.000000 0.931730 1.0 0.916667
6 What makes paintings more realistic than photos? By subtly emphasizing visual cues such as the … [copy pixel by pixel from what you’re seeing. … By subtly emphasizing visual cues, paintings c… 1.000000 0.963414 1.0 1.000000
7 «What led Jessica to compile a book of intervi… Jessica was surprised by how different reality… [Jessica was in charge of marketing at a Bosto… Jessica’s realization of the differences betwe… 1.000000 0.954422 1.0 1.000000
8 Why did the founders of Viaweb set their price… The founders of Viaweb set their prices low fo… [There were a lot of startups making ecommerce… The founders of Viaweb set their prices low fo… 1.000000 1.000000 1.0 1.000000

We visualize the statistical distributions that emerge.

results_df.plot.hist(subplots=True,bins=20)

We can observe that the system is not perfect even though we have generated only 10 questions (more would be needed) and it can also be seen that in one of them, the RAG pipeline has failed to create the ground truth.

Nevertheless, we could draw some conclusions:

  • Sometimes it is not able to provide very faithful responses.
  • The relevance of the response varies but consistently good.
  • The context recall is perfect but the context precision is not as good.

Now, here we can consider trying different elements:

  • Changing the embedding used to one that we can find in the HuggingFace MTEB Leaderboard.
  • Improving the retrieval system with different strategies than the default.
  • Evaluating with other LLMs.

With these possibilities, it is feasible to analyze each of these previous strategies and choose the one that best fits our data or monetary criteria.

Conclusions

In this article, we have seen what a RAG consists of and how we can evaluate a complete workflow. This subject matter is currently booming as it is one of the most effective and cost-effective alternatives to avoid fine-tuning LLMs.

It is possible that new metrics, new frameworks, will make the evaluation of these simpler and more effective, but in the next articles, we will not only be able to see their evolution but also how to bring a RAG-based architecture into production.

Tabla de contenidos
  1. Components of a RAG
  2. High-Level Operation
  3. Evaluation of RAGs
  4. Evaluation Metrics
  5. Conclusions

Publicado en: Blog, Practices, Tech

Databricks on AWS – An Architectural Perspective (part 2)

marzo 5, 2024 by Bluetab

Databricks on AWS – An Architectural Perspective (part 2)

Rubén Villa

Big Data & Cloud Architect

Jon Garaialde

Cloud Data Solutions Engineer/Architect

Alfonso Jerez

Analytics Engineer | GCP | AWS | Python Dev | Azure | Databricks | Spark

Alberto Jaén

Cloud Engineer | 3x AWS Certified | 2x HashiCorp Certified | GitHub: ajaen4

This article is the second in a two-part series aimed at addressing the integration of Databricks in AWS environments by analyzing the alternatives offered by the product concerning architectural design. The first part discussed topics more related to architecture and networking, while in this second installment, we will cover subjects related to security and general administration.

The contents of each article are as follows:

First installment:

  • Introduction
  • Data Lakehouse & Delta
  • Concepts
  • Architecture
  • Plans and types of workloads
  • Networking

This installment:

  • Security
  • Persistence
  • Billing

The first article can be visited at the following link.

Glossary

  • Control Plane: Hosts Databricks’ backend services necessary to provide the graphical interface, REST APIs for account and workspaces management. These services are deployed in an AWS account owned by Databricks. Refer to the first article for more information.
  • Credentials Passthrough: Mechanism used by Databricks for managing access to different data sources. Refer to the first article for more information.
  • Cross-account role: Role provided for Databricks to assume from its AWS account. It is used to deploy infrastructure and assume other roles within AWS. Refer to the first article for more information.
  • Compute Plane: Hosts all the infrastructure necessary for data processing: persistence, clusters, logging services, Spark libraries, etc. The Data Plane is deployed in the client’s AWS account. Refer to the first article for more information.
  • Data role: Roles with access/write permissions to S3 buckets that will be assumed by the cluster through the meta instance profile. Refer to the first article for more information.
  • DBFS: Distributed storage system available for clusters. It is an abstraction over an object storage system, in this case, S3, and allows access to files and folders without the need to use URLs. Refer to the first article for more information.
  • IAM Policies: Policies through which access permissions are defined in AWS.
  • Key Management Service (KMS): AWS service that allows creating and managing encryption keys.
  • Pipelines: Series of processes in which a set of data is executed.
  • Prepared: Processed data from raw used as a basis for creating Trusted data.
  • Init Script (User Data Script): EC2 instances launched from Databricks clusters allow including a script to install software updates, download libraries/modules, etc., at the time it starts.
  • Mount: To avoid internally loading the data required for the process, Databricks enables synchronization with external sources, such as S3, to facilitate interaction with different files (simulating that they are local, making relative paths simpler) while actually stored in the corresponding external storage source.
  • Personal Access (PAT) Token: Token for personal authentication that replaces username and password authentication.
  • Raw: Ingested raw data.
  • Root Bucket: Root directory for the workspace (DBFS root). Used to host cluster logs, notebook revisions, and libraries. Refer to the first article for more information.
  • Secret Scope: Environment to store sensitive information through key-value pairs (name – secret)
  • Trusted: Data prepared for visualization and study by different interest groups.
  • Workflows: Sequence of tasks.

Security

Visit Data security and encryption this link

Databricks introduces data security configurations to safeguard information in transit or at rest. The documentation provides a comprehensive overview of the available encryption features. These features encompass:

  • Customer-managed keys for encryption: Enabling the protection and access control of data in the Databricks control plane, including source files of notebooks, notebook results, secrets, SQL queries, and personal access tokens.

  • Encryption of traffic between cluster nodes: Ensuring the security of communication between nodes within the cluster.

  • Encryption of queries and results: Securing the privacy of queries and the stored results.

  • Encryption of S3 buckets at rest: Providing security for data stored in S3 buckets.

It’s essential to highlight that within the support for customer-managed keys:

  • Keys can be configured to encrypt data in the root S3 bucket and EBS volumes of the cluster.

Another capability offered by Databricks is the use of AWS KMS keys to encrypt SQL queries and their history stored in the control plane.

Lastly, it also facilitates the encryption of traffic between cluster nodes and the administration of security configurations for the workspace by administrators.

In this article, we will delve into two of the options: customer-managed keys and the encryption of traffic between cluster worker nodes.

Customer-managed keys

Visit Customer-managed keys this link

Databricks account administrators can configure managed keys for encryption. Two use cases are highlighted for adding a customer-managed key: data from managed services in the Databricks control plane (such as notebooks, secrets, and SQL queries) and workspace storage (root S3 buckets and EBS volumes).

It’s important to note that managed keys for EBS volumes do not apply to serverless compute resources, as these disks are ephemeral and tied to the lifecycle of the serverless workload. In the Databricks documentation, there are comparisons of use cases for customer-managed keys, and it is mentioned that this feature is available in the Enterprise subscription.

Regarding the concept of encryption key configurations, these are account-level objects that reference user cloud keys. Account administrators can create these configurations in the account console and associate them with one or more workspaces. The configuration process involves creating or selecting a symmetric key in AWS KMS and subsequently editing the key policy to allow Databricks to perform encryption and decryption operations. Detailed instructions, along with examples of necessary JSON policies for both use configurations (managed services and workspace storage), can be found in the documentation.

Lastly, there is the option to add an access policy to a cross-account IAM role in AWS, in case the KMS key is in a different account.

Encryption in transit

For this part, it is crucial to emphasize the importance of the init script.

Encryption in transit

  • Encrypt traffic between cluster worker nodes
  • Example init script
  • Use cluster-scoped init scripts

In Databricks, it is crucial to highlight the significance of the init script, which, among other functions, is used to configure encryption between worker nodes in a Spark cluster. This init script enables the retrieval of a shared encryption secret from the key scope stored in DBFS. If the secret is rotated by updating the key store file in DBFS, all running clusters must be restarted to avoid authentication issues between Spark workers and the driver. It’s noteworthy that, since the shared secret is stored in DBFS, any user with access to DBFS can retrieve the secret through a notebook.

While specific AWS instances automatically encrypt data between worker nodes without additional configuration, using the init script provides an added level of security for data in transit or complete control over the type of encryption to be applied.

The script is responsible for obtaining the secret from the key store and its password, as well as configuring the necessary Spark parameters for encryption. Launched as Bash, it performs these tasks and, if necessary, waits until the key store file is available in DBFS and derives the shared encryption secret from the hash of the key store file. Once the initialization of the driver and worker nodes is complete, all traffic between these nodes will be encrypted using the key store file.

These features are part of the Enterprise plan.

Persistence and Metastores

Databricks supports two main types of persistent storage: DBFS (Databricks File System) and S3 (Amazon Simple Storage Service).

DBFS

DBFS is an integrated distributed file system directly connected to Databricks, storing data in the cluster and workspace’s local storage. It provides a file interface similar to standard HDFS, facilitating collaboration by offering a centralized place to store and access data.

S3

On the other hand, Databricks can also connect directly to data stored in Amazon S3. S3 data is independent of clusters and workspaces and can be accessed by multiple clusters and users. S3 stands out for its scalability, durability, and the ability to separate storage and computation, making data access easy even from multiple environments.

Regarding metastores, Databricks on AWS supports various types, including:

Hive Metastore

Databricks can integrate with the Hive metastore, allowing users to use tables and schemas defined in Hive.

Glue Metastore in Data Plane

Databricks also has the option to host the metastore in the compute plane itself with Glue.

These metastores enable users to manage and query table metadata, facilitating schema management and integration with other data services. The choice of metastore will depend on the specific workflow requirements and metadata management preferences in the Databricks environment on AWS.

Unity Catalog

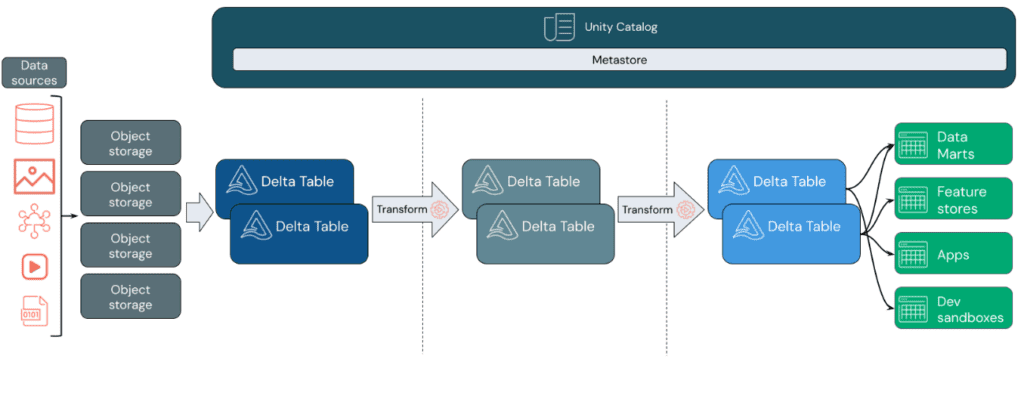
Undoubtedly, a new feature of Databricks that unifies these previous metastores and enhances the various options and tools each of them offers is the Unity Catalog.


Unity Catalog provides centralized capabilities for access control, auditing, lineage, and data discovery.

Key Features of Unity Catalog:

  • Manages data access policies in a single location that apply to all defined workspaces.
  • Based on ANSI SQL, it allows administrators to grant these permissions using SQL syntax.
  • Automatically captures user-level audit logs.
  • Enables labeling tables and schemas, providing an efficient search interface to find information.

Databricks recommends configuring all access to cloud object storage through Unity Catalog to manage relationships between data in Databricks and cloud storage.

Unity Catalog Object Model

  • Metastore: Top-level metadata container, exposes a three-level namespace (catalog.schema.table).
  • Catalog: Organizes data assets, the first layer in the hierarchy.
  • Schema: Second layer, organizes tables and views.
  • Tables, Views, and Volumes: Lower levels, with volumes providing non-tabular access to data.
  • Models: Not data assets, record machine learning models.

Billing

Here is a detailed explanation of Databricks’ function on AWS that enables the delivery and access to billable usage logs. Account administrators can configure the daily delivery of CSV logs to an AWS S3 bucket. Each CSV file provides historical data on the usage of clusters in Databricks, categorizing them by criteria such as cluster ID, billing SKU, cluster creator, and tags. The delivery includes logs for both running workspaces and those canceled, ensuring the proper representation of the last day of such a workspace (it must have been operational for at least 24 hours).

The setup involves creating an S3 bucket and an IAM role in AWS, along with calling the Databricks API to set up storage configuration objects and credentials. The cross-account support option allows delivery to different AWS accounts through an S3 bucket policy. CSV files are located at <bucket-name>/<prefix>/billable-usage/csv/, and it is advisable to review S3 security best practices.

The account API allows shared configurations for all workspaces or separate configurations for each space or group. The delivery of these CSVs enables account owners to directly download the logs. The S3 object ownership is auto-configured as “Bucket owner preferred” to support ownership of newly created objects.

There is a limit on the number of log delivery configurations, and one needs to be an account administrator, providing the account ID. Extra caution is required when configuring the S3 object property as “Object writer” instead of “Bucket owner preferred” due to potential access difficulties.

Fields Description
workspaceId
Workspace Id
timestamp
Established frequency (hourly, daily,…)
clusterId
Cluster Id
clusterName
Name assigned to the Cluster
clusterNodeType
Type of node assigned
clusterOwnerUserId
Cluster creator user id
clusterCustomTags
Customizable cluster information labels
sku
Package assigned by Databricks in relation to the cluster characteristics.
dbus
DBUs consumption per machine hour
machineHours
Cluster deployment machine hours
clusterOwnerUserName
Username of the cluster creator
tags
Customizable cluster information labels

Referencias

  1. https://bluetab.net/es/databricks-sobre-aws-una-perspectiva-de-arquitectura-parte-1/ 
  2. https://docs.databricks.com/en/security/keys/index.html | 2024-02-06
  3. https://docs.databricks.com/en/security/keys/customer-managed-keys.html |  2024-02-06
  4. https://docs.databricks.com/en/security/keys/encrypt-otw.html | 2024-02-24
  5. https://docs.databricks.com/en/security/keys/encrypt-otw.html#example-init-script |  2024-02-24
  6. https://docs.databricks.com/en/init-scripts/cluster-scoped.html |  2023-12-05
  7. https://docs.databricks.com/en/data-governance/unity-catalog/index.html | 2024-02-26
 

Navegación

Do you want to know more about what we offer and to see other success stories?
DISCOVER BLUETAB

Rubén Villa

Big Data & Cloud Architect

Alfonso Jerez

Analytics Engineer | GCP | AWS | Python Dev | Azure | Databricks | Spark

Jon Garaialde

Cloud Data Solutions Engineer/Architect

Alberto Jaén

Cloud Engineer | 3x AWS Certified | 2x HashiCorp Certified | GitHub: ajaen4

SOLUTIONS, WE ARE EXPERTS
DATA STRATEGY
DATA FABRIC
AUGMENTED ANALYTICS
You may be interested in

$ docker run 2021

febrero 2, 2021
LEER MÁS

Características esenciales que debemos tener en cuenta al adoptar un paradigma en la nube

septiembre 12, 2022
LEER MÁS

¿Qué está pasando en el mundo de la AI?

marzo 6, 2023
LEER MÁS

De documentos en papel a datos digitales con Fastcapture y Generative AI

junio 7, 2023
LEER MÁS

Usando los Grandes Modelos de Lenguaje en información privada

marzo 11, 2024
LEER MÁS

Empoderando a las decisiones en diversos sectores con árboles de decisión en AWS

junio 4, 2024
LEER MÁS

Publicado en: Blog, Practices, Tech

Databricks sobre AWS – Una perspectiva de arquitectura (parte 2)

marzo 5, 2024 by Bluetab

Databricks sobre AWS – Una perspectiva de arquitectura (parte 2)

Rubén Villa

Big Data & Cloud Architect

Jon Garaialde

Cloud Data Solutions Engineer/Architect

Alfonso Jerez

Analytics Engineer | GCP | AWS | Python Dev | Azure | Databricks | Spark

Alberto Jaén

Cloud Engineer | 3x AWS Certified | 2x HashiCorp Certified | GitHub: ajaen4

Este artículo es el segundo de una serie de dos que pretende abordar la integración de Databricks en entornos AWS analizando las alternativas ofrecidas por el producto respecto al diseño de arquitectura. En el primero se habló acerca de temas más relacionados con la arquitectura y networking, en esta segunda entrega hablaremos sobre temas relacionados con la seguridad y administración general.

Los contenidos de cada artículo son los siguientes:

Primera entrega:

  • Introducción
  • Data Lakehouse & Delta
  • Conceptos.
  • Arquitectura.
  • Planes y tipos de carga de trabajo.
  • Networking.

Esta entrega:

  • Seguridad
  • Persistencia
  • Billing

El primer artículo puede visitarse en el siguiente enlace

Glosario

  • Control Plane: aloja los servicios back-end de Databricks necesarios para disponibilizar la interfaz gráfica, APIs REST para la gestión de la cuenta y workspaces. Dichos servicios están desplegados en una cuenta AWS propiedad de Databricks. Ver primer artículo para más información.
  • Credentials Passthrough: mecanismo utilizado por Databricks para la gestión de accesos a las diferentes fuentes de datos. Ver primer artículo para más información.
  • Cross-account role: rol que se disponibiliza para que Databricks pueda asumirlo desde su cuenta en AWS. Se utiliza para desplegar la infraestructura y para poder asumir otros roles dentro de AWS. Ver primer artículo para más información.
  • Compute Plane: aloja toda la infraestructura necesaria para el procesamiento de datos: persistencia, clusters, servicios de logging, librerías spark, etc. El Data Plane se despliega en la cuenta AWS del cliente. Ver primer artículo para más información.
  • Data role: roles con permisos de acceso/escritura a los buckets de S3 que serán asumidos por el cluster a través del meta instance profile. Ver primer artículo para más información. Ver primer artículo para más información.
  • DBFS: sistema de almacenamiento distribuido disponible para los clusters. Es una abstracción sobre un sistema de almacenamiento de objetos, en este caso S3, y permite el acceso a ficheros y carpetas sin necesidad de utilizar URLs. Ver primer artículo para más información.
  • IAM Policies: políticas a través de las cuales se definen los permisos de acceso en AWS.
  • Key Management Service (KMS): servicio de AWS que permite crear y administrar claves de encriptación.
  • Pipelines: series de procesos en los que se ejecuta un conjunto de datos.
  • Prepared: datos procesados desde raw que se utilizaran como base para poder crear los datos Trusted.
  • Init Script (User Data Script): las instancias de EC2 lanzadas desde los clúster de Databricks permiten incluir un script con el cual instalar actualizaciones de software, descargar librerías/módulos, entre otros, en el momento que esta se arranca
  • Mount: Para evitar tener que cargar internamente los datos que se requieren para el proceso, Databricks posibilita la sincronización con fuentes externas, como S3, para facilitar la interacción con los distintos archivos (simula que estos se encuentran en local haciendo así más simple los relatives paths) pero realmente estos se encuentran almacenados en la fuente de almacenamiento externa correspondiente.
  • Personal Access (PAT) Token: token para la autenticación personal que sustituye la autenticación por usuario y contraseña.
  • Raw: datos ingestados sin procesar.
  • Root Bucket: directorio de raíz para el workspace (DBFS root). Utilizado para alojar cluster logs, revisiones de notebooks y librerías. Ver primer artículo para más información.
  • Secret Scope: entorno en el que almacenar información sensible mediante pares clave valor (nombre – secreto)
  • Trusted: datos preparados para su visualización y estudio por parte de los diferentes grupos de interés.
  • Workflows: secuencia de tareas.
  •  

Seguridad de la información

Visita Data security and encryption en esté enlace

Databricks presenta configuraciones de seguridad de datos para proteger la información que está en tránsito o en reposo. En la documentación se ofrece una descripción general de las características de encriptación disponibles. Dichas características incluyen claves gestionadas por el cliente para encriptación, encriptación del tráfico entre nodos de clúster, encriptación de consultas y resultados, y encriptación de buckets S3 en reposo.

Hay que destacar que dentro del soporte para claves gestionadas por el cliente, que permite la protección y control de acceso a datos en el control plane de Databricks, como archivos fuente de notebooks, resultados de notebooks, secretos, consultas SQL y tokens de acceso personal. También se puede configurar claves para encriptar datos en el bucket S3 raíz y volúmenes EBS del clúster.

Otra posibilidad que ofrece Databricks es la de utilizar claves de AWS KMS para encriptar consultas de SQL y su historial almacenado en el control plane. 

Por último, también facilita la encriptación del tráfico entre nodos de clúster y la administración de configuraciones de seguridad del workspace por parte de los administradores. 

En este articulo hablaremos sobre dos de las opciones: customer-managed keys y el encriptado del trafico entre nodos workers del clúster


Customer-managed keys

Visita Customer-managed keys en esté enlace

Los administradores de cuentas de Databricks pueden configurar claves gestionadas para la encriptación. Se destacan dos casos de uso para agregar una clave gestionada por el cliente: datos de servicios gestionados en el control plane de Databricks (como notebooks, secretos y consultas SQL) y almacenamiento del workspaces (buckets S3 raíz y volúmenes EBS).

Hay que destacar que las claves gestionadas para volúmenes EBS no se aplican a recursos de cómputo serverless, ya que estos discos son efímeros y están vinculados al ciclo de vida de la carga de trabajo serverless. En la documentación de Databricks existen comparaciones de los casos de uso de claves gestionadas por el cliente y se menciona que esta función está disponible en la subcripción Enterprise.

Respecto al concepto de configuraciones de claves de encriptación, estos son objetos a nivel de cuenta que hacen referencia a las claves en la nube del usuario. Los administradores de cuentas pueden crear estas configuraciones en la consola de la cuenta y asociarlas con uno o más workspaces. El proceso de configuración implica la creación o selección de una clave simétrica en AWS KMS y la posterior edición de la política de la clave para permitir a Databricks realizar operaciones de encriptación y desencriptación. Se pueden consultar en la documentación las instrucciones detalladas junto con ejemplos de políticas JSON necesarias para ambas configuraciones de uso (servicios gestionados y almacenamiento workspaces).

Por último, existe la posibilidad de agregar una política de acceso a un rol IAM de cuenta cruzada (cross-account) en AWS, en caso de que la clave KMS esté en una cuenta diferente. 


Encriptación en tránsito

Para esta parte, es muy importante destacar la importancia del script de inicio (init script) 

Encriptación en tránsito

  • Encrypt traffic between cluster worker nodes
  • Example init script
  • Use cluster-scoped init scripts

en Databricks, el cual, entre otras cosas, sirve para configurar la encriptación entre nodos de workers en un clúster de Spark. Este script de inicio permite obtener un secreto de encriptación compartido a partir del scope de claves almacenado en DBFS. Si se rota el secreto actualizando el archivo del almacén de claves en DBFS, se debe reiniciar todos los clústeres en ejecución para evitar problemas de autenticación entre los workers de Spark y el driver. Señalar que, dado que el secreto compartido el cual se almacena en DBFS, cualquier usuario con acceso a DBFS puede recuperar el secreto mediante un notebook.

Se pueden utilizar instancias de AWS específicas que cifran automáticamente los datos entre los nodos de trabajadores sin necesidad de configuración adicional, pero utilizar el init-script proporciona un nivel añadido de seguridad para los datos en tránsito o un control total sobre el tipo de encriptación que se quiere aplicar.

El script será el encargado de obtener el secreto del almacén de claves y su contraseña, así como configurar los parámetros necesarios de Spark para la encriptación. Lanzado como Bash, realizará estas tareas y en caso de ser necesario, realizará una espera hasta que el archivo de almacén de claves esté disponible en DBFS y la derivación del secreto de encriptación compartido a partir del hash del archivo de almacén de claves. Una vez completada la inicialización de los nodos del driver y de los workers, todo el tráfico entre estos nodos se cifrará utilizando el archivo de almacén de claves.

Este tipo de características están dentro del plan Enterprise

Persistencia y metastores

Databricks admite dos tipos principales de almacenamiento persistente: DBFS (Databricks File System) y S3 (Simple Storage Service de AWS).

DBFS

DBFS es un sistema de archivos distribuido integrado directamente con Databricks, almacenando datos en el almacenamiento local del clúster y de los workspaces. Proporciona una interfaz de archivo similar a HDFS estándar y facilita la colaboración al ofrecer un lugar centralizado para almacenar y acceder a datos.

S3

Por otro lado, Databricks también puede conectarse directamente a datos almacenados en Amazon S3. Los datos en S3 son independientes de los clústeres y de los workspaces y pueden ser accedidos por varios clústeres y usuarios. S3 destaca por su escalabilidad, durabilidad y la capacidad de separar almacenamiento y cómputo, lo que facilita el acceso a datos incluso desde múltiples entornos.

En cuanto a los metastores, Databricks en AWS admite varios tipos, incluyendo:

Metastore de Hive

Databricks puede integrarse con el metastore de Hive, permitiendo a los usuarios utilizar tablas y esquemas definidos en Hive.

Metastore Glue en Data Plane

Databricks también tiene la posibilidad de alojar el metastore en el propio compute plane con Glue.

Estos metastores permiten a los usuarios gestionar y consultar metadatos de tablas, facilitando la gestión de esquemas y la integración con otros servicios de datos. La elección del metastore dependerá de los requisitos específicos del flujo de trabajo y las preferencias de gestión de metadatos en el entorno de Databricks en AWS.

Unity Catalog 

Sin duda alguna, una nueva funcionalidad de Databricks que permite unificar estos metastores previos y amplifica las distintas opciones y herramientas que ofrece cada uno de ellos es el Unity Catalog

Unity Catalog proporciona capacidades centralizadas de control de acceso, auditoría, linaje y descubrimiento de datos.

Características clave de Unity Catalog

  • Administra políticas de acceso a datos en un solo lugar que se aplican a todos los workspaces que se definan.
  • Basado en ANSI SQL, permite a los administradores otorgar estos permisos mediante una sintaxis SQL.
  • Captura automáticamente registros de auditoría a nivel de usuario.
  • Permite etiquetar tablas y esquemas, proporcionando una interfaz de búsqueda eficaz para buscar información.

Databricks recomienda configurar todo el acceso al almacenamiento de objetos en la nube mediante Unity Catalog para gestionar relaciones entre datos en Databricks y almacenamiento en la nube.

Modelo de objetos de Unity Catalog

  • Metastore: Contenedor de metadatos de nivel superior, expone un espacio de nombres de tres niveles (catálogo.esquema.tabla).
  • Catálogo: Organiza activos de datos, primera capa en la jerarquía.
  • Esquema: Segunda capa, organiza tablas y vistas.
  • Tablas, vistas y volúmenes: Niveles más bajos, con volúmenes que proporcionan acceso no tabular a datos.
  • Modelos: No son activos de datos, registran modelos de aprendizaje automático.

Billing

A continuación, se detalla la función de Databricks en AWS que permite la entrega y acceso a registros de uso facturables. Los administradores de cuenta pueden configurar la entrega diaria de registros CSV a un bucket S3 de AWS. Cada archivo CSV proporciona datos históricos sobre el uso de clústeres en Databricks, clasificándolos por criterios como ID de clúster, SKU de facturación, creador del clúster y etiquetas. La entrega incluye registros tanto para workspaces en ejecución como para aquellos cancelados, garantizando la representación adecuada del último día de dicho workspace (debe haber estado operativo al menos 24 h).

La configuración implica la creación de un bucket S3 y un rol IAM en AWS, junto con la llamada a la API de Databricks para establecer objetos de configuración de almacenamiento y credenciales. La opción de soporte de cuentas cruzadas permite la entrega a cuentas AWS diferentes mediante una política de bucket S3. Los archivos CSV se encuentran en <bucket-name>/<prefix>/billable-usage/csv/, es recomendable revisar las bestpractices de seguridad de S3.

La API de la cuenta permite configuraciones compartidas para todos los workspaces o configuraciones separadas para cada espacio o grupos. La entrega de estos CSV permite que los owners de cuentas descarguen directamente los registros. La propiedad del objeto S3 se autoconfigura como «Bucket owner preferred» para admitir la propiedad de los objetos recién creados.

Se destaca un límite en la cantidad de configuraciones de entrega de registros y se requiere ser administrador de cuenta, además de proporcionar el ID de cuenta. Especial cuidado con las dificultades de acceso si se configura la propiedad del objeto S3 como «Object writer» en lugar de «Bucket owner preferred».

Campos paramétricos de configuración Description
workspaceId
Workspace Id
timestamp
Established frequency (hourly, daily,…)
clusterId
Cluster Id
clusterName
Name assigned to the Cluster
clusterNodeType
Type of node assigned
clusterOwnerUserId
Cluster creator user id
clusterCustomTags
Customizable cluster information labels
sku
Package assigned by Databricks in relation to the cluster characteristics.
dbus
DBUs consumption per machine hour
machineHours
Cluster deployment machine hours
clusterOwnerUserName
Username of the cluster creator
tags
Customizable cluster information labels

Referencias

  1. https://bluetab.net/es/databricks-sobre-aws-una-perspectiva-de-arquitectura-parte-1/ 
  2. https://docs.databricks.com/en/security/keys/index.html | 2024-02-06
  3. https://docs.databricks.com/en/security/keys/customer-managed-keys.html |  2024-02-06
  4. https://docs.databricks.com/en/security/keys/encrypt-otw.html | 2024-02-24
  5. https://docs.databricks.com/en/security/keys/encrypt-otw.html#example-init-script |  2024-02-24
  6. https://docs.databricks.com/en/init-scripts/cluster-scoped.html |  2023-12-05
  7. https://docs.databricks.com/en/data-governance/unity-catalog/index.html | 2024-02-26
 

Navegación

¿Quieres saber más de lo que ofrecemos y ver otros casos de éxito?
DISCOVER BLUETAB

Rubén Villa

Big Data & Cloud Architect

Alfonso Jerez

Analytics Engineer | GCP | AWS | Python Dev | Azure | Databricks | Spark

Jon Garaialde

Cloud Data Solutions Engineer/Architect

Alberto Jaén

Cloud Engineer | 3x AWS Certified | 2x HashiCorp Certified | GitHub: ajaen4

SOLUCIONES, SOMOS EXPERTOS
DATA STRATEGY
DATA FABRIC
AUGMENTED ANALYTICS
Te puede interesar

Starburst: Construyendo un futuro basado en datos.

mayo 25, 2023
LEER MÁS

Cómo preparar la certificación AWS Data Analytics – Specialty

noviembre 17, 2021
LEER MÁS

Gobierno del Dato: Una mirada en la realidad y el futuro

mayo 18, 2022
LEER MÁS

DataOps

octubre 24, 2023
LEER MÁS

Leadership changes at Bluetab EMEA

abril 3, 2024
LEER MÁS

Domina los Costos en la Nube: Optimización de GCS y BigQuery en Google Cloud

marzo 17, 2025
LEER MÁS

Publicado en: Blog, Practices, Tech

Databricks sobre AWS – Una perspectiva de arquitectura (parte 1)

marzo 5, 2024 by Bluetab

Databricks sobre AWS – Una perspectiva de arquitectura (parte 1)

Jon Garaialde

Cloud Data Solutions Engineer/Architect

Rubén Villa

Big Data & Cloud Architect

Alfonso Jerez

Analytics Engineer | GCP | AWS | Python Dev | Azure | Databricks | Spark

Alberto Jaén

Cloud Engineer | 3x AWS Certified | 2x HashiCorp Certified | GitHub: ajaen4

Databricks se ha convertido en un producto de referencia en el ámbito de plataformas de análisis unificadas para crear, implementar, compartir y mantener soluciones de datos, proporcionando un entorno para los roles de ingeniería y analítica. Debido a que no todas las organizaciones tienen los mismos tipos de carga de trabajo, Databricks ha diseñado diferentes planes que permiten adaptarse a las distintas necesidades, y esto tiene un impacto directo en el diseño de la arquitectura de la plataforma. 

Con esta serie de artículos, se pretende abordar la integración de Databricks en entornos AWS, analizando las alternativas ofrecidas por el producto respecto al diseño de arquitectura, además se abordarán las bondades de la plataforma de Databricks por sí misma. Debido a la extensión de los contenidos, se ha considerado conveniente dividirlos en tres entregas:

Primera entrega:

  • Introducción.
  • Data Lakehouse & Delta.
  • Conceptos.
  • Arquitectura.
  • Planes y tipos de carga de trabajo.
  • Networking.

Segunda entrega:

  • Seguridad.
  • Persistencia.
  • Billing.

Introducción

Databricks se crea con la idea de poder desarrollar un entorno único en el que distintos perfiles (como Data Engineers, Data Scientists y Data Analysts) puedan trabajar de forma colaborativa sin la necesidad de contar con proveedores de servicios externos que ofrezcan las distintas funcionalidades que cada uno de estos necesita en su día a día.

El área de trabajo de Databricks proporciona una interfaz unificada y herramientas para la mayoría de las tareas de datos, entre las que se incluyen:

  • Programación y administración de procesamiento de datos.
  • Generación de paneles y visualizaciones.
  • Administración de la seguridad, la gobernanza, la alta disponibilidad y la recuperación ante desastres.
  • Detección, anotación y exploración de datos.
  • Modelado, seguimiento y servicio de modelos de Machine Learning (ML).
  • Soluciones de IA generativa.


El nacimiento de Databricks se lleva a cabo gracias a la colaboración de los fundadores de Spark, publicando Delta Lake y MLFlow como productos de Databricks siguiendo la filosofía open-source.

Colaboración Spark, Delta Lake y MLFlow

Este nuevo entorno colaborativo tuvo un gran impacto en su presentación debido a las novedades que ofrecía al integrarse las distintas tecnologías:

  • Spark es un framework de programación distribuida que presenta como una de sus funcionalidades la capacidad de realizar consultas sobre los Delta Lakes en unos ratios de coste/tiempo superiores a los de la competencia, consiguiendo optimizar los procesos de análisis.
  • Delta Lake se presenta como soporte de almacenamiento de Spark. Aúna las principales ventajas de los Data WareHouse y Data Lakes al posibilitar la carga de información estructurada y no estructurada mediante una versión mejorada de Parquet que permite soportar transacciones ACID asegurando así la integridad de la información en los procesos ETL llevados a cabo por Spark.
  • MLFlow es una plataforma para la administración del ciclo de vida de Machine Learning que incluye: experimentación, reusabilidad, implementación y registro de modelos centralizados.

Data Lakehouse & Delta

Un Data Lakehouse es un sistema de gestión de datos que combina los beneficios de los Data Lakes y los Data Warehouses.

Diagrama de un Data Lakehouse (fuente: Databricks)

Un Data Lakehouse proporciona capacidades de almacenamiento y procesamiento escalables para organizaciones modernas que desean evitar sistemas aislados para procesar diferentes cargas de trabajo, como el aprendizaje automático (ML) y la inteligencia empresarial (BI). Un Data Lakehouse puede ayudar a establecer una única fuente de verdad, eliminar costes redundantes y garantizar la actualización de los datos.

Los Data Lakehouses utilizan un patrón de diseño de datos que mejora, enriquece y refina gradualmente los datos a medida que avanzan a través de diferentes capas. Este patrón se conoce frecuentemente como arquitectura de medallón.

Databricks se basa en Apache Spark. Apache Spark habilita un motor enormemente escalable que se ejecuta en recursos informáticos desacoplados del almacenamiento.

El Data Lakehouse de Databricks utiliza dos tecnologías clave adicionales:

  • Delta Lake: capa de almacenamiento optimizada que admite transacciones ACID y aplicación de esquemas.
  • Unity Catalog: solución de gobernanza unificada y detallada para datos e inteligencia artificial.

Patrón de diseño de datos

  • Ingesta de datos

En la capa de ingesta, los datos llegan desde diversas fuentes en lotes o en streaming, en una amplia gama de formatos. Esta primera etapa proporciona un punto de entrada para los datos en su forma sin procesar. Al convertir estos archivos en tablas Delta, se pueden aprovechar las capacidades de aplicación de esquemas de Delta Lake para identificar y manejar datos faltantes o inesperados.

Para gestionar y registrar estas tablas de manera eficiente según los requisitos de gobierno de datos y los niveles de seguridad necesarios, se puede utilizar Unity Catalog. Este catálogo permite realizar un seguimiento del linaje de los datos a medida que se transforman y refinan, al mismo tiempo que facilita la aplicación de un modelo unificado de gobernanza para mantener la privacidad y la seguridad de los datos confidenciales.

  • Procesamiento, curación e integración de datos

Después de verificar los datos, se procede a la selección y refinamiento. En esta etapa, los científicos de datos y los profesionales de aprendizaje automático suelen trabajar con los datos para combinarlos, crear nuevas características y completar la limpieza. Una vez que los datos estén completamente limpios, se pueden integrar y reorganizar en tablas diseñadas para satisfacer las necesidades comerciales específicas.

El enfoque de esquema en la escritura, junto con las capacidades de evolución del esquema de Delta, permite realizar cambios en esta capa sin necesidad de reescribir la lógica subyacente que proporciona datos a los usuarios finales.

  • Servicio de datos

La última capa proporciona datos limpios y enriquecidos a los usuarios finales. Las tablas finales deben estar diseñadas para satisfacer todas las necesidades de uso. Gracias a un modelo de gobernanza unificado, se puede rastrear el linaje de los datos hasta su fuente de verdad única. Los diseños de datos optimizados para diversas tareas permiten a los usuarios acceder a los datos para aplicaciones de aprendizaje automático, ingeniería de datos, inteligencia empresarial e informes.

Características

  • El concepto de Data Lakehouse se basa en aprovechar un Data Lake para almacenar una amplia variedad de datos en sistemas de almacenamiento de bajo coste, como Amazon S3 en este caso. Esto se complementa con la implementación de sistemas que aseguren la calidad y fiabilidad de los datos almacenados, garantizando la coherencia incluso cuando se accede a ellos desde múltiples fuentes simultáneamente.
  • Se emplean catálogos y esquemas para proporcionar mecanismos de gobernanza y auditoría, permitiendo operaciones de manipulación de datos (DML) mediante diversos lenguajes, y almacenando historiales de cambios y snapshots de datos. Además, se aplican controles de acceso basados en roles para garantizar la seguridad.
  • Se emplean técnicas de optimización de rendimiento y escalabilidad para garantizar un funcionamiento eficiente del sistema.
  • Permite el uso de datos no estructurados y no-SQL, además de facilitar el intercambio de información entre plataformas utilizando formatos de código abierto como Parquet y ORC, y ofreciendo APIs para un acceso eficiente a los datos.
  • Proporciona soporte para streaming de extremo a extremo, eliminando la necesidad de sistemas dedicados para aplicaciones en tiempo real. Esto se complementa con capacidades de procesamiento masivo en paralelo para manejar diversas cargas de trabajo y análisis de manera eficiente.

Conceptos: Account & Workspaces

En Databricks, un workspace es una implementación de Databricks en la nube que funciona como un entorno para que su equipo acceda a los activos de Databricks. Se puede optar por tener varios espacios de trabajo o solo uno, según las necesidades.

Una cuenta de Databricks representa una única entidad que puede incluir varias áreas de trabajo. Las cuentas habilitadas para Unity Catalog se pueden usar para administrar usuarios y su acceso a los datos de forma centralizada en todos los workspaces de la cuenta. La facturación y el soporte también se manejan a nivel de cuenta.


Billing: Databricks units (DBUs)

Las facturas de Databricks se basan en unidades de Databricks (DBU), unidades de capacidad de procesamiento por hora según el tipo de instancia de VM.


Authentication & Authorization

Conceptos relacionados con la administración de identidades de Databricks y su acceso a los activos de Databricks.

  • User: un individuo único que tiene acceso al sistema. Las identidades de los usuarios están representadas por direcciones de correo electrónico.
  • Service Principal: identidad de servicio para usar con jobs, herramientas automatizadas y sistemas como scripts, aplicaciones y plataformas CI/CD. Las entidades de servicio están representadas por un ID de aplicación.
  • Group: colección de identidades. Los grupos simplifican la gestión de identidades, facilitando la asignación de acceso a workspaces, datos y otros objetos. Todas las identidades de Databricks se pueden asignar como miembros de grupos.
  • Access control list (ACL): lista de permisos asociados al workspace, cluster, job, tabla o experimento. Una ACL especifica a qué usuarios o procesos del sistema se les concede acceso a los objetos, así como qué operaciones están permitidas en los activos. Cada entrada en una ACL típica especifica un tema y una operación.
  • Personal access token: cadena opaca para autenticarse en la API REST, almacenes SQL, etc.
  • UI: interfaz de usuario de Databricks, es una interfaz gráfica para interactuar con características, como carpetas del workspace y sus objetos contenidos, objetos de datos y recursos computacionales.


Data science & Engineering

Las herramientas de ingeniería y ciencia de datos ayudan a la colaboración entre científicos de datos, ingenieros de datos y analistas de datos.

  • Workspace: entorno para acceder a todos los activos de Databricks, organiza objetos (Notebooks, bibliotecas, paneles y experimentos) en carpetas y proporciona acceso a objetos de datos y recursos computacionales.
  • Notebook: interfaz basada en web para crear flujos de trabajo de ciencia de datos y aprendizaje automático que pueden contener comandos ejecutables, visualizaciones y texto narrativo.
  • Dashboard: interfaz que proporciona acceso organizado a visualizaciones.
  • Library: paquete de código disponible que se ejecuta en el cluster. Databricks incluye muchas bibliotecas y se pueden agregar las propias.
  • Repo: carpeta cuyos contenidos se versionan juntos sincronizándolos con un repositorio Git remoto. Databricks Repos se integra con Git para proporcionar control de código fuente y de versiones para los proyectos.
  • Experiment: colección de ejecuciones de MLflow para entrenar un modelo de aprendizaje automático.


Databricks interfaces

Describe las interfaces que admite Databricks, además de la interfaz de usuario, para acceder a sus activos: API y línea de comandos (CLI).

  • REST API: Databricks proporciona documentación API para el workspace y la cuenta.
  • CLI: proyecto de código abierto alojado en GitHub. La CLI se basa en la API REST de Databricks.


Data management

Describe los objetos que contienen los datos sobre los que se realiza el análisis y alimenta los algoritmos de aprendizaje automático.

  • Databricks File System (DBFS): capa de abstracción del sistema de archivos sobre un almacén de blobs. Contiene directorios, que pueden contener archivos (archivos de datos, bibliotecas e imágenes) y otros directorios.
  • Database: colección de objetos de datos, como tablas o vistas y funciones, que está organizada para que se pueda acceder a ella, administrarla y actualizarla fácilmente.
  • Table: representación de datos estructurados.
  • Delta table: de forma predeterminada, todas las tablas creadas en Databricks son tablas delta. Las tablas delta se basan en el proyecto de código abierto Delta Lake, un marco para el almacenamiento de tablas ACID de alto rendimiento en almacenes de objetos en la nube. Una tabla Delta almacena datos como un directorio de archivos en el almacenamiento de objetos en la nube y registra los metadatos de la tabla en el metastore dentro de un catálogo y un esquema.
  • Metastore: componente que almacena toda la información de la estructura de las distintas tablas y particiones en el almacén de datos, incluida la información de columnas y tipos de columnas, los serializadores y deserializadores necesarios para leer y escribir datos, y los archivos correspondientes donde se almacenan los datos. Cada implementación de Databricks tiene un metastore central de Hive al que pueden acceder todos los clusters para conservar los metadatos de la tabla.
  • Visualization: representación gráfica del resultado de ejecutar una consulta.


Computation management

Describe los conceptos para la ejecución de cálculos en Databricks.

  • Cluster: conjunto de configuraciones y recursos informáticos en los que se ejecutan Notebooks y jobs. Hay dos tipos de clusters: all-purpose y job.
    • Un cluster all-purpose se crea mediante la interfaz de usuario, la CLI o la API REST, pudiendo finalizar y reiniciar manualmente este tipo de clusters.
    • Un cluster job se crea cuando se ejecuta un job en un nuevo cluster job y finaliza cuando se completa el job. Los jobs cluster no pueden reiniciar.
  • Pool: conjunto de instancias y listas para usar que reducen los tiempos de inicio y escalado automático del cluster. Cuando se adjunta a un pool, un cluster asigna los nodos driver y workers al pool. Si el pool no tiene suficientes recursos para atender la solicitud del cluster, el pool se expande asignando nuevas instancias del proveedor de instancias. Cuando se finaliza un cluster adjunto, las instancias que utilizó se devuelven al pool y pueden ser reutilizadas por un cluster diferente.
  • Databricks runtime: conjunto de componentes principales que se ejecutan en los clusters administrados por Databricks. Se disponen de los siguientes runtimes:
    • Databricks runtime incluye Apache Spark, además agrega una serie de componentes y actualizaciones que mejoran sustancialmente la usabilidad, el rendimiento y la seguridad del análisis.
    • Databricks runtime para Machine Learning se basa en Databricks runtime y proporciona una infraestructura de aprendizaje automático prediseñada que se integra con todas las capacidades del workspace de Databricks. Contiene varias bibliotecas populares, incluidas TensorFlow, Keras, PyTorch y XGBoost.
  • Workflows: marcos para desarrollar y ejecutar canales de procesamiento de datos:
    • Jobs: mecanismo no interactivo para ejecutar un Notebook o una biblioteca, ya sea de forma inmediata o programada.
    • Delta Live Tables: marco para crear canales de procesamiento de datos confiables, mantenibles y comprobables.
  • Workload: Databricks identifica dos tipos de cargas de trabajo sujetas a diferentes esquemas de precios:
    • Ingeniería de datos (job): carga de trabajo (automatizada) que se ejecuta en un cluster job que Databricks crea para cada carga de trabajo.
    • Análisis de datos (all-purpose): carga de trabajo (interactiva) que se ejecuta en un cluster all-purpose. Las cargas de trabajo interactivas normalmente ejecutan comandos dentro de un Notebooks de Databricks. En cualquier caso, ejecutar un job en un cluster all-purpose existente también se trata como una carga de trabajo interactiva.
  • Execution context: estado de un entorno de lectura, evaluación e impresión (REPL) para cada lenguaje de programación admitido. Los lenguajes admitidos son Python, R, Scala y SQL.


Machine learning

Entorno integrado de extremo a extremo que incorpora servicios administrados para el seguimiento de experimentos, entrenamiento de modelos, desarrollo y administración de funciones, y servicio de funciones y modelos.

  • Experiments: principal unidad de organización para el seguimiento del desarrollo de modelos de aprendizaje automático. Los experimentos organizan, muestran y controlan el acceso a ejecuciones registradas individuales de código de entrenamiento de modelos.
  • Feature Store: repositorio centralizado de funciones. Permite compartir y descubrir funciones en toda su organización y también garantiza que se utilice el mismo código de cálculo de funciones para el entrenamiento y la inferencia del modelo.
  • Models & model registry: modelo de aprendizaje automático o aprendizaje profundo que se ha registrado en el registro de modelos.


SQL

  • SQL REST API: interfaz que permite automatizar tareas en objetos SQL.
  • Dashboard: representación de visualizaciones de datos y comentarios.
  • SQL queries: consultas SQL en Databricks.
    • Consulta.
    • Almacén SQL.
    • Historial de consultas.

Arquitectura: Arquitectura a alto nivel

Antes de comenzar a analizar las diferentes alternativas que nos proporciona Databricks respecto al despliegue de infraestructura, conviene conocer los principales componentes del producto. A continuación, una descripción general a alto nivel de la arquitectura de Databricks, incluida su arquitectura empresarial, en combinación con AWS.

Diagrama a alto nivel de la Arquitectura (fuente: Databricks)

Aunque las arquitecturas pueden variar según las configuraciones personalizadas, el diagrama anterior representa la estructura y el flujo de datos más común para Databricks en entornos de AWS.

El diagrama describe la arquitectura general del compute plane clásico. Al respecto de la arquitectura sobre el compute plane serverless que se utiliza para los almacenes SQL sin servidor, la capa de computación se aloja en una cuenta de Databricks en vez de en una cuenta de AWS.

Control plane y compute plane

Databricks está estructurado para permitir una colaboración segura en equipos multifuncionales y, al mismo tiempo, mantiene una cantidad significativa de servicios de backend administrados por Databricks para que pueda concentrarse en sus tareas de ciencia de datos, análisis de datos e ingeniería de datos.

Databricks opera desde un control plane y compute plane.

  • El control plane incluye los servicios backend que Databricks administra en su cuenta de Databricks. Los Notebooks y muchas otras configuraciones del workspace se almacenan en el control  plane y se cifran en reposo.
  • El compute plane es donde se procesan los datos.
    • Para la mayoría de los cálculos de Databricks, los recursos informáticos se encuentran en su cuenta de AWS, en lo que se denomina el compute plane clásico. Esto se refiere a la red en su cuenta de AWS y sus recursos. Databricks usa el compute plane clásico para sus Notebooks, jobs y almacenes SQL de Databricks clásicos y profesionales.
    • Tal y como adelantábamos, para los almacenes SQL serverless, los recursos informáticos serverless se ejecutan en un compute plane sin servidor en una cuenta de Databricks.

Existen multitud de conectores de Databricks para conectar clusters a orígenes de datos externos fuera de la  cuenta de AWS, para ingerir datos o almacenarlos. También con el objeto de ingerir datos de fuentes de transmisión externas, como datos de eventos, de transmisión, de IoT, etc.

El Data Lake se almacena en reposo en la cuenta de AWS y en las propias fuentes de datos para mantener el control y la propiedad de los datos.


Arquitectura E2

La plataforma E2 proporciona características tales como:

  • Multi-workspace accounts.
  • Customer-managed VPCs: creación de workspaces de Databricks en la propia VPC en lugar de utilizar la arquitectura predeterminada en la que los clusters se crean en una única VPC de AWS que Databricks crea y configura en su cuenta de AWS.
  • Secure cluster connectivity: también conocida como «Sin IP públicas», la conectividad de clusters segura permite lanzar clusters en los que todos los nodos tienen direcciones IP privadas, lo que proporciona una seguridad mejorada.
  • Customer-managed keys: proporcione claves KMS para el cifrado de datos.

Planes y tipos de carga de trabajo

El precio indicado por Databricks se imputa en relación con las DBUs consumidas por los clusters. Este parámetro está relacionado con la capacidad de procesamiento consumida por los clusters y dependen directamente del tipo de instancias seleccionadas (al configurar el cluster se facilita un cálculo aproximado de las DBUs que consumirá por hora el cluster). 

El precio imputado por DBU depende de dos factores principales:

  • Factor computacional: la definición de las características del cluster (Cluster Mode, Runtime, On-Demand-Spot Instances, Autoscaling, etc.) que se traducirá en la asignación de un paquete en concreto.
  • Factor de arquitectura: la personalización de esta (Customer Managed-VPC), en algunos aspectos requerirá tener una suscripción Premium e incluso Enterprise, lo que genera que el coste de cada DBU sea mayor a medida que se obtiene una suscripción con mayores privilegios.

La combinación de ambos factores, computacional y de arquitectura, definirá el coste final de cada DBU por hora de trabajo.

Toda la información relativa a planes y tipos de trabajo se puede encontrar en el siguiente enlace

Networking

Databricks tiene una arquitectura dividida en control plane y compute plane. El control plane incluye servicios backend gestionados por Databricks, mientras que el compute plane procesa los datos. Para el cómputo y cálculo clásico, los recursos están en la cuenta de AWS en un classic compute plane. Para el cómputo serverless, los recursos corren en un serverless compute plane en la cuenta de Databricks.

De esta forma, Databricks proporciona conectividad de red segura de manera predeterminada, pero se pueden configurar funciones adicionales. A destacar:

  • La conexión entre usuarios y Databricks: esta puede ser controlada y configurada para una conectividad privada. Dentro de las características que se pueden configurar tenemos:
    • Autenticación y control de acceso.
    • Conexión privada.
    • Lista de IPs de acceso.
    • Reglas de Firewall.
  • Características de conectividad de red para control plane y compute plane. La conectividad entre el control plane y el serverless compute plane siempre se realiza a través de la red en la nube, no a través de Internet público. Este enfoque se centra en establecer y asegurar la conexión entre el control plane y el classic compute plane. Destacar el concepto de «conectividad segura de cluster», que, cuando está habilitado, implica que las redes virtuales del cliente no tienen puertos abiertos y los nodos del cluster de Databricks no tienen direcciones IP públicas, simplificando así la administración de la red. Por otro lado, existe la opción de implementar un espacio de trabajo en la  propia Virtual Private Cloud (VPC) en AWS, lo que permite un mayor control sobre la cuenta de AWS y limita las conexiones salientes. Otros temas incluyen la posibilidad de emparejar la VPC de Databricks con otra VPC de AWS para mayor seguridad, y habilitar la conectividad privada desde el control plane al classic compute plane mediante AWS PrivateLink. 

Se proporciona el siguiente enlace para obtener más información sobre estas características específicas


Conexiones a través de red privada (Private Links)

Por último, queremos destacar como AWS utiliza los PrivateLink para establecer una conectividad privada entre usuarios y los workspaces de Databricks, así como entre los clusters y la infraestructura de los workspaces.

AWS PrivateLink proporciona conectividad privada desde las VPC de AWS y las redes locales hacia los servicios de AWS sin exponer el tráfico a la red pública. En Databricks, las conexiones PrivateLink se admiten para dos tipos de conexiones: Front-end (users a workspaces) y back-end (control plane al control plane).

La conexión front-end permite a los usuarios conectarse a la aplicación web, la API REST y la API Databricks Connect a través de un punto de conexión de interfaz VPC.

La conexión back-end implica que los clusters de Databricks Runtime en una VPC administrada por el cliente se conectan a los servicios centrales del workspace en la cuenta de Databricks para acceder a las API REST.

Se pueden implementar ambas conexiones PrivateLink o únicamente una de ellas.

Referencias

What is a data lakehouse? [link] (January 18, 2024)

Databricks concepts [link] (January 31, 2024)

Architecture [link] (December 18, 2023)

Users to Databricks networking [link] (February 7, 2024)

Secure cluster connectivity [link] (January 23, 2024)

Enable AWS PrivateLink [link] (February 06, 2024)

Navegación

¿Quieres saber más de lo que ofrecemos y ver otros casos de éxito?
DESCUBRE BLUETAB

Jon Garaialde

Cloud Data Solutions Engineer/Architect

Alfonso Jerez

Analytics Engineer | GCP | AWS | Python Dev | Azure | Databricks | Spark

Rubén Villa

Big Data & Cloud Architect

Alberto Jaén

Cloud Engineer | 3x AWS Certified | 2x HashiCorp Certified | GitHub: ajaen4

SOLUCIONES, SOMOS EXPERTOS

DATA STRATEGY
DATA FABRIC
AUGMENTED ANALYTICS

Te puede interesar

Databricks on Azure – An architecture perspective (part 2)

marzo 24, 2022
LEER MÁS

Gobierno de Datos: ¿tendencia o necesidad?

octubre 13, 2022
LEER MÁS

Big Data e IoT

febrero 10, 2021
LEER MÁS

Espiando a tu kubernetes con kubewatch

septiembre 14, 2020
LEER MÁS

Mi experiencia en el mundo de Big Data – Parte II

febrero 4, 2022
LEER MÁS

LA BANCA Y LA ERA DEL OPEN DATA

abril 19, 2023
LEER MÁS

Publicado en: Blog, Practices, Tech

  • Página 1
  • Página 2
  • Página 3
  • Página 4
  • Ir a la página siguiente »

Footer

LegalPrivacidadPolítica de cookies
LegalPrivacy Cookies policy

Patrono

Patron

Sponsor

Patrocinador

© 2025 Bluetab Solutions Group, SL. All rights reserved.