• Saltar a la navegación principal
  • Saltar al contenido principal
  • Saltar al pie de página
Bluetab

Bluetab

an IBM Company

  • Soluciones
    • DATA STRATEGY
    • DATA READINESS
    • DATA PRODUCTS AI
  • Assets
    • TRUEDAT
    • FASTCAPTURE
    • Spark Tune
  • Conócenos
  • Oficinas
    • España
    • Mexico
    • Perú
    • Colombia
  • talento
    • España
    • TALENT HUB BARCELONA
    • TALENT HUB BIZKAIA
    • TALENT HUB ALICANTE
    • TALENT HUB MÁLAGA
  • Blog
  • English

Bluetab

Leadership changes at Bluetab EMEA

abril 3, 2024 by Bluetab

Leadership changes at Bluetab EMEA

Bluetab

  • Luis Malagón, as the new CEO of Bluetab EMEA, assumes the highest position in the company in the region.
  • Meanwhile, Tom Uhart will continue to drive the development of the Data and Artificial Intelligence Offering, enhancing Bluetab's positioning.

Photo: Luis Malagón, CEO of Bluetab EMEA, and Tom Uhart, Co-Founder y Data & AI Offering Lead

Luis Malagón becomes the new CEO of Bluetab EMEA after more than 10 years of experience within the company, having contributed significantly to its success and positioning. His proven leadership qualities position him perfectly to drive Bluetab in its next phase of growth.

‘This new challenge leading the EMEA region is a great opportunity to continue fostering a customer-oriented culture and enhancing their transformation processes. Collaboration is part of our DNA, and this, combined with an exceptional team, positions us in the right place at the right time. Together with IBM Consulting, we will continue to lead the market in Data and Artificial Intelligence solutions’, states Luis.

At Bluetab, we have been leading the data sector for nearly 20 years. Throughout this time, we have adapted to various trends and accompanied our clients in their digital transformation, and now we continue to do so with the arrival of Generative AI.

Tom Uhart’s new journey

Tom Uhart, Co-Founder of Bluetab and until now CEO of EMEA, will continue to drive the project from his new role as Data & AI Offering Lead. In this way, Tom will continue to enhance the company’s positioning and international expansion hand in hand with the IBM group and other key players in the sector.

‘Looking back, I am very proud to have seen Bluetab grow over all these years. A team that stands out for its great technical talent, rebellious spirit, and culture of closeness. We have achieved great goals, overcome obstacles, and created a legacy of which we can all be proud. Now it's time to leave the next stage of Bluetab's growth in Luis's hands, which I am sure will be a great success and will take the company to the next level’, says Tom.

Do you want to know more about what we offer and to see other success stories?
DISCOVER BLUETAB

SOLUTIONS, WE ARE EXPERTS

DATA STRATEGY
DATA FABRIC
AUGMENTED ANALYTICS

You may be interested in

Hashicorp Boundary

diciembre 3, 2020
READ MORE

Bluetab se certifica como AWS Well Architected Partner Program

octubre 19, 2020
READ MORE

Workshop Ingeniería del caos sobre Kubernetes con Litmus

julio 7, 2021
READ MORE

Databricks sobre Azure – Una perspectiva de Arquitectura (parte 1)

febrero 15, 2022
READ MORE

Snowflake, el Time Travel sin DeLorean para unos datos Fail-Safe.

febrero 23, 2023
READ MORE

Domina los Costos en la Nube: Optimización de GCS y BigQuery en Google Cloud

marzo 17, 2025
READ MORE

Publicado en: Blog, Blog, Noticias, Noticias

Potencia Tu Negocio con GenAI y GCP: Simple y para Todos

marzo 27, 2024 by Bluetab

Alfonso Zamora
Cloud Engineer

Introducción

El objetivo principal de este artículo es presentar una solución para el análisis y la ingeniería de datos desde el punto de vista del personal de negocio, sin requerir unos conocimientos técnicos especializados. 

Las compañías disponen de una gran cantidad de procesos de ingeniería del dato para sacarle el mayor valor a su negocio, y en ocasiones, soluciones muy complejas para el caso de uso requerido. Desde aquí, proponemos simplificar la operativa para que un usuario de negocio, que anteriormente no podía llevar a cabo el desarrollo y la implementación de la parte técnica, ahora será autosuficiente, y podrá implementar sus propias soluciones técnicas con lenguaje natural.

Para poder cumplir nuestro objetivo, vamos a hacer uso de distintos servicios de la plataforma Google Cloud para crear tanto la infraestructura necesaria como los distintos componentes tecnológicos para poder sacar todo el valor a la información empresarial.

Antes de comenzar

Antes de comenzar con el desarrollo del artículo, vamos a explicar algunos conceptos básicos sobre los servicios y sobre distintos frameworks de trabajo que vamos a utilizar para la implementación:

  1. Cloud Storage[1]: Es un servicio de almacenamiento en la nube proporcionado por Google Cloud Platform (GCP) que permite a los usuarios almacenar y recuperar datos de manera segura y escalable.
  2. BigQuery[2]: Es un servicio de análisis de datos totalmente administrado que permite realizar consultas SQL en conjuntos de datos masivos en GCP. Es especialmente eficaz para el análisis de datos a gran escala.
  3. Terraform[3]: Es una herramienta de infraestructura como código (IaC) desarrollada por HashiCorp. Permite a los usuarios describir y gestionar la infraestructura utilizando archivos de configuración en el lenguaje HashiCorp Configuration Language (HCL). Con Terraform, puedes definir recursos y proveedores de manera declarativa, facilitando la creación y gestión de infraestructuras en plataformas como AWS, Azure y Google Cloud.
  4. PySpark[4]: Es una interfaz de Python para Apache Spark, un marco de procesamiento distribuido de código abierto. PySpark facilita el desarrollo de aplicaciones de análisis de datos paralelas y distribuidas utilizando la potencia de Spark.
  5. Dataproc[5]: Es un servicio de gestión de clústeres para Apache Spark y Hadoop en GCP que permite ejecutar eficientemente tareas de análisis y procesamiento de datos a gran escala. Dataproc admite la ejecución de código PySpark, facilitando la realización de operaciones distribuidas en grandes conjuntos de datos en la infraestructura de Google Cloud.

Qué es un LLM 

Un LLM (Large Language Model) es un tipo de algoritmo de inteligencia artificial (IA) que utiliza técnicas de deep learning y enormes conjuntos de datos para comprender, resumir, generar y predecir nuevos contenidos. Un ejemplo de LLM podría ser ChatGPT que hace uso del modelo GPT desarrollado por OpenAI. 

En nuestro caso, vamos a hacer uso del modelo Codey[6] (code-bison) que es un modelo implementado por Google que está optimizado para generar código ya que ha sido entrenado para esta especialización que se encuentra dentro del stack de VertexAI[7]

Y no solo es importante el modelo que vamos a utilizar, sino también el cómo lo vamos a utilizar. Con esto, me refiero a que es necesario comprender los parámetros de entrada que afectan directamente a las respuestas que nos dará nuestro modelo, en los que podemos destacar los siguientes:

  • Temperatura (temperature): Este parámetro controla la aleatoriedad en las predicciones del modelo. Una temperatura baja, como 0.1, genera resultados más deterministas y enfocados, mientras que una temperatura alta, como 0.8, introduce más variabilidad y creatividad en las respuestas del modelo.
  • Prefix (Prompt): El prompt es el texto de entrada que se proporciona al modelo para iniciar la generación de texto. La elección del prompt es crucial, ya que guía al modelo sobre la tarea específica que se espera realizar. La formulación del prompt puede influir en la calidad y relevancia de las respuestas del modelo, aunque hay que tener en cuenta la longitud para que cumpla con el  número máximo de tokens de entrada que es 6144.
  • Tokens de salida (max_output_tokens): Este parámetro limita el número máximo de tokens que se generarán en la salida. Controlar este valor es útil para evitar respuestas excesivamente largas o para ajustar la longitud de la salida según los requisitos específicos de la aplicación.
  • Recuento de candidatos (candidate_count): Este parámetro controla el número de respuestas candidatas que el modelo genera antes de seleccionar la mejor opción. Un valor más alto puede ser útil para explorar diversas respuestas potenciales, pero también aumentará el costo computacional.

Desarrollo del prompt

Una vez que hemos definido los parámetros y sabemos bien para qué sirve cada uno de ellos y comprendemos lo que es un prompt, vamos a enfocarnos en cómo utilizarlo e implementar uno que se pueda adaptar a nuestras necesidades.

Como se ha comentado anteriormente, el objetivo es generar tanto código Pyspark como terraform para poder realizar las tareas de creación de infraestructura y tratamiento del dato. Como son tareas totalmente distintas, como primera decisión importante para nuestro prompt se ha optado por dividirlo en dos partes específicas para que cada prompt esté entrenado con ejemplos para generar un lenguaje u otro.

Para cada uno de los prompt, se hace una introducción para especificar cuál va a ser el objetivo y qué peticiones se van a realizar, y después una serie de ejemplos en los que se le da un input en lenguaje natural simulando una petición, y posteriormente también se le da el output deseado para asignar el texto al código específico. El objetivo es generar un prompt estructurado que pueda ser procesado de manera eficiente por el modelo para que en los siguientes casos, pueda asociar los ejemplos que tiene disponibles con respuestas adecuadas.

Vamos a poner en práctica estos pequeños tips para ver una de las entradas al prompt de terraform:

input: I need to read a file named `myfile.csv` inside the folder `data/input` in a bucket called `application-data-input`, and I need to create a new dataset and table in BigQuery called `tst_tf_ai`. The process has to read the file, remove the first three characters of the name, and write the result in BigQuery. The schema of the table will be ‘name’ of String type and ‘surname’ of String type. The infrastructure has to be deployed in the project `project-cloud-223` in GCP, and region `europe-southwest1`.
output: «`hcl
terraform {
 required_version = «>= 0.15»
 required_providers {
  google = «~> 5.0»
 }
}

resource «google_storage_bucket» «temporary_files» { 
 project       = «project-cloud-223» 
 name          = «temporary-files-dataproc» 
 location      = «europe-southwest1» 
 force_destroy = true 
} 

resource «google_storage_bucket» «bucket1» { 
 project       = «project-cloud-223» 
 name          = «application-data-input» 
 location      = «europe-southwest1» 
 force_destroy = true 
} 

resource «google_storage_bucket_object» «folder1» {
 name    = «data/input/»
 bucket  = google_storage_bucket.bucket1.name
 content = » «
}

resource «google_bigquery_dataset» «dataset» { 
 project       = «project-cloud-223» 
 dataset_id    = «tst_tf_ai» 
 friendly_name = «tst_tf_ai» 
 description   = «Description» 
 location      = «europe-southwest1» 
} 

resource «google_bigquery_table» «table» { 
 project              = «project-cloud-223» 
 dataset_id           = google_bigquery_dataset.dataset.dataset_id 
 deletion_protection  = false
 table_id             = «tst_tf_ai» 
 schema               = <<EOF
[ 
 { 
  «name»: «name», 
  «type»: «STRING», 
  «mode»: «NULLABLE», 
  «description»: «The name» 
 }, 
 { 
  «name»: «surname», 
  «type»: «STRING», 
  «mode»: «NULLABLE», 
  «description»: «The surname» 
 }
] 
EOF 
} 
«`

Author Name

Es importante implementar ejemplos lo más parecido posible a tu caso de uso para que las respuestas sean más precisas, y también que tenga bastantes ejemplos con variedad de peticiones para que sea más inteligente a la hora de devolver las respuestas. Una de las prácticas para que sea más interactiva la implementación del prompt, puede ser ir probando con distintas peticiones, y si no es capaz de hacer lo que se le ha pedido, se debería modificar las instrucciones.

Como hemos podido observar, el desarrollo del prompt sí necesitamos conocimientos técnicos para poder traducir las peticiones a código, por lo que esta tarea sí se debería de abordar por una persona técnica para posteriormente evadir a la persona de negocio. En otras palabras, necesitamos que una persona técnica genere la primera base de conocimiento para que luego las personas de negocio puedan hacer uso de este tipo de herramientas.

También se ha podido ver, que la generación de código en terraform es más compleja que la generación en Pyspark, por lo que se han requerido de más ejemplos de entrada en la realización del prompt de terraform para que se ajuste a nuestro caso de uso. Por ejemplo, hemos aplicado en los ejemplos que en terraform siempre cree un bucket temporal (temporary-files-dataproc) para que pueda ser utilizado por Dataproc.

Casos prácticos

Se han realizado tres ejemplos con peticiones distintas, requiriendo más o menos infraestructura y transformaciones para ver si nuestro prompt es lo suficientemente robusto. 

En el archivo ai_gen.py vemos el código necesario para hacer las peticiones y los tres ejemplos, en el que cabe destacar la configuración escogida para los parámetros del modelo:

  • Se ha decidido darle valor 1 a candidate_count para que no tenga más que una respuesta final válida para devolver. Además que como se ha comentado, aumentar este número también lleva aumento de costes.
  • El max_output_tokens se ha decidido 2048 que es el mayor número de tokens para este modelo, ya que si se necesita generar una respuesta con diversas transformaciones, no falle por esta limitación.
  • La temperatura se ha variado entre el código terraform y Pyspark, para terraform se ha optado por 0 para que siempre dé la respuesta que se considera más cercana a nuestro prompt para que no genere más de lo estrictamente necesario para nuestro objetivo. En cambio para Pyspark se ha optado por 0.2 que es una temperatura baja para que no sea muy creativo, pero para que también pueda darnos diversas respuestas con cada llamada para también poder hacer pruebas de rendimiento entre ellas.

Vamos a realizar un ejemplo de petición que está disponible en el siguiente repositorio github, en el que está detallado en el README paso por paso para poder ejecutarlo tú mismo. La petición es la siguiente:

In the realm of ‘customer_table,’ my objective is the seamless integration of pivotal fields such as ‘customer_id’, ‘name’, and ‘email’. These components promise to furnish crucial insights into the essence of our valued customer base.

Conversely, when delving into the nuances of ‘sales_table,’ the envisioned tapestry includes essential elements like ‘order_id’ ‘product’ ‘price’, ‘amount’ and ‘customer_id’. Theseattributes, meticulously curated, will play a pivotal role in the nuanced exploration and analysis of sales-related data.

The ‘bigtable_info’ table will have all the fields resulting from the union of the two tables, ‘customer_table’ and ‘sales_table.’ Here, the outcome of joining the two tables by the ‘customer_id’ numeric field will be stored.

Furthermore, as part of our meticulous data collection strategy, I plan to inaugurate a dedicated Google Cloud Storage bucket christened ‘sales-etl-bucket.’ This repository is strategically designed to serve as a robust container for collating data, particularly hailing from CSV files. This endeavor is set to enhance the efficiency and organizational prowess of our data management processes.

To enhance the structure, two distinct subfolders, ‘input/sales’ and ‘input/customers’ have been ingeniously incorporated within the ‘sales-etl-bucket,’ ensuring a refined organization of the incoming data streams.

You will need to read the CSV files within the ‘input/sales’ folder to write the data into the ‘sales_table’. Additionally, you should perform the same operation with the files from the ‘input/customers’ folder to write the data into the ‘customer_table’. Finally, you are required to perform a join between the sales and customers information based on the ‘customer_id’ number field and write the merged information into the ‘bigtable_info’.

Author Name

Ejecutamos  y vamos a analizar las salidas generadas en las carpetas generated/customers/python/etl.py y generated/terraform/main.tf.:

terraform {
 required_version = ">= 0.15"
 required_providers {
   google = "~> 5.0"
 }
}


resource "google_storage_bucket" "temporary_files" {
 project       = "my-cloud-project"
 name          = "temporary-files-dataproc"
 location      = "europe-southwest1"
 force_destroy = true
}


resource "google_storage_bucket" "sales_etl_bucket" {
 project       = "my-cloud-project"
 name          = "sales-etl-bucket"
 location      = "europe-southwest1"
 force_destroy = true
}


resource "google_storage_bucket_object" "sales_folder" {
 name    = "input/sales/"
 bucket  = google_storage_bucket.sales_etl_bucket.name
 content = " "
}


resource "google_storage_bucket_object" "customers_folder" {
 name    = "input/customers/"
 bucket  = google_storage_bucket.sales_etl_bucket.name
 content = " "
}


resource "google_bigquery_dataset" "raw_sales_data" {
 project       = "my-cloud-project"
 dataset_id    = "raw_sales_data"
 friendly_name = "Raw Sales Data"
 description   = "This dataset contains the raw sales data."
 location      = "europe-southwest1"
}


resource "google_bigquery_table" "customer_table" {
 project              = "my-cloud-project"
 dataset_id           = google_bigquery_dataset.raw_sales_data.dataset_id
 deletion_protection  = false
 table_id             = "customer_table"
 schema               = <<EOF
[
 {
   "name": "customer_id",
   "type": "INT64",
   "mode": "REQUIRED",
   "description": "The customer ID."
 },
 {
   "name": "name",
   "type": "STRING",
   "mode": "NULLABLE",
   "description": "The customer's name."
 },
 {
   "name": "email",
   "type": "STRING",
   "mode": "NULLABLE",
   "description": "The customer's email address."
 }
]
EOF
}


resource "google_bigquery_table" "sales_table" {
 project              = "my-cloud-project"
 dataset_id           = google_bigquery_dataset.raw_sales_data.dataset_id
 deletion_protection  = false
 table_id             = "sales_table"
 schema               = <<EOF
[
 {
   "name": "order_id",
   "type": "INT64",
   "mode": "REQUIRED",
   "description": "The order ID."
 },
 {
   "name": "product",
   "type": "STRING",
   "mode": "NULLABLE",
   "description": "The product name."
 },
 {
   "name": "price",
   "type": "FLOAT64",
   "mode": "NULLABLE",
   "description": "The product price."
 },
 {
   "name": "amount",
   "type": "INT64",
   "mode": "NULLABLE",
   "description": "The product amount."
 },
 {
   "name": "customer_id",
   "type": "INT64",
   "mode": "REQUIRED",
   "description": "The customer ID."
 }
]
EOF
}


resource "google_bigquery_dataset" "master_sales_data" {
 project       = "my-cloud-project"
 dataset_id    = "master_sales_data"
 friendly_name = "Master Sales Data"
 description   = "This dataset contains the master sales data."
 location      = "europe-southwest1"
}


resource "google_bigquery_table" "bigtable_info" {
 project              = "my-cloud-project"
 dataset_id           = google_bigquery_dataset.master_sales_data.dataset_id
 deletion_protection  = false
 table_id             = "bigtable_info"
 schema               = <<EOF
[
 {
   "name": "customer_id",
   "type": "INT64",
   "mode": "REQUIRED",
   "description": "The customer ID."
 },
 {
   "name": "name",
   "type": "STRING",
   "mode": "NULLABLE",
   "description": "The customer's name."
 },
 {
   "name": "email",
   "type": "STRING",
   "mode": "NULLABLE",
   "description": "The customer's email address."
 },
 {
   "name": "order_id",
   "type": "INT64",
   "mode": "REQUIRED",
   "description": "The order ID."
 },
 {
   "name": "product",
   "type": "STRING",
   "mode": "NULLABLE",
   "description": "The product name."
 },
 {
   "name": "price",
   "type": "FLOAT64",
   "mode": "NULLABLE",
   "description": "The product price."
 },
 {
   "name": "amount",
   "type": "INT64",
   "mode": "NULLABLE",
   "description": "The product amount."
 }
]
EOF
}


Vemos que va a añadir un bucket con dos carpetas para poder subir los datos a la carpeta correspondiente dependiendo si es sales o customer. También ha creado dos datasets, uno para la capa de raw para tener los datos según nos han venido de origen con las tablas de customers y sales, y el segundo dataset para la tabla final que almacenará el resultado de juntar la información de ambas tablas.

Vamos a revisar el código pyspark:

from pyspark.sql import SparkSession
from pyspark.sql import functions as F


# Configure Spark session
spark = SparkSession.builder.appName("SalesETL").getOrCreate()


# Define file paths
sales_path = "gs://sales-etl-bucket/input/sales/*.csv"
customers_path = "gs://sales-etl-bucket/input/customers/*.csv"


# Read CSV files into DataFrames
sales_df = spark.read.csv(sales_path, header=True, inferSchema=True)
customers_df = spark.read.csv(customers_path, header=True, inferSchema=True)


# Write tables to BigQuery
sales_df.write.format("bigquery") \
   .option("temporaryGcsBucket", "temporary-files-dataproc") \
   .option("table",  "raw_sales_data.sales_table") \
   .mode("overwrite") \
   .save()
customers_df.write.format("bigquery") \
   .option("temporaryGcsBucket", "temporary-files-dataproc") \
   .option("table",  "raw_sales_data.customer_table") \
   .mode("overwrite") \
   .save()


# Join sales and customers tables
bigtable_info_df = sales_df.join(customers_df, on="customer_id", how="inner")


# Write joined table to BigQuery
bigtable_info_df.write.format("bigquery") \
   .option("temporaryGcsBucket", "temporary-files-dataproc") \
   .option("table",  "master_sales_data.bigtable_info") \
   .mode("overwrite") \
   .save()


# Stop the Spark session
spark.stop()

Se puede observar que el código generado realiza la lectura por cada una de las carpetas e inserta cada dato en su tabla correspondiente. 

Para poder asegurarnos de que el ejemplo está bien realizado, podemos seguir los pasos del README en el repositorio GitHub[8] para aplicar los cambios en el código terraform, subir los ficheros de ejemplo que tenemos en la carpeta example_data y a ejecutar un Batch en Dataproc. 

Finalmente, vemos si la información que se ha almacenado en BigQuery es correcta:

  • Tabla customer:
  • Tabla sales:
  • Tabla final:

De esta forma, hemos conseguido de a través de lenguaje natural, tener un proceso funcional totalmente operativo. Hay otro ejemplo que se puede ejecutar, aunque también animo a hacer más ejemplos, o incluso mejorar el prompt, para poder meterle ejemplos más complejos, y también adaptarlo a tu caso de uso.

Conclusiones y Recomendaciones

Al ser ejemplos muy concretos sobre unas tecnologías tan concretas, cuando se hace un cambio en el prompt en cualquier ejemplo puede afectar a los resultados, o también, modificar alguna palabra de la petición de entrada. Esto se traduce en que el prompt no es lo suficientemente robusto como para poder asimilar distintas expresiones sin afectar al código generado. Para poder tener un prompt y un sistema productivo, se necesita más entrenamiento y distinta variedad tanto de soluciones, peticiones, expresiones,. … Con todo ello, finalmente podremos tener una primera versión que poder presentar a nuestro usuario de negocio para que sea autónomo.

Especificar el máximo detalle posible a un LLM es crucial para obtener resultados precisos y contextuales. Aquí hay varios consejos que debemos tener en cuenta para poder tener un resultado adecuado:

  • Claridad y Concisión:
    • Sé claro y conciso en tu prompt, evitando oraciones largas y complicadas.
    • Define claramente el problema o la tarea que deseas que el modelo aborde.
  • Especificidad:
    • Proporciona detalles específicos sobre lo que estás buscando. Cuanto más preciso seas, mejores resultados obtendrás.
  • Variabilidad y Diversidad:
    • Considera incluir diferentes tipos de ejemplos o casos para evaluar la capacidad del modelo para manejar la variabilidad.
  • Feedback Iterativo:
    • Si es posible, realiza iteraciones en tu prompt basándote en los resultados obtenidos y el feedback del modelo.
  • Prueba y Ajuste:
    • Antes de usar el prompt de manera extensa, realiza pruebas con ejemplos y ajusta según sea necesario para obtener resultados deseados.

Perspectivas Futuras

En el ámbito de LLM, las líneas futuras de desarrollo se centran en mejorar la eficiencia y la accesibilidad de la implementación de modelos de lenguaje. Aquí se detallan algunas mejoras clave que podrían potenciar significativamente la experiencia del usuario y la eficacia del sistema:

1. Uso de distintos modelos de LLM:

La inclusión de una función que permita a los usuarios comparar los resultados generados por diferentes modelos sería esencial. Esta característica proporcionaría a los usuarios información valiosa sobre el rendimiento relativo de los modelos disponibles, ayudándoles a seleccionar el modelo más adecuado para sus necesidades específicas en términos de precisión, velocidad y recursos requeridos.

2. Capacidad de retroalimentación del usuario:

Implementar un sistema de retroalimentación que permita a los usuarios calificar y proporcionar comentarios sobre las respuestas generadas podría ser útil para mejorar continuamente la calidad del modelo. Esta información podría utilizarse para ajustar y refinar el modelo a lo largo del tiempo, adaptándose a las preferencias y necesidades cambiantes de los usuarios.

3. RAG (Retrieval-augmented generation)

RAG (Retrieval-augmented generation) es un enfoque que combina la generación de texto y la recuperación de información para mejorar las respuestas de los modelos de lenguaje. Implica el uso de mecanismos de recuperación para obtener información relevante de una base de datos o corpus textual, que luego se integra en el proceso de generación de texto para mejorar la calidad y la coherencia de las respuestas generadas.

Enlaces de interés

Cloud Storage[1]: https://cloud.google.com/storage/docs

BigQuery[2]: https://cloud.google.com/bigquery/docs

Terraform[3]: https://developer.hashicorp.com/terraform/docs

PySpark[4]: https://spark.apache.org/docs/latest/api/python/index.html

Dataproc[5]: https://cloud.google.com/dataproc/docs

Codey[6]: https://cloud.google.com/vertex-ai/generative-ai/docs/model-reference/code-generation

VertexAI[7]: https://cloud.google.com/vertex-ai/docs

GitHub[8]: https://github.com/alfonsozamorac/etl-genai

Tabla de contenidos
  1. Introducción
  2. Antes de comenzar
  3. Qué es un LLM 
  4. Desarrollo del prompt
  5. Casos prácticos

Publicado en: Blog, Practices, Tech

Boost Your Business with GenAI and GCP: Simple and for Everyone

marzo 27, 2024 by Bluetab

Alfonso Zamora
Cloud Engineer

Introduction

The main goal of this article is to present a solution for data analysis and engineering from a business perspective, without requiring specialized technical knowledge.

Companies have a large number of data engineering processes to extract the most value from their business, and sometimes, very complex solutions for the required use case. From here, we propose to simplify the operation so that a business user, who previously could not carry out the development and implementation of the technical part, will now be self-sufficient, and will be able to implement their own technical solutions with natural language.

To fulfill our goal, we will make use of various services from the Google Cloud platform to create both the necessary infrastructure and the different technological components to extract all the value from business information.

Before we begin

Before we begin with the development of the article, let’s explain some basic concepts about the services and different frameworks we will use for implementation:

  1. Cloud Storage[1]: It is a cloud storage service provided by Google Cloud Platform (GCP) that allows users to securely and scalably store and retrieve data.
  2. BigQuery[2]: It is a fully managed data analytics service that allows you to run SQL queries on massive datasets in GCP. It is especially effective for large-scale data analysis.
  3. Terraform[3]: It is an infrastructure as code (IaC) tool developed by HashiCorp. It allows users to describe and manage infrastructure using configuration files in the HashiCorp Configuration Language (HCL). With Terraform, you can define resources and providers declaratively, making it easier to create and manage infrastructure on platforms like AWS, Azure, and Google Cloud.
  4. PySpark[4]: It is a Python interface for Apache Spark, an open-source distributed processing framework. PySpark makes it easy to develop parallel and distributed data analysis applications using the power of Spark.
  5. Dataproc[5]: It is a cluster management service for Apache Spark and Hadoop on GCP that enables efficient execution of large-scale data analysis and processing tasks. Dataproc supports running PySpark code, making it easy to perform distributed operations on large datasets in the Google Cloud infrastructure.

What is an LLM?

An LLM (Large Language Model) is a type of artificial intelligence (AI) algorithm that utilizes deep learning techniques and massive datasets to comprehend, summarize, generate, and predict new content. An example of an LLM could be ChatGPT, which makes use of the GPT model developed by OpenAI.

In our case, we will be using the Codey model (code-bison), which is a model implemented by Google that is optimized for generating code as it has been trained specifically for this specialization, which is part of the VertexAI stack.

However, it’s not only important which model we are going to use, but also how we are going to use it. By this, I mean it’s necessary to understand the input parameters that directly affect the responses our model will provide, among which we can highlight the following:

  • Temperature: This parameter controls the randomness in the model’s predictions. A low temperature, such as 0.1, generates more deterministic and focused results, while a high temperature, such as 0.8, introduces more variability and creativity in the model’s responses.
  • Prefix (Prompt): The prompt is the input text provided to the model to initiate text generation. The choice of prompt is crucial as it guides the model on the specific task expected to be performed. The formulation of the prompt can influence the quality and relevance of the model’s responses, although the length should be considered to meet the maximum number of input tokens, which is 6144.
  • Output Tokens (max_output_tokens): This parameter limits the maximum number of tokens that will be generated in the output. Controlling this value is useful for avoiding excessively long responses or for adjusting the output length according to the specific requirements of the application.
  • Candidate Count: This parameter controls the number of candidate responses the model generates before selecting the best option. A higher value can be useful for exploring various potential responses, but it will also increase computational cost.

Development of the prompt

Once we have defined the parameters and understand well what each of them is for, and we comprehend what a prompt is, let’s focus on how to use it and implement one that can adapt to our needs.

As mentioned earlier, the goal is to generate both PySpark code and Terraform in order to perform infrastructure creation and data processing tasks. Since these are completely different tasks, as a first important decision for our prompt, we have chosen to divide it into two specific parts so that each prompt is trained with examples to generate one language or the other.

For each prompt, an introduction is made to specify what the objective will be and what requests will be made, followed by a series of examples in which input in natural language is given simulating a request, and then the desired output is also given to assign the text to the specific code. The goal is to generate a structured prompt that can be efficiently processed by the model so that in the following cases, it can associate the available examples with appropriate responses.

Let’s put these small tips into practice to see one of the entries to the Terraform prompt:


input: I need to read a file named `myfile.csv` inside the folder `data/input` in a bucket called `application-data-input`, and I need to create a new dataset and table in BigQuery called `tst_tf_ai`. The process has to read the file, remove the first three characters of the name, and write the result in BigQuery. The schema of the table will be ‘name’ of String type and ‘surname’ of String type. The infrastructure has to be deployed in the project `project-cloud-223` in GCP, and region `europe-southwest1`.
output: «`hcl
terraform {
 required_version = «>= 0.15»
 required_providers {
  google = «~> 5.0»
 }
}

resource «google_storage_bucket» «temporary_files» { 
 project       = «project-cloud-223» 
 name          = «temporary-files-dataproc» 
 location      = «europe-southwest1» 
 force_destroy = true 
} 

resource «google_storage_bucket» «bucket1» { 
 project       = «project-cloud-223» 
 name          = «application-data-input» 
 location      = «europe-southwest1» 
 force_destroy = true 
} 

resource «google_storage_bucket_object» «folder1» {
 name    = «data/input/»
 bucket  = google_storage_bucket.bucket1.name
 content = » «
}

resource «google_bigquery_dataset» «dataset» { 
 project       = «project-cloud-223» 
 dataset_id    = «tst_tf_ai» 
 friendly_name = «tst_tf_ai» 
 description   = «Description» 
 location      = «europe-southwest1» 
} 

resource «google_bigquery_table» «table» { 
 project              = «project-cloud-223» 
 dataset_id           = google_bigquery_dataset.dataset.dataset_id 
 deletion_protection  = false
 table_id             = «tst_tf_ai» 
 schema               = <<EOF
[ 
 { 
  «name»: «name», 
  «type»: «STRING», 
  «mode»: «NULLABLE», 
  «description»: «The name» 
 }, 
 { 
  «name»: «surname», 
  «type»: «STRING», 
  «mode»: «NULLABLE», 
  «description»: «The surname» 
 }
] 
EOF 
} 
«`
Author Name

It’s important to implement examples as closely as possible to your use case so that the responses are more accurate, and also to have plenty of examples with a variety of requests to make it smarter when returning responses. One of the practices to make the prompt implementation more interactive could be to try different requests, and if it’s unable to do what’s been asked, the instructions should be modified.

As we have observed, developing the prompt does require technical knowledge to translate requests into code, so this task should be tackled by a technical person to subsequently empower the business user. In other words, we need a technical person to generate the initial knowledge base so that business users can then make use of these types of tools.

It has also been noticed that generating code in Terraform is more complex than generating code in PySpark, so more input examples were required in creating the Terraform prompt to tailor it to our use case. For example, we have applied in the examples that in Terraform it always creates a temporary bucket (temporary-files-dataproc) so that it can be used by Dataproc.

Practical Cases

Three examples have been carried out with different requests, requiring more or less infrastructure and transformations to see if our prompt is robust enough.

In the file ai_gen.py, we see the necessary code to make the requests and the three examples, in which it is worth highlighting the configuration chosen for the model parameters:

  • It has been decided to set the value of candidate_count to 1 so that it has no more than one valid final response to return. Additionally, as mentioned, increasing this number also entails increased costs.
  • The max_output_tokens has been set to 2048, which is the highest number of tokens for this model, as if it needs to generate a response with various transformations, it won’t fail due to this limitation.
  • The temperature has been varied between the Terraform and PySpark code. For Terraform, we have opted for 0 so that it always gives the response that is considered closest to our prompt, ensuring it doesn’t generate more than strictly necessary for our objective. In contrast, for PySpark, we have opted for 0.2, which is a low temperature to prevent excessive creativity, yet still allowing it to provide diverse responses with each call, enabling performance testing among them.

We are going to carry out an example of a request that is available in the following GitHub repository, where it is detailed step by step in the README to be able to execute it yourself. The request is as follows:


In the realm of ‘customer_table,’ my objective is the seamless integration of pivotal fields such as ‘customer_id’, ‘name’, and ‘email’. These components promise to furnish crucial insights into the essence of our valued customer base.

Conversely, when delving into the nuances of ‘sales_table,’ the envisioned tapestry includes essential elements like ‘order_id’ ‘product’ ‘price’, ‘amount’ and ‘customer_id’. Theseattributes, meticulously curated, will play a pivotal role in the nuanced exploration and analysis of sales-related data.

The ‘bigtable_info’ table will have all the fields resulting from the union of the two tables, ‘customer_table’ and ‘sales_table.’ Here, the outcome of joining the two tables by the ‘customer_id’ numeric field will be stored.

Furthermore, as part of our meticulous data collection strategy, I plan to inaugurate a dedicated Google Cloud Storage bucket christened ‘sales-etl-bucket.’ This repository is strategically designed to serve as a robust container for collating data, particularly hailing from CSV files. This endeavor is set to enhance the efficiency and organizational prowess of our data management processes.

To enhance the structure, two distinct subfolders, ‘input/sales’ and ‘input/customers’ have been ingeniously incorporated within the ‘sales-etl-bucket,’ ensuring a refined organization of the incoming data streams.

You will need to read the CSV files within the ‘input/sales’ folder to write the data into the ‘sales_table’. Additionally, you should perform the same operation with the files from the ‘input/customers’ folder to write the data into the ‘customer_table’. Finally, you are required to perform a join between the sales and customers information based on the ‘customer_id’ number field and write the merged information into the ‘bigtable_info’.
Author Name

We execute and will analyze the outputs generated in the folders generated/customers/python/etl.py and generated/terraform/main.tf.

terraform {
 required_version = ">= 0.15"
 required_providers {
   google = "~> 5.0"
 }
}


resource "google_storage_bucket" "temporary_files" {
 project       = "my-cloud-project"
 name          = "temporary-files-dataproc"
 location      = "europe-southwest1"
 force_destroy = true
}


resource "google_storage_bucket" "sales_etl_bucket" {
 project       = "my-cloud-project"
 name          = "sales-etl-bucket"
 location      = "europe-southwest1"
 force_destroy = true
}


resource "google_storage_bucket_object" "sales_folder" {
 name    = "input/sales/"
 bucket  = google_storage_bucket.sales_etl_bucket.name
 content = " "
}


resource "google_storage_bucket_object" "customers_folder" {
 name    = "input/customers/"
 bucket  = google_storage_bucket.sales_etl_bucket.name
 content = " "
}


resource "google_bigquery_dataset" "raw_sales_data" {
 project       = "my-cloud-project"
 dataset_id    = "raw_sales_data"
 friendly_name = "Raw Sales Data"
 description   = "This dataset contains the raw sales data."
 location      = "europe-southwest1"
}


resource "google_bigquery_table" "customer_table" {
 project              = "my-cloud-project"
 dataset_id           = google_bigquery_dataset.raw_sales_data.dataset_id
 deletion_protection  = false
 table_id             = "customer_table"
 schema               = <<EOF
[
 {
   "name": "customer_id",
   "type": "INT64",
   "mode": "REQUIRED",
   "description": "The customer ID."
 },
 {
   "name": "name",
   "type": "STRING",
   "mode": "NULLABLE",
   "description": "The customer's name."
 },
 {
   "name": "email",
   "type": "STRING",
   "mode": "NULLABLE",
   "description": "The customer's email address."
 }
]
EOF
}


resource "google_bigquery_table" "sales_table" {
 project              = "my-cloud-project"
 dataset_id           = google_bigquery_dataset.raw_sales_data.dataset_id
 deletion_protection  = false
 table_id             = "sales_table"
 schema               = <<EOF
[
 {
   "name": "order_id",
   "type": "INT64",
   "mode": "REQUIRED",
   "description": "The order ID."
 },
 {
   "name": "product",
   "type": "STRING",
   "mode": "NULLABLE",
   "description": "The product name."
 },
 {
   "name": "price",
   "type": "FLOAT64",
   "mode": "NULLABLE",
   "description": "The product price."
 },
 {
   "name": "amount",
   "type": "INT64",
   "mode": "NULLABLE",
   "description": "The product amount."
 },
 {
   "name": "customer_id",
   "type": "INT64",
   "mode": "REQUIRED",
   "description": "The customer ID."
 }
]
EOF
}


resource "google_bigquery_dataset" "master_sales_data" {
 project       = "my-cloud-project"
 dataset_id    = "master_sales_data"
 friendly_name = "Master Sales Data"
 description   = "This dataset contains the master sales data."
 location      = "europe-southwest1"
}


resource "google_bigquery_table" "bigtable_info" {
 project              = "my-cloud-project"
 dataset_id           = google_bigquery_dataset.master_sales_data.dataset_id
 deletion_protection  = false
 table_id             = "bigtable_info"
 schema               = <<EOF
[
 {
   "name": "customer_id",
   "type": "INT64",
   "mode": "REQUIRED",
   "description": "The customer ID."
 },
 {
   "name": "name",
   "type": "STRING",
   "mode": "NULLABLE",
   "description": "The customer's name."
 },
 {
   "name": "email",
   "type": "STRING",
   "mode": "NULLABLE",
   "description": "The customer's email address."
 },
 {
   "name": "order_id",
   "type": "INT64",
   "mode": "REQUIRED",
   "description": "The order ID."
 },
 {
   "name": "product",
   "type": "STRING",
   "mode": "NULLABLE",
   "description": "The product name."
 },
 {
   "name": "price",
   "type": "FLOAT64",
   "mode": "NULLABLE",
   "description": "The product price."
 },
 {
   "name": "amount",
   "type": "INT64",
   "mode": "NULLABLE",
   "description": "The product amount."
 }
]
EOF
}


We see that it will add a bucket with two folders to upload the data to the corresponding folder depending on whether it is sales or customer data. It has also created two datasets, one for the raw layer to have the data as it came from the source with the tables of customers and sales, and the second dataset for the final table that will store the result of joining the information from both tables.

Let’s review the PySpark code:

from pyspark.sql import SparkSession
from pyspark.sql import functions as F


# Configure Spark session
spark = SparkSession.builder.appName("SalesETL").getOrCreate()


# Define file paths
sales_path = "gs://sales-etl-bucket/input/sales/*.csv"
customers_path = "gs://sales-etl-bucket/input/customers/*.csv"


# Read CSV files into DataFrames
sales_df = spark.read.csv(sales_path, header=True, inferSchema=True)
customers_df = spark.read.csv(customers_path, header=True, inferSchema=True)


# Write tables to BigQuery
sales_df.write.format("bigquery") \
   .option("temporaryGcsBucket", "temporary-files-dataproc") \
   .option("table",  "raw_sales_data.sales_table") \
   .mode("overwrite") \
   .save()
customers_df.write.format("bigquery") \
   .option("temporaryGcsBucket", "temporary-files-dataproc") \
   .option("table",  "raw_sales_data.customer_table") \
   .mode("overwrite") \
   .save()


# Join sales and customers tables
bigtable_info_df = sales_df.join(customers_df, on="customer_id", how="inner")


# Write joined table to BigQuery
bigtable_info_df.write.format("bigquery") \
   .option("temporaryGcsBucket", "temporary-files-dataproc") \
   .option("table",  "master_sales_data.bigtable_info") \
   .mode("overwrite") \
   .save()


# Stop the Spark session
spark.stop()

It can be observed that the generated code reads from each of the folders and inserts each data into its corresponding table.

Para poder asegurarnos de que el ejemplo está bien realizado, podemos seguir los pasos del README en el repositorio GitHub[8] para aplicar los cambios en el código terraform, subir los ficheros de ejemplo que tenemos en la carpeta example_data y a ejecutar un Batch en Dataproc. 

Finally, we check if the information stored in BigQuery is correct:

  • Table customer:
  • Tabla sales:
  • Final table:

This way, we have managed to have a fully operational functional process through natural language. There is another example that can be executed, although I also encourage creating more examples, or even improving the prompt, to incorporate more complex examples and also adapt it to your use case.

Conclusions and Recommendations

As the examples are very specific to particular technologies, any change in the prompt in any example can affect the results, or also modifying any word in the input request. This means that the prompt is not robust enough to assimilate different expressions without affecting the generated code. To have a productive prompt and system, more training and different variety of solutions, requests, expressions, etc., are needed. With all this, we will finally be able to have a first version to present to our business user so that they can be autonomous.

Specifying the maximum possible detail to an LLM is crucial for obtaining precise and contextual results. Here are several tips to keep in mind to achieve appropriate results:

  • Clarity and Conciseness:
    • Be clear and concise in your prompt, avoiding long and complicated sentences.
    • Clearly define the problem or task you want the model to address.
  • Specificity:
    • Provide specific details about what you are looking for. The more precise you are, the better results you will get.
  • Variability and Diversity:
    • Consider including different types of examples or cases to assess the model’s ability to handle variability.
  • Iterative Feedback:
    • If possible, iterate on your prompt based on the results obtained and the model’s feedback.
  • Testing and Adjustment:
    • Before using the prompt extensively, test it with examples and adjust as needed to achieve desired results.

Future Perspectives

In the field of LLMs, future lines of development focus on improving the efficiency and accessibility of language model implementation. Here are some key improvements that could significantly enhance user experience and system effectiveness:

1. Use of different LLM models:

The inclusion of a feature that allows users to compare the results generated by different models would be essential. This feature would provide users with valuable information about the relative performance of the available models, helping them select the most suitable model for their specific needs in terms of accuracy, speed, and required resources.

2. User feedback capability:

Implementing a feedback system that allows users to rate and provide feedback on the generated responses could be useful for continuously improving the model’s quality. This information could be used to adjust and refine the model over time, adapting to users’ changing preferences and needs.

3. RAG (Retrieval-augmented generation)

RAG (Retrieval-augmented generation) is an approach that combines text generation and information retrieval to enhance the responses of language models. It involves using retrieval mechanisms to obtain relevant information from a database or textual corpus, which is then integrated into the text generation process to improve the quality and coherence of the generated responses.

Links of Interest

Cloud Storage[1]: https://cloud.google.com/storage/docs

BigQuery[2]: https://cloud.google.com/bigquery/docs

Terraform[3]: https://developer.hashicorp.com/terraform/docs

PySpark[4]: https://spark.apache.org/docs/latest/api/python/index.html

Dataproc[5]: https://cloud.google.com/dataproc/docs

Codey[6]: https://cloud.google.com/vertex-ai/generative-ai/docs/model-reference/code-generation

VertexAI[7]: https://cloud.google.com/vertex-ai/docs

GitHub[8]: https://github.com/alfonsozamorac/etl-genai

Tabla de contenidos
  1. Introduction
  2. Before we begin
  3. What is an LLM?
  4. Development of the prompt
  5. Practical Cases

Publicado en: Blog, Practices, Tech

Container vulnerability scanning with Trivy

marzo 22, 2024 by Bluetab

Container vulnerability scanning
with Trivy

Ángel Maroco

AWS Cloud Architect

Within the framework of security in container, the build phase is of vital importance as we need to select the base image on which applications will run. Not having automatic mechanisms for vulnerability scanning can lead to production environments with insecure applications with the risks that involves.

In this article we will cover vulnerability scanning using Aqua Security’s Trivy solution, but before we begin, we need to explain what the basis is for these types of solutions for identifying vulnerabilities in Docker images.

Introduction to CVE (Common Vulnerabilities and Exposures)

CVE is a list of information maintained by MITRE Corporation which is aimed at centralising the records of known security vulnerabilities, where each reference has a CVE-ID number, description of the vulnerability, which versions of the software are affected, possible fix for the flaw (if any) or how to configure to mitigate the vulnerability and references to publications or posts in forums or blogs where the vulnerability has been made public or its exploitation is demonstrated.

The CVE-ID provides a standard naming convention for uniquely identifying a vulnerability. They are classified into 5 typologies, which we will look at in the Interpreting the analysis section. These types are assigned based on different metrics (if you are curious, see CVSS Calculator v3).

CVE has become the standard for vulnerability recording, so it is used by the great majority of technology companies and individuals.

There are various channels for keeping informed of all the news related to vulnerabilities: official blog, Twitter, cvelist on GitHub and LinkedIn.

If you want more detailed information about a vulnerability, you can also consult the NIST website, specifically the NVD (National Vulnerability Database).

We invite you to search for one of the following critical vulnerabilities. It is quite possible that they have affected you directly or indirectly. We should forewarn you that they have been among the most discussed data-src=

  • CVE-2017-5753
  • CVE-2017-5754

If you detect a vulnerability, we encourage you to register it using the form below.

Aqua Security – Trivy

Trivy is an open source tool focused on detecting vulnerabilities in OS-level packages and dependency files for various languages:

  • OS packages: (Alpine, Red Hat Universal Base Image, Red Hat Enterprise Linux, CentOS, Oracle Linux, Debian, Ubuntu, Amazon Linux, openSUSE Leap, SUSE Enterprise Linux, Photon OS and Distroless)

  • Application dependencies: (Bundler, Composer, Pipenv, Poetry, npm, yarn and Cargo)

Aqua Security, a company specialising in development of security solutions, acquired Trivy in 2019. Together with a substantial number of collaborators, they are responsible for developing and maintaining it.

Installation

Trivy has installers for most Linux and MacOS systems. For our tests, we will use the generic installer:

curl -sfL https://raw.githubusercontent.com/aquasecurity/trivy/master/contrib/install.sh | sudo sh -s -- -b /usr/local/bin 

If we do not want to persist the binary on our system, we have a Docker image:

docker run --rm -v /var/run/docker.sock:/var/run/docker.sock -v /tmp/trivycache:/root/.cache/ aquasec/trivy python:3.4-alpine 

Basic operations

  • Local images

Trivy has installers for most Linux and MacOS systems. For our tests, we will use the generic installer:

#!/bin/bash
docker build -t cloud-practice/alpine:latest -<<EOF
FROM alpine:latest
RUN echo "hello world"
EOF

trivy image cloud-practice/alpine:latest 
  • Remote images
#!/bin/bash
trivy image python:3.4-alpine 
  • Local projects:
    Enable you to analyse dependency files (outputs):
    • Pipfile.lock: Python
    • package-lock_react.json: React
    • Gemfile_rails.lock: Rails
    • Gemfile.lock: Ruby
    • Dockerfile: Docker
    • composer_laravel.lock: PHP Lavarel
    • Cargo.lock: Rust
#!/bin/bash
git clone https://github.com/knqyf263/trivy-ci-test
trivy fs trivy-ci-test 
  • Public repositories:
#!/bin/bash
trivy repo https://github.com/knqyf263/trivy-ci-test 
  • Private image repositories:
    • Amazon ECR (Elastic Container Registry)
    • Docker Hub
    • GCR (Google Container Registry)
    • Private repositories with BasicAuth
  • Cache database
    The vulnerability database is hosted on GitHub. To avoid downloading this database in each analysis operation, you can use the --cache-dir <dir> parameter:
#!/bin/bash trivy –cache-dir .cache/trivy image python:3.4-alpine3.9 
  • Filter by severity
#!/bin/bash
trivy image --severity HIGH,CRITICAL ruby:2.4.0 
  • Filter unfixed vulnerabilities
#!/bin/bash
trivy image --ignore-unfixed ruby:2.4.0 
  • Specify output code
    This option is very useful in the continuous integration process, as we can specify that your pipeline ends in error when vulnerabilities of the critical type are found, but medium and high types finish properly.
#!/bin/bash
trivy image --exit-code 0 --severity MEDIUM,HIGH ruby:2.4.0
trivy image --exit-code 1 --severity CRITICAL ruby:2.4.0 
  • Ignore specific vulnerabilities
    You can specify those CVEs you want to ignore by using the .trivyignore file. This can be useful if the image contains a vulnerability that does not affect your development.
#!/bin/bash
cat .trivyignore
# Accept the risk
CVE-2018-14618

# No impact in our settings
CVE-2019-1543 
  • Export output in JSON format:
    This option is useful if you want to automate a process before an output, display the results in a custom front end, or persist the output in a structured format.
#!/bin/bash
trivy image -f json -o results.json golang:1.12-alpine
cat results.json | jq 
  • Export output in SARIF format:
    There is a standard called SARIF (Static Analysis Results Interchange Format) that defines the format for outputs that any vulnerability analysis tool should have.
#!/bin/bash
wget https://raw.githubusercontent.com/aquasecurity/trivy/master/contrib/sarif.tpl
trivy image --format template --template "@sarif.tpl" -o report-golang.sarif  golang:1.12-alpine
cat report-golang.sarif   

VS Code has the sarif-viewer extension for viewing vulnerabilities.

Continuous integration processes

Trivy has templates for the leading CI/CD solutions:

  • GitHub Actions
  • Travis CI
  • CircleCI
  • GitLab CI
  • AWS CodePipeline
#!/bin/bash
$ cat .gitlab-ci.yml
stages:
  - test

trivy:
  stage: test
  image: docker:stable-git
  before_script:
    - docker build -t trivy-ci-test:${CI_COMMIT_REF_NAME} .
    - export VERSION=$(curl --silent "https://api.github.com/repos/aquasecurity/trivy/releases/latest" | grep '"tag_name":' | sed -E 's/.*"v([^"]+)".*/\1/')
    - wget https://github.com/aquasecurity/trivy/releases/download/v${VERSION}/trivy_${VERSION}_Linux-64bit.tar.gz
    - tar zxvf trivy_${VERSION}_Linux-64bit.tar.gz
  variables:
    DOCKER_DRIVER: overlay2
  allow_failure: true
  services:
    - docker:stable-dind
  script:
    - ./trivy --exit-code 0 --severity HIGH --no-progress --auto-refresh trivy-ci-test:${CI_COMMIT_REF_NAME}
    - ./trivy --exit-code 1 --severity CRITICAL --no-progress --auto-refresh trivy-ci-test:${CI_COMMIT_REF_NAME} 

Interpreting the analysis

#!/bin/bash
trivy image httpd:2.2-alpine
2020-10-24T09:46:43.186+0200    INFO    Need to update DB
2020-10-24T09:46:43.186+0200    INFO    Downloading DB...
18.63 MiB / 18.63 MiB [---------------------------------------------------------] 100.00% 8.78 MiB p/s 3s
2020-10-24T09:47:08.571+0200    INFO    Detecting Alpine vulnerabilities...
2020-10-24T09:47:08.573+0200    WARN    This OS version is no longer supported by the distribution: alpine 3.4.6
2020-10-24T09:47:08.573+0200    WARN    The vulnerability detection may be insufficient because security updates are not provided

httpd:2.2-alpine (alpine 3.4.6)
===============================
Total: 32 (UNKNOWN: 0, LOW: 0, MEDIUM: 15, HIGH: 14, CRITICAL: 3)

+-----------------------+------------------+----------+-------------------+------------------+--------------------------------+
|        LIBRARY        | VULNERABILITY ID | SEVERITY | INSTALLED VERSION |  FIXED VERSION   |             TITLE              |
+-----------------------+------------------+----------+-------------------+------------------+--------------------------------+
| libcrypto1.0          | CVE-2018-0732    | HIGH     | 1.0.2n-r0         | 1.0.2o-r1        | openssl: Malicious server can  |
|                       |                  |          |                   |                  | send large prime to client     |
|                       |                  |          |                   |                  | during DH(E) TLS...            |
+-----------------------+------------------+----------+-------------------+------------------+--------------------------------+
| postgresql-dev        | CVE-2018-1115    | CRITICAL | 9.5.10-r0         | 9.5.13-r0        | postgresql: Too-permissive     |
|                       |                  |          |                   |                  | access control list on         |
|                       |                  |          |                   |                  | function pg_logfile_rotate()   |
+-----------------------+------------------+----------+-------------------+------------------+--------------------------------+
| libssh2-1             | CVE-2019-17498   | LOW      | 1.8.0-2.1         |                  | libssh2: integer overflow in   |
|                       |                  |          |                   |                  | SSH_MSG_DISCONNECT logic in    |
|                       |                  |          |                   |                  | packet.c                       |
+-----------------------+------------------+----------+-------------------+------------------+--------------------------------+ 
  • Library: the library/package identifying the vulnerability.

  • Vulnerability ID: vulnerability identifier (according to CVE standard).

  • Severity: there is a classification with 5 typologies [source] which are assigned a CVSS (Common Vulnerability Scoring System) score:

    • Critical (CVSS Score 9.0-10.0): flaws that could be easily exploited by a remote unauthenticated attacker and lead to system compromise (arbitrary code execution) without requiring user interaction.

    • High (CVSS score 7.0-8.9): flaws that can easily compromise the confidentiality, integrity or availability of resources.

    • Medium (CVSS score 4.0-6.9): flaws that may be more difficult to exploit but could still lead to some compromise of the confidentiality, integrity or availability of resources under certain circumstances.

    • Low (CVSS score 0.1-3.9): all other issues that may have a security impact. These are the types of vulnerabilities that are believed to require unlikely circumstances to be able to be exploited, or which would give minimal consequences.

    • Unknown (CVSS score 0.0): allocated to vulnerabilities with no assigned score.

  • Installed version: the version installed in the system analysed.

  • Fixed version: the version in which the issue is fixed. If the version is not reported, this means the fix is pending.

  • Title: A short description of the vulnerability. For further information, see the NVD.

Now you know how to interpret at the analysis information at a high level. So, what actions should you take? We give you some pointers in the Recommendations section.

Recommendations

  • This section describes some of the most important aspects within the scope of vulnerabilities in containers:

    • Avoid (wherever possible) using images in which critical and high severity vulnerabilities have been identified.
    • Include image analysis in CI processes
      Security in development is not optional; automate your testing and do not rely on manual processes.
    • Use lightweight images, fewer exposures:
      Images of the Alpine / BusyBox type are built with as few packages as possible (the base image is 5 MB), resulting in reduced attack vectors. They support multiple architectures and are updated quite frequently.
REPOSITORY  TAG     IMAGE ID      CREATED      SIZE
alpine      latest  961769676411  4 weeks ago  5.58MB
ubuntu      latest  2ca708c1c9cc  2 days ago   64.2MB
debian      latest  c2c03a296d23  9 days ago   114MB
centos      latest  67fa590cfc1c  4 weeks ago  202MB 

If for a dependencies reason, you cannot customise an Alpine base image, look for slim-type images from trusted software vendors. Apart from the security component, people who share a network with you will appreciate not having to download 1 GB images.

  • Get images from official repositories: Using DockerHub is recommended, and preferably images from official publishers. DockerHub and CVEs

  • Keep images up to date: the following example shows an analysis of two different Apache versions:

    Image published in 11/2018

httpd:2.2-alpine (alpine 3.4.6)
 Total: 32 (UNKNOWN: 0, LOW: 0, MEDIUM: 15, **HIGH: 14, CRITICAL: 3**) 

Image published in 01/2020

httpd:alpine (alpine 3.12.1)
 Total: 0 (UNKNOWN: 0, LOW: 0, MEDIUM: 0, **HIGH: 0, CRITICAL: 0**) 

As you can see, if a development was completed in 2018 and no maintenance was performed, you could be exposing a relatively vulnerable Apache. This is not an issue resulting from the use of containers. However, because of the versatility Docker provides for testing new product versions, we now have no excuse.

  • Pay special attention to vulnerabilities affecting the application layer:
    According to the study conducted by the company edgescan, 19% of vulnerabilities detected in 2018 were associated with Layer 7 (OSI Model), with XSS (Cross-site Scripting) type attacks standing out above all.

  • Select latest images with special care:
    Although this advice is closely related to the use of lightweight images, we consider it worth inserting a note on latest images:

Latest Apache image (Alpine base 3.12)

httpd:alpine (alpine 3.12.1)
 Total: 0 (UNKNOWN: 0, LOW: 0, MEDIUM: 0, HIGH: 0, CRITICAL: 0) 

Latest Apache image (Debian base 10.6)

httpd:latest (debian 10.6)
 Total: 119 (UNKNOWN: 0, LOW: 87, MEDIUM: 10, HIGH: 22, CRITICAL: 0) 

We are using the same version of Apache (2.4.46) in both cases, the difference is in the number of critical vulnerabilities.
Does this mean that the Debian base 10 image makes the application running on that system vulnerable? It may or may not be. You need to assess whether the vulnerabilities could compromise your application. The recommendation is to use the Alpine image.

  • Evaluate the use of Docker distroless images
    The distroless concept is from Google and consists of Docker images based on Debian9/Debian10, without package managers, shells or utilities. The images are focused on programming languages (Java, Python, Golang, Node.js, dotnet and Rust), containing only what is required to run the applications. As they do not have package managers, you cannot install your own dependencies, which can be a big advantage or in other cases a big obstacle. Do testing and if it fits your project requirements, go ahead; it is always useful to have alternatives. Maintenance is Google’s responsibility, so the security aspect will be well-defined.

Container vulnerability scanner ecosystem

In our case we have used Trivy as it is a reliable, stable, open source tool that is being developed continually, but there are numerous tools for container analysis:
  • Clair
  • Snyk
  • Anchore Cloud
  • Docker Bench
  • Docker Scan
Do you want to know more about what we offer and to see other success stories?
DISCOVER BLUETAB
Ángel Maroco
AWS Cloud Architect

My name is Ángel Maroco and I have been working in the IT sector for over a decade. I started my career in web development and then moved on for a significant period to IT platforms in banking environments and have been working on designing solutions in AWS environments for the last 5 years.

I now combine my role as an architect with being head of /bluetab Cloud Practice, with the mission of fostering Cloud culture within the company.

SOLUTIONS, WE ARE EXPERTS

DATA STRATEGY
DATA FABRIC
AUGMENTED ANALYTICS

You may be interested in

MDM como ventaja competitiva en las organizaciones

junio 18, 2024
READ MORE

Empoderando a las decisiones en diversos sectores con árboles de decisión en AWS

junio 4, 2024
READ MORE

FinOps

mayo 20, 2024
READ MORE

Algunas de las capacidades de Matillion ETL en Google Cloud

julio 11, 2022
READ MORE

CDKTF: Otro paso en el viaje del DevOps, introducción y beneficios.

mayo 9, 2023
READ MORE

Bluetab se incorporará a IBM

julio 9, 2021
READ MORE

Publicado en: Blog, Practices, Tech

Análisis de vulnerabilidades en contenedores con trivy

marzo 22, 2024 by Bluetab

Análisis de vulnerabilidades en contenedores con trivy

Ángel Maroco

AWS Cloud Architect

Dentro del marco de la seguridad en contenedores, la fase de construcción adquiere vital importancia debido a que debemos seleccionar la imagen base sobre la que ejecutarán las aplicaciones. El no disponer de mecanismos automáticos para el análisis de vulnerabilidades puede desembocar en entornos productivos con aplicaciones inseguras con los riesgos que ello conlleva.

En este artículo cubriremos el análisis de vulnerabilidades a través de la solución Trivy de Aqua Security, pero antes de comenzar, es preciso explicar en qué se basan este tipo de soluciones para identificar vulnerabilidades en las imágenes docker.

Introducción a CVE (Common Vulnerabilities and Exposures)

CVE es una lista de información mantenida por MITRE Corporation cuyo objetivo es centralizar el registro de vulnerabilidades de seguridad conocidas, en la que cada referencia tiene un número de identificación CVE-ID, descripción de la vulnerabilidad, que versiones del software están afectadas, posible solución al fallo (si existe) o como configurar para mitigar la vulnerabilidad y referencias a publicaciones o entradas de foros o blog donde se ha hecho pública la vulnerabilidad o se demuestra su explotación.

El CVE-ID ofrece una nomenclatura estándar para identificar de forma inequívoca una vulnerabilidad. Se clasifican en 5 tipologías, las cuales veremos en la sección Interpretación del análisis. Dichas tipologías son asignadas basándose en diferentes métricas (si tenéis curiosidad, consultad CVSS v3 Calculator)

CVE se ha convertido en el estándar para el registro de vulnerabilidades, por lo que la amplia mayoría de empresas de tecnología y particulares hacen uso de la misma.

Disponemos de múltiples canales para estar informados de todas las novedades referentes a vulnerabilidades: blog oficial, twitter, repositorio cvelist en github o LinkedIn.

Adicionalmente, si queréis información más detallada sobre una vulnerabilidad, podéis consultar la web del NIST, en concreto la NVD (National Vulnerability Database)

Os invitamos a buscar alguna de las siguientes vulnerabilidades críticas, es muy posible que de forma directa o indirecta os haya podido afectar. Os adelantamos que han sido de las más sonadas 🙂

  • CVE-2017-5753
  • CVE-2017-5754

Si detectas una vulnerabilidad, te animamos a registrarla a través del siguiente formulario

Aqua Security – Trivy

Trivy es una herramienta open source enfocada en la detección de vulnerabilidades en paquetes a nivel OS y ficheros de dependencias de distintitos lenguajes:

  • OS packages; (Alpine, Red Hat Universal Base Image, Red Hat Enterprise Linux, CentOS, Oracle Linux, Debian, Ubuntu, Amazon Linux, openSUSE Leap, SUSE Enterprise Linux, Photon OS and Distroless)

  • Application dependencies: (Bundler, Composer, Pipenv, Poetry, npm, yarn and Cargo)

Aqua Security, empresa especializada en el desarrollo de soluciones de seguridad, adquirió trivy en 2019. Junto a un amplio número de colaboradores, son los encargados del desarrollo y mantenimiento de la misma.

Instalación

Trivy dispone de instaladores para la mayor parte de sistemas Linux and macOS. Para nuestras pruebas vamos a utilizar el instalador genérico:

curl -sfL https://raw.githubusercontent.com/aquasecurity/trivy/master/contrib/install.sh | sudo sh -s -- -b /usr/local/bin 

Si no queremos persistir el binario en nuestro sistema, disponemos de una imagen docker:

docker run --rm -v /var/run/docker.sock:/var/run/docker.sock -v /tmp/trivycache:/root/.cache/ aquasec/trivy python:3.4-alpine 

Operaciones básicas

  • Imágenes locales

Trivy dispone de instaladores para la mayor parte de sistemas Linux and macOS. Para nuestras pruebas vamos a utilizar el instalador genérico:

#!/bin/bash
docker build -t cloud-practice/alpine:latest -<<EOF
FROM alpine:latest
RUN echo "hello world"
EOF

trivy image cloud-practice/alpine:latest 
  • Imágenes remotas
#!/bin/bash
trivy image python:3.4-alpine 
  • Proyectos locales:
    Permite analizar ficheros de dependencias (salidas):
    • Pipfile.lock: Python
    • package-lock_react.json: React
    • Gemfile_rails.lock: Rails
    • Gemfile.lock: Ruby
    • Dockerfile: Docker
    • composer_laravel.lock: PHP Lavarel
    • Cargo.lock: Rust
#!/bin/bash
git clone https://github.com/knqyf263/trivy-ci-test
trivy fs trivy-ci-test 
  • Repositorios públicos:
#!/bin/bash
trivy repo https://github.com/knqyf263/trivy-ci-test 
  • Repositorios de imágenes privados:
    • Amazon ECR (Elastic Container Registry)
    • Docker Hub
    • GCR (Google Container Registry)
    • Repositorios privados con BasicAuth
  • Cache database
    La base de datos de vulnerabilidades se aloja en github. Para evitar descargar dicha base de datos en cada operación de análisis, podemos utilizar el parámetro --cache-dir <dir>:
#!/bin/bash trivy –cache-dir .cache/trivy image python:3.4-alpine3.9 
  • Filtrar por criticidad
#!/bin/bash
trivy image --severity HIGH,CRITICAL ruby:2.4.0 
  • Filtrar vulnerabiliades no resueltas
#!/bin/bash
trivy image --ignore-unfixed ruby:2.4.0 
  • Especificar código de salida
    Esta opción en muy util en el proceso de integración continua, ya que podemos especificar que nuestro pipeline finalice con error cuando se encuentre vulnerabilidad de tipo critical pero las tipo medium y high finalicen correctamente.
#!/bin/bash
trivy image --exit-code 0 --severity MEDIUM,HIGH ruby:2.4.0
trivy image --exit-code 1 --severity CRITICAL ruby:2.4.0 
  • Ignorar vulnerabilidades específicas
    A través del fichero .trivyignore, podemos especificar aquellas CVEs que nos interesa descartar. Puede resultar útil si la imagen contiene una vulnerabilidad que no afecta a nuestro desarrollo.
#!/bin/bash
cat .trivyignore
# Accept the risk
CVE-2018-14618

# No impact in our settings
CVE-2019-1543 
  • Exportar salida en formato JSON:
    Esta opción es interesante si quieres automatizar un proceso antes una salida, visualizar los resultados en un front personalizado o persistir la salida con un formato estructurado.
#!/bin/bash
trivy image -f json -o results.json golang:1.12-alpine
cat results.json | jq 
  • Exportar salida en formato SARIF:
    Existe un estandar llamado SARIF (Static Analysis Results Interchange Format) que define el formato que deben tener las salidas cualquier herramienta de análisis de vulnerabilidades.
#!/bin/bash
wget https://raw.githubusercontent.com/aquasecurity/trivy/master/contrib/sarif.tpl
trivy image --format template --template "@sarif.tpl" -o report-golang.sarif  golang:1.12-alpine
cat report-golang.sarif   

VS Code dispone de la extensión sarif-viewer para la visualización de vulnerabilidades.

Procesos de integración contínua

Trivy dispone de plantillas para las principales soluciones de CI/CD:

  • GitHub Actions
  • Travis CI
  • CircleCI
  • GitLab CI
  • AWS CodePipeline
#!/bin/bash
$ cat .gitlab-ci.yml
stages:
  - test

trivy:
  stage: test
  image: docker:stable-git
  before_script:
    - docker build -t trivy-ci-test:${CI_COMMIT_REF_NAME} .
    - export VERSION=$(curl --silent "https://api.github.com/repos/aquasecurity/trivy/releases/latest" | grep '"tag_name":' | sed -E 's/.*"v([^"]+)".*/\1/')
    - wget https://github.com/aquasecurity/trivy/releases/download/v${VERSION}/trivy_${VERSION}_Linux-64bit.tar.gz
    - tar zxvf trivy_${VERSION}_Linux-64bit.tar.gz
  variables:
    DOCKER_DRIVER: overlay2
  allow_failure: true
  services:
    - docker:stable-dind
  script:
    - ./trivy --exit-code 0 --severity HIGH --no-progress --auto-refresh trivy-ci-test:${CI_COMMIT_REF_NAME}
    - ./trivy --exit-code 1 --severity CRITICAL --no-progress --auto-refresh trivy-ci-test:${CI_COMMIT_REF_NAME} 

Interpretación del análisis

#!/bin/bash
trivy image httpd:2.2-alpine
2020-10-24T09:46:43.186+0200    INFO    Need to update DB
2020-10-24T09:46:43.186+0200    INFO    Downloading DB...
18.63 MiB / 18.63 MiB [---------------------------------------------------------] 100.00% 8.78 MiB p/s 3s
2020-10-24T09:47:08.571+0200    INFO    Detecting Alpine vulnerabilities...
2020-10-24T09:47:08.573+0200    WARN    This OS version is no longer supported by the distribution: alpine 3.4.6
2020-10-24T09:47:08.573+0200    WARN    The vulnerability detection may be insufficient because security updates are not provided

httpd:2.2-alpine (alpine 3.4.6)
===============================
Total: 32 (UNKNOWN: 0, LOW: 0, MEDIUM: 15, HIGH: 14, CRITICAL: 3)

+-----------------------+------------------+----------+-------------------+------------------+--------------------------------+
|        LIBRARY        | VULNERABILITY ID | SEVERITY | INSTALLED VERSION |  FIXED VERSION   |             TITLE              |
+-----------------------+------------------+----------+-------------------+------------------+--------------------------------+
| libcrypto1.0          | CVE-2018-0732    | HIGH     | 1.0.2n-r0         | 1.0.2o-r1        | openssl: Malicious server can  |
|                       |                  |          |                   |                  | send large prime to client     |
|                       |                  |          |                   |                  | during DH(E) TLS...            |
+-----------------------+------------------+----------+-------------------+------------------+--------------------------------+
| postgresql-dev        | CVE-2018-1115    | CRITICAL | 9.5.10-r0         | 9.5.13-r0        | postgresql: Too-permissive     |
|                       |                  |          |                   |                  | access control list on         |
|                       |                  |          |                   |                  | function pg_logfile_rotate()   |
+-----------------------+------------------+----------+-------------------+------------------+--------------------------------+
| libssh2-1             | CVE-2019-17498   | LOW      | 1.8.0-2.1         |                  | libssh2: integer overflow in   |
|                       |                  |          |                   |                  | SSH_MSG_DISCONNECT logic in    |
|                       |                  |          |                   |                  | packet.c                       |
+-----------------------+------------------+----------+-------------------+------------------+--------------------------------+ 
  • Library: librería/paquete donde se ha identificado la vulnerabilidad.

  • Vulnerability ID: Identificador de vulnerabilidad (según estandar CVE).

  • Severity: existe una clasificación con 5 tipologías [fuente] las cuales tienen asignado una puntuación CVSS (Common Vulnerability Scoring System):

    • Critical (puntuación CVSS 9.0-10.0): fallos que podría aprovechar fácilmente un atacante no autenticado y llegar a comprometer el sistema (ejecución de código arbitrario) sin interacción por parte del usuario.

    • High (puntuación CVSS 7.0-8.9): fallos que podrían comprometer fácilmente la confidencialidad, integridad o disponibilidad de los recursos.

    • Medium (puntuación CVSS 4.0-6.9): fallos que, aún siendo más difíciles de aprovechar, pueden seguir comprometiendo la confidencialidad, integridad o disponibilidad de los recursos en determinadas circunstancias.

    • Low (puntuación CVSS 0.1-3.9): resto de problemas que producen un impacto de seguridad. Son los tipos de vulnerabilidades de los que se considera que su aprovechamiento exige unas circunstancias poco probables o que tendría consecuencias mínimas.

    • Unknow (puntuación CVSS 0.0): se otorga a vulnerabilidades que no tienen asignada puntuación.

  • Installed version: versión instalada en el sistema analizado.

  • Fixed version: versión en la que se resuelve el problema. Si no se informa la versión quiere decir que está pendiente de resolución.

  • Title: Descripción corta de la vulnerabilidad. Para más información, consultar NVD.

Ya sabemos interpretar a alto nivel la información que nos muestra el análisis. Ahora bien, ¿qué acciones debería tomar? En la sección Recomendaciones te damos alguna pista.

Recomendaciones

  • En esta sección describimos algunos aspectos más importantes dentro del ámbito de vulnerabilidades en contenedores:

    • Evitar (en la medida de lo posible) hacer uso de imágenes donde se hayan identificado vulnerabilidades critical y high

    • Incluir el análisis de imágenes en procesos de CI
      La seguridad en tu desarrollo no es opcional, automatiza tus pruebas y no dependas de procesos manuales.

    • Utilizar imágenes ligeras, menos exposiciones:
      Las imágenes tipo Alpine / BusyBox están construidas con el menor número de paquetes posible (la imagen base pesa 5MB), lo que se traduce en una reducción de vectores de ataque. Soportan múltiples arquitecturas y se actualizan con bastante frecuencia.
REPOSITORY  TAG     IMAGE ID      CREATED      SIZE
alpine      latest  961769676411  4 weeks ago  5.58MB
ubuntu      latest  2ca708c1c9cc  2 days ago   64.2MB
debian      latest  c2c03a296d23  9 days ago   114MB
centos      latest  67fa590cfc1c  4 weeks ago  202MB 
Si por algún motivo de dependencias no podéis customizar una imagen base de alpine, buscad imágenes tipo slim de proveedores de software confiables. Además del componente de seguridad, las personas que compartan red contigo lo agradecerán al no tener que bajar imágenes de 1GB
  • Obtener imágenes de repositorios oficiales: Lo recomendable es utilizar DockerHub y preferentemente imágenes de publishers oficiales. DockerHub y CVEs

  • Mantener actualizadas las imágenes En el siguiente ejemplo vemos un análisis sobre dos versiones diferentes de apache:

    Imagen publicada el 11/2018

httpd:2.2-alpine (alpine 3.4.6)
 Total: 32 (UNKNOWN: 0, LOW: 0, MEDIUM: 15, **HIGH: 14, CRITICAL: 3**) 

Imagen publicada el 01/2020

httpd:alpine (alpine 3.12.1)
 Total: 0 (UNKNOWN: 0, LOW: 0, MEDIUM: 0, **HIGH: 0, CRITICAL: 0**) 

Como podéis observar, si un desarrollo finalizó en 2018 y no se realizan tareas de mantenimiento, podría estar exponiendo un apache relativamente vulnerable. No es un problema derivado del uso de contenedores, pero debido a la versatilidad que nos proporciona docker para testar nuevas versiones de productos, ahora no tenemos excusa.

  • Especial atención a vulnerabilidades que afecten a la capa de aplicación:
    Según el estudio realizado por la compañía edgescan, el 19% de las vulnerabilidades detectadas en 2018 corresponden a capa 7 (Modelo OSI), destacando por encima de todos ataques de tipo XSS (Cross-site Scripting).

  • Seleccionar imágenes latest con especial cuidado:
    Aunque este consejo está muy relacionado con el uso de imágenes ligeras, consideramos hacer un inciso sobre las imágenes latest:

Imagen latest Apache (base alpine 3.12)

httpd:alpine (alpine 3.12.1)
 Total: 0 (UNKNOWN: 0, LOW: 0, MEDIUM: 0, HIGH: 0, CRITICAL: 0) 

Imagen latest Apache (base debian 10.6)

httpd:latest (debian 10.6)
 Total: 119 (UNKNOWN: 0, LOW: 87, MEDIUM: 10, HIGH: 22, CRITICAL: 0) 

En ambos casos estamos utilizando la misma versión de apache (2.4.46), la diferencia está en el número de vulnerabilidades críticas.
¿Quiere decir que la imagen basada en debian 10 convierte en vulnerable la aplicación que ejecuta en ese sistema? Puede que si o puede que no, hay que evaluar si las vulnerabilidades pueden comprometer nuestra aplicación. La recomendación es utilizar la imagen de alpine.

  • Evaluar el uso de imágenes docker distroless
    El concepto distroless es de Google y consiste en imágenes docker basadas en debian9/debian10, sin gestores de paquetes, shells ni utilidades. Las imágenes están enfocadas a lenguajes de programación (Java, Python, Golang, Node.js, dotnet y Rust), contiene exclusivamente lo necesario para ejecutar las aplicaciones. Al no disponer de gestores de paquetes, no puedes instalar tus propias dependencias, lo que se puede traducir en una gran ventaja y en otros casos, un gran obstáculo. Realizad pruebas y si encaja con los requisitos de vuestro proyecto, adelante, siempre es beneficioso disponer de alternativas. El mantenimiento corre a cuenta de Google, así que el aspecto de seguridad estará bien acotado.

Ecosistema de analizadores de vulnerabilidades para contenedores

En nuestro caso hemos utilizado trivy ya que se trata de una herramienta open source, fiable, estable y en continua evolución, pero disponemos de multitud de herramientas para el análisis de contenedores:
  • Clair
  • Snyk
  • Anchore Cloud
  • Docker Bench
  • Docker Scan
¿Quieres saber más de lo que ofrecemos y ver otros casos de éxito?
DESCUBRE BLUETAB
Ángel Maroco
AWS Cloud Architect

Ángel Maroco llevo en el sector IT más de una década, iniciando mi carrera profesional con el desarrollo web, pasando una buena etapa en distintas plataformas informacionales en entornos bancarios y los últimos 5 años dedicado al diseño de soluciones en entornos AWS.

En la actualidad, compagino mi papel de arquitecto junto al de responsable de la Pŕactica Cloud /bluetab, cuya misión es impulsar la cultura Cloud dentro de la compañía.

SOLUCIONES, SOMOS EXPERTOS

DATA STRATEGY
DATA FABRIC
AUGMENTED ANALYTICS

Te puede interesar

Databricks sobre Azure – Una perspectiva de Arquitectura (parte 2)

marzo 24, 2022
LEER MÁS

LA BANCA Y LA ERA DEL OPEN DATA

abril 19, 2023
LEER MÁS

Usando los Grandes Modelos de Lenguaje en información privada

marzo 11, 2024
LEER MÁS

El futuro del Cloud y GenIA en el Next ’23

septiembre 19, 2023
LEER MÁS

Gobierno de Datos: ¿tendencia o necesidad?

octubre 13, 2022
LEER MÁS

¿Cuánto vale tu cliente?

octubre 1, 2020
LEER MÁS

Publicado en: Blog, Practices, Tech

Usando los Grandes Modelos de Lenguaje en información privada

marzo 11, 2024 by Bluetab

Roger Pou Lopez
Data Scientist

Un RAG, acrónimo de «Retrieval Augmented Generation», representa una estrategia innovadora dentro del procesamiento de lenguaje natural. Se integra con los Grandes Modelos de Lenguaje (LLM, por sus siglas en inglés), tales como los que usa ChatGPT internamente (GPT-3.5-turbo o GPT-4), con el objetivo de mejorar la calidad de la respuesta y reducir ciertos comportamientos no deseados, como las alucinaciones.
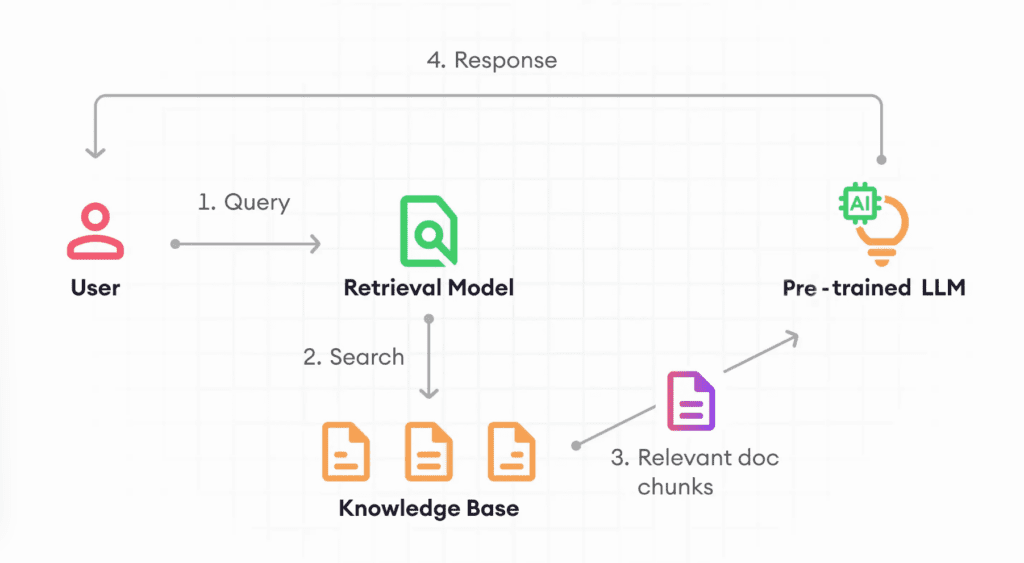
https://www.superannotate.com/blog/rag-explained

Estos sistemas combinan los conceptos de vectorización y búsqueda semántica, junto con los LLMs para retroalimentar su conocimiento con información externa que no se incluyó durante su fase de entrenamiento y que, por lo tanto, desconocen.

Existen ciertos puntos a favor de utilizar RAGs:

  • Permiten reducir el nivel de alucinaciones que presentan los modelos. A menudo, los LLM responden con información incorrecta (o inventada), aunque semánticamente su respuesta tenga sentido. A esto se le denomina alucinación. Uno de los objetivos principales del RAG es intentar reducir al máximo este tipo de situaciones, especialmente cuando se pregunta por cosas concretas. Esto es de alta utilidad si se quiere utilizar un LLM de forma productiva.
  • Utilizando un RAG, ya no es necesario reentrenar el LLM. Este proceso puede llegar a ser costoso económicamente, dado que necesitaría GPUs para su entrenamiento, además de la complejidad que puede conllevar ese entrenamiento.
  • Son sistemas económicos, rápidos (utilizan información indexada) y además, no dependen del modelo que se está utilizando (en cualquier momento podemos cambiarlo por de GPT-3.5 a Llama-2-70B).

En contra:

  • Se va a necesitar ayuda de código, matemáticas y no va a ser tan sencillo como lanzar un simple prompt modificado.
  • En la evaluación de los RAGs (veremos más adelante en el artículo) vamos a necesitar modelos potentes como GPT-4.

Ejemplo de caso de uso

Existen varios ejemplos donde los RAGs están siendo utilizados. El ejemplo más típico es su uso con chatbots para consultar información muy específica del negocio.

  • En call-centers, los agentes están empezando a utilizar un chatbot con información sobre tarifas para poder responder de forma rápida y eficaz a las llamadas que reciben.
  • En chatbots, como asistentes de venta donde están ganando popularidad. Aquí, los RAGs ayudan a responder a comparativas entre productos o cuando se consulta de manera específica sobre un servicio, haciendo recomendaciones de productos similares.

Componentes de un RAG
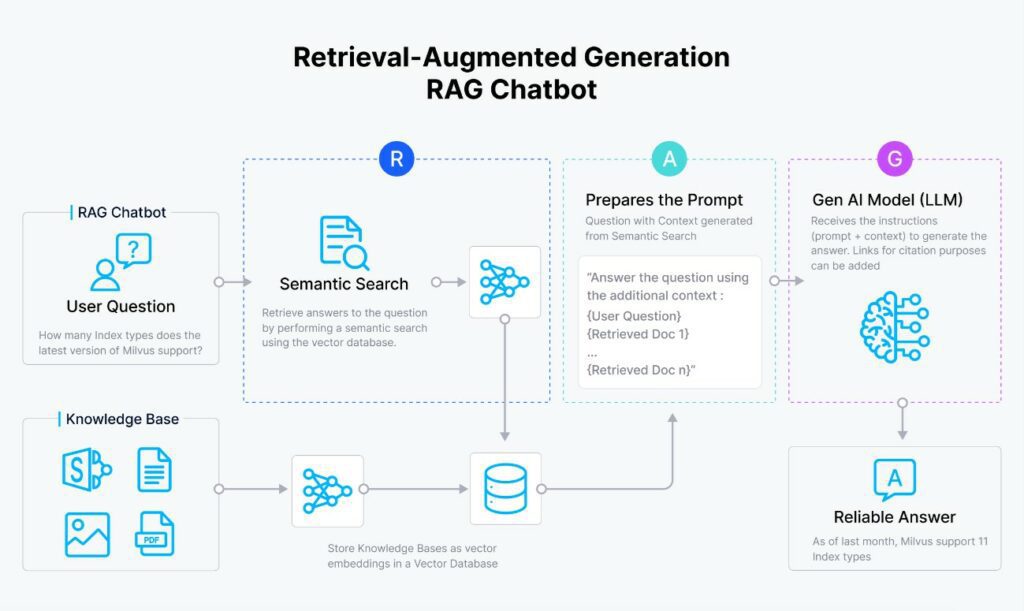
https://zilliz.com/learn/Retrieval-Augmented-Generation

Vamos a hablar en detalle sobre los distintos componentes que conforman un RAG para poder tener una idea aproximada, y luego vamos a hablar de cómo interaccionan entre sí estos elementos.

Base de conocimiento

Este elemento es un concepto un poco abierto pero también lógico: se refiere al conocimiento objetivo del cual sabemos que el LLM no es consciente y que tiene un alto riesgo de alucinación. Este conocimiento, en formato de texto, puede estar en muchos formatos: PDF, Excel, Word, etc… Los RAGs avanzados son capaces también de detectar conocimientos en imágenes y tablas.

En general, todo contenido va a ser en formato de texto y va a necesitar ser indexado. Como los textos humanos son muchas veces desestructurados, se recurre a la subdivisión de los textos con estrategias llamadas chunking.

Modelo de Embeddings

Un embedding es la representación vectorial generada por una red neuronal entrenada sobre un cuerpo de datos (texto, imágenes, sonido, etc.) que es capaz de resumir la información de un objeto de ese mismo tipo hacia un vector dentro de un espacio vectorial concreto.

Por ejemplo, en el caso de un texto que se refiere a “Me gustan los patitos de goma azules” y otro que dice “Adoro los patitos de goma amarillos”, al ser convertidos en vectores, estos estarán más próximos en distancia entre sí que un texto que se refiere a “Los automóviles del futuro son los coches eléctricos”.

Este componente es el que, posteriormente, nos permitirá indexar de forma correcta los distintos chunks de información de texto.

Base de datos vectorial

Es el lugar donde vamos a guardar y indexar la información vectorial de los chunks mediante los embeddings. Se trata de un componente muy importante y complejo donde, afortunadamente, ya existen varias soluciones open source muy válidas para poder desplegarlo de forma «fácil», como Milvus o Chroma.

LLM

Es lógico, puesto que el RAG es una solución que nos permite ayudar a responder de forma más veraz a estos LLMs. No tenemos por qué restringirnos a modelos muy grandes y eficientes (pero no económicos como GPT-4), sino que pueden ser modelos más pequeños y más «sencillos» en cuanto a la calidad de respuestas y número de parámetros.

A continuación podemos ver una imagen representativa del proceso de carga de información en la base de datos vectoriales.
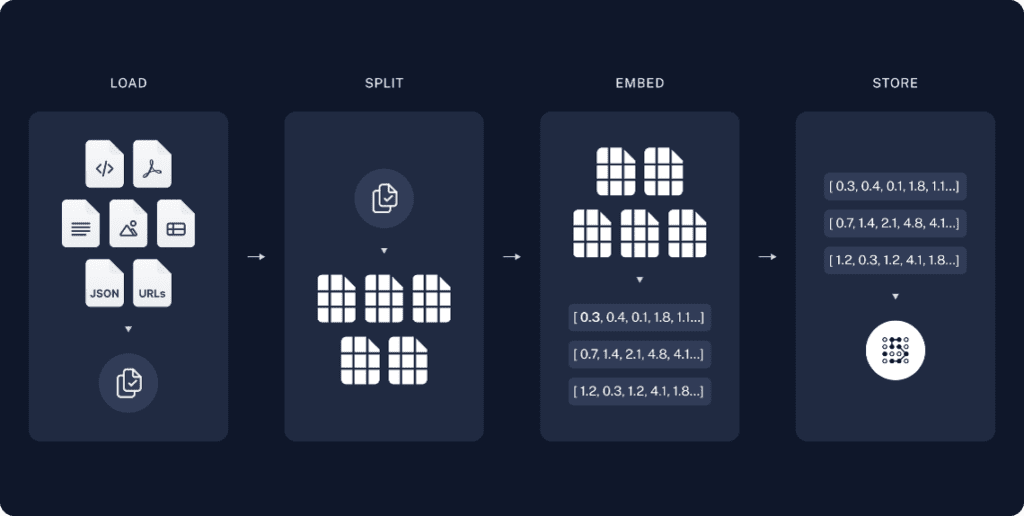
https://python.langchain.com/docs/use_cases/question_answering/

Funcionamiento a Alto Nivel

Ahora que tenemos un poco más claras las piezas del rompecabezas, surgen algunas dudas:

  • ¿Cómo interactúan estos componentes entre sí?
  • ¿Por qué hace falta una base de datos vectorial?

Vamos a intentar esclarecer un poco el asunto.
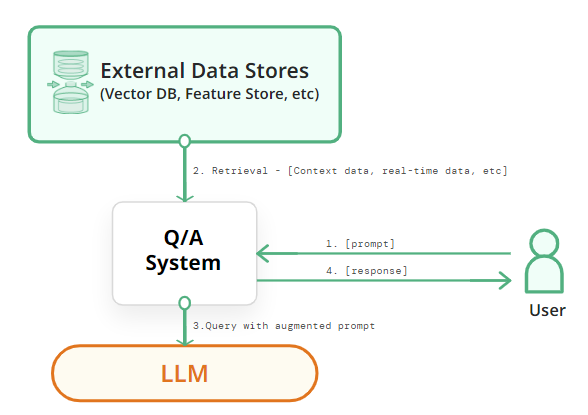
https://www.hopsworks.ai/dictionary/retrieval-augmented-generation-llm

La idea intuitiva del funcionamiento de un RAG es la siguiente:

  1. El usuario hace una pregunta. Transformamos la pregunta a un vector con el mismo sistema de embedding que hemos utilizado para guardar los chunks. Esto nos va a permitir comparar nuestra pregunta con toda la información que tenemos indexada en nuestra base de datos vectorial.
  2. Calculamos las distancias entre la pregunta y todos los vectores que tenemos en la base de datos. Seleccionamos, con una estrategia, algunos de los chunks y añadimos todas esas piezas de información dentro del prompt como contexto. La estrategia más sencilla es basarse en seleccionar un número (K) de vectores más próximos a la pregunta.
  3. Se lo pasamos al LLM para que genere la respuesta en base a los contextos. Es decir, el prompt contiene instrucciones + pregunta + contexto devuelto por el sistema de Retrieval. Por este motivo, la parte de «Augmentation» en las siglas del RAG, dado que estamos haciendo prompt augmentation.
  4. El LLM nos ha generado una respuesta en base a la pregunta que hacemos y el contexto que le hemos pasado. Esta será la respuesta que el usuario va a visualizar.

Es por eso que necesitamos un embedding y la base de datos vectorial. Ahí está un poco el truco. Si eres capaz de encontrar información muy parecida a tu pregunta en tu base de datos vectorial, entonces puedes detectar contenido que puede ser de utilidad para tu pregunta. Pero para todo ello, necesitamos un elemento que nos permita poder comparar textos de forma objetiva y esa información no podemos tenerla guardada de forma desestructurada si necesitamos hacer preguntas de forma frecuente.

También, que al final todo esto termina en el prompt, que nos permite que sea un flujo independiente del modelo de LLM que vayamos a usar.

Evaluación de los RAG

De igual manera que los modelos de estadística o ciencias de datos más clásicos, tenemos una necesidad de cuantificar cómo está funcionando un modelo antes de utilizarlo de manera productiva.

La estrategia más básica (por ejemplo, para medir la efectividad de una regresión lineal) consiste en dividir el conjunto de datos en distintas partes como train y test (80 y 20% respectivamente), entrenando el modelo en train y evaluando en test con métricas como el root-mean-square error, dado que el conjunto de test son datos que no ha visto el modelo. Sin embargo, un RAG no consta de entrenamiento sino de un sistema compuesto de distintos elementos donde una de sus partes es usar un modelo de generación de texto.

Más allá de esto, aquí ya no tenemos datos cuantitativos (es decir, números) y la naturaleza del dato consiste en texto generado que puede variar en función de la pregunta que le hagamos, el contexto detectado por el sistema de Retrieval y incluso el comportamiento no determinista que tienen los modelos de redes neuronales.

Una estrategia básica que podemos pensar es en ir analizando a mano qué tan bueno está funcionando nuestro sistema, en base a hacer preguntas y ver cómo están funcionando las respuestas y los contextos devueltos. Pero este enfoque se vuelve impracticable cuando queremos evaluar todas las posibilidades de preguntas en documentos muy grandes y de forma recurrente.

¿Entonces, cómo podemos hacer esta evaluación?

El truco: Aprovechando los propios LLMs. Con ellos podemos construir un conjunto de datos sintético con el que se haya simulado la misma acción de hacer preguntas a nuestro sistema, tal como si un humano lo hubiera hecho. Incluso le podemos añadir un nivel de fineza mayor: utilizar un modelo más inteligente que el anterior y que funcione como un crítico, que nos indique si lo que está sucediendo tiene sentido o no.

Ejemplo de conjunto de datos de evaluación

https://docs.ragas.io/en/stable/getstarted/evaluation.html

Aquí lo que tenemos son muestras de Pregunta-Respuesta de cómo hubiera funcionado nuestro sistema de RAG simulando las preguntas que le podría hacer un humano en comparativa al modelo que estamos evaluando. Para hacer esto, necesitamos dos modelos: el LLM que utilizaríamos en nuestro RAG, por ejemplo, GPT-3.5-turbo (Answer) y otro modelo con mejor funcionamiento para generar una “verdad” (Ground Truth), como GPT-4.

Es decir, en otras palabras, el ChatGPT 3.5 sería el sistema generador de preguntas y el ChatGPT 4 sería como la parte crítica.

Una vez generado nuestro conjunto de datos de evaluación, lo que nos queda es cuantificar numéricamente con algún tipo de métrica.

Métricas de Evaluación

La evaluación de las respuestas es algo nuevo pero ya existen proyectos de código abierto que logran cuantificar de forma efectiva la calidad de los RAGs. Estos sistemas de evaluación permiten medir la parte de «Retrieval» y «Generation» por separado.
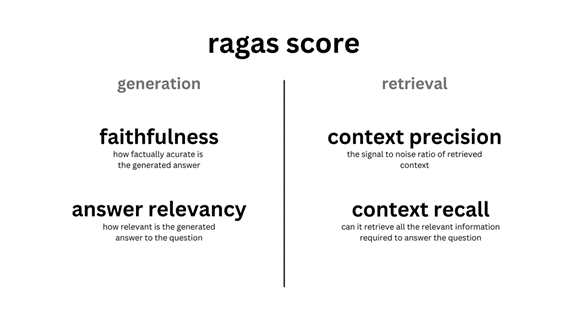
https://docs.ragas.io/en/stable/concepts/metrics/index.html

Faitfulness Score

Mide la veracidad de nuestras respuestas dado un contexto. Es decir, con qué porcentaje lo que se pregunta es verdad en función del contexto conseguido a través de nuestro sistema.  Esta métrica sirve para intentar controlar las alucinaciones que pueden tener los LLMs. Un valor muy bajo en esta métrica implicaría que el modelo se está inventando cosas, aunque se le dé un contexto. Por lo tanto, es una métrica que debe estar lo más cercano a uno.

Answer Relevancy Score

Cuantifica la relevancia de la respuesta en base a la pregunta que se le hace a nuestro sistema. Si la respuesta no es relevante a lo que le preguntamos, no nos está respondiendo adecuadamente. Por lo tanto cuanto más alta sea esta métrica, mejor.

Context Precision Score

Evalua si todos los elementos de nuestros ground-truth ítems dentro de los contextos, son rankeados de forma prioritaria o no.

Context Recall Score

Cuantifica si el contexto devuelto se alinea con la respuesta anotada. En otras palabras, cómo de relevante es el contexto respecto a la pregunta que hacemos. Una valor bajo indicaría que el contexto devuelto es poco relevante y no nos ayuda a responder la pregunta.
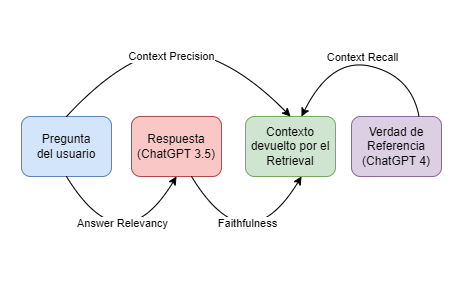
El cómo todas estas métricas se están evaluando es un poco más complejo pero podemos encontrar ejemplos bien explicados en la documentación de RAGAS.

Ejemplo práctico utilizando LangChain, OpenAI y ChromaDB

Vamos a utilizar el framework de LangChain que nos permite construir un RAG de forma muy fácil.

El dataset que vamos a utilizar es un ensayo de Paul Graham, un dataset típico y pequeño en cuanto a tamaño.

La base de datos vectorial que vamos a utilizar va a ser Chroma, open-source y con plena integración con LangChain. El uso de esta va a ser completamente transparente, utilizando los parámetros por defecto.

NOTA: Cada llamada a un modelo asociado, tiene un coste monetario y conviene revisar el pricing de OpenAI. Nosotros vamos a trabajar con un dataset pequeño de 10 preguntas pero si se escalase, el coste podría incrementarse.

import os
from dotenv import load_dotenv  

load_dotenv() # Configurar OpenAI API Key

from langchain_community.document_loaders import TextLoader
from langchain.text_splitter import RecursiveCharacterTextSplitter
from langchain_openai import OpenAIEmbeddings
from langchain_community.vectorstores import Chroma
from langchain.prompts import ChatPromptTemplate

embeddings = OpenAIEmbeddings(
    model="text-embedding-ada-002"
)

text_splitter = RecursiveCharacterTextSplitter(
    chunk_size = 700,
    chunk_overlap = 50
)

loader = TextLoader('paul_graham/paul_graham_essay.txt')
text = loader.load()
documents = text_splitter.split_documents(text)
print(f'Número de chunks generados gracias al documento: {len(documents)}')

vector_store = Chroma.from_documents(documents, embeddings)
retriever = vector_store.as_retriever()
Número de chunks generados gracias al documento: 158

Dado que el texto del libro está en inglés, debemos de hacer nuestro template de prompt esté en inglés.

from langchain.prompts import ChatPromptTemplate

template = """Answer the question based only on the following context. If you cannot answer the question with the context, please respond with 'I don't know':

Context:
{context}

Question:
{question}
"""

prompt = ChatPromptTemplate.from_template(template)

Ahora vamos a definir nuestro RAG mediante LCEL. El modelo a utilizar que responderá a las preguntas de nuestro RAG va a ser GPT-3.5-turbo.  Importante es que el parámetro de la temperatura esté a 0 para que el modelo no sea creativo.

from operator import itemgetter

from langchain_openai import ChatOpenAI
from langchain_core.output_parsers import StrOutputParser
from langchain_core.runnables import RunnablePassthrough 

primary_qa_llm = ChatOpenAI(model_name="gpt-3.5-turbo", temperature=0)

retrieval_augmented_qa_chain = (
    {"context": itemgetter("question") | retriever, "question": itemgetter("question")}
    | RunnablePassthrough.assign(context=itemgetter("context"))
    | {"response": prompt | primary_qa_llm, "context": itemgetter("context")}
)

.. y ahora es posible hacerle ya preguntas a nuestro sistema RAG.

question = "What was doing the author before collegue? "

result = retrieval_augmented_qa_chain.invoke({"question" : question}) 

print(f' Answer the question based: {result["response"].content}')
Answer the question based: The author was working on writing and programming before college.

También podemos investigar cuales han sido los contextos devueltos por nuestro retriever. Como hemos mencionado, la estrategia de Retrieval es la por defecto y nos devolverá los top 4 contextos para responder a una pregunta.

display(retriever.get_relevant_documents(question))
[Document(page_content="What I Worked On\n\nFebruary 2021\n\nBefore college the two main things I worked on, outside of school, were writing and programming. I didn't write essays. I wrote what beginning writers were supposed to write then, and probably still are: short stories. My stories were awful. They had hardly any plot, just characters with strong feelings, which I imagined made them deep.", metadata={'source': 'paul_graham/paul_graham_essay.txt'}),
 Document(page_content="Over the next several years I wrote lots of essays about all kinds of different topics. O'Reilly reprinted a collection of them as a book, called Hackers & Painters after one of the essays in it. I also worked on spam filters, and did some more painting. I used to have dinners for a group of friends every thursday night, which taught me how to cook for groups. And I bought another building in Cambridge, a former candy factory (and later, twas said, porn studio), to use as an office.", metadata={'source': 'paul_graham/paul_graham_essay.txt'}),
 Document(page_content="In the print era, the channel for publishing essays had been vanishingly small. Except for a few officially anointed thinkers who went to the right parties in New York, the only people allowed to publish essays were specialists writing about their specialties. There were so many essays that had never been written, because there had been no way to publish them. Now they could be, and I was going to write them. [12]\n\nI've worked on several different things, but to the extent there was a turning point where I figured out what to work on, it was when I started publishing essays online. From then on I knew that whatever else I did, I'd always write essays too.", metadata={'source': 'paul_graham/paul_graham_essay.txt'}),
 Document(page_content="Wow, I thought, there's an audience. If I write something and put it on the web, anyone can read it. That may seem obvious now, but it was surprising then. In the print era there was a narrow channel to readers, guarded by fierce monsters known as editors. The only way to get an audience for anything you wrote was to get it published as a book, or in a newspaper or magazine. Now anyone could publish anything.", metadata={'source': 'paul_graham/paul_graham_essay.txt'})]

Evaluando nuestro RAG

Ahora que ya tenemos nuestro RAG montado gracias a LangChain, nos falta evaluarlo. 

Parece que tanto LangChain como LlamaIndex empiezan a tener maneras de evaluar de forma fácil los RAGs sin moverse del framework. Sin embargo, por ahora, la mejor opción es utilizar RAGAS, una librería que ya habíamos mencionado y está específicamente diseñada con ese propósito. Internamente, va a utilizar GPT-4 como modelo crítico, tal y como hemos mencionado anteriormente.

from ragas.testset.generator import TestsetGenerator
from ragas.testset.evolutions import simple, reasoning, multi_context
text = loader.load()
text_splitter = RecursiveCharacterTextSplitter(
    chunk_size = 1000,
    chunk_overlap = 200
)
documents = text_splitter.split_documents(text)

generator = TestsetGenerator.with_openai()
testset = generator.generate_with_langchain_docs(
    documents, 
    test_size=10, 
    distributions={simple: 0.5, reasoning: 0.25, multi_context: 0.25}
)
test_df = testset.to_pandas()
display(test_df)
question contexts ground_truth evolution_type episode_done
0 What is the batch model and how does it relate… [The most distinctive thing about YC is the ba… The batch model is a method used by YC (Y Comb… simple True
1 How did the use of Scheme in the new version o… [In the summer of 2006, Robert and I started w… The use of Scheme in the new version of Arc co… simple True
2 How did learning Lisp expand the author’s conc… [There weren’t any classes in AI at Cornell th… Learning Lisp expanded the author’s concept of… simple True
3 How did Moore’s Law contribute to the downfall… [[4] You can of course paint people like still… Moore’s Law contributed to the downfall of com… simple True
4 Why did the creators of Viaweb choose to make … [There were a lot of startups making ecommerce… The creators of Viaweb chose to make their eco… simple True
5 During the author’s first year of grad school … [I applied to 3 grad schools: MIT and Yale, wh… reasoning True
6 What suggestion from a grad student led to the… [McCarthy didn’t realize this Lisp could even … reasoning True
7 What makes paintings more realistic than photos? [life interesting is that it’s been through a … By subtly emphasizing visual cues, paintings c… multi_context True
8 «What led Jessica to compile a book of intervi… [Jessica was in charge of marketing at a Bosto… Jessica’s realization of the differences betwe… multi_context True
9 Why did the founders of Viaweb set their price… [There were a lot of startups making ecommerce… The founders of Viaweb set their prices low fo… simple True
test_questions = test_df["question"].values.tolist()
test_groundtruths = test_df["ground_truth"].values.tolist()
answers = []
contexts = []
for question in test_questions:
  response = retrieval_augmented_qa_chain.invoke({"question" : question})
  answers.append(response["response"].content)
  contexts.append([context.page_content for context in response["context"]])

from datasets import Dataset # HuggingFace
response_dataset = Dataset.from_dict({
    "question" : test_questions,
    "answer" : answers,
    "contexts" : contexts,
    "ground_truth" : test_groundtruths
})
from ragas import evaluate
from ragas.metrics import (
    faithfulness,
    answer_relevancy,
    context_recall,
    context_precision,
)

metrics = [
    faithfulness,
    answer_relevancy,
    context_recall,
    context_precision,
]

results = evaluate(response_dataset, metrics)
results_df = results.to_pandas().dropna()
question answer contexts ground_truth faithfulness answer_relevancy context_recall context_precision
0 What is the batch model and how does it relate… The batch model is a system where YC funds a g… [The most distinctive thing about YC is the ba… The batch model is a method used by YC (Y Comb… 0.750000 0.913156 1.0 1.000000
1 How did the use of Scheme in the new version o… The use of Scheme in the new version of Arc co… [In the summer of 2006, Robert and I started w… The use of Scheme in the new version of Arc co… 1.000000 0.910643 1.0 1.000000
2 How did learning Lisp expand the author’s conc… Learning Lisp expanded the author’s concept of… [So I looked around to see what I could salvag… Learning Lisp expanded the author’s concept of… 1.000000 0.924637 1.0 1.000000
3 How did Moore’s Law contribute to the downfall… Moore’s Law contributed to the downfall of com… [[5] Interleaf was one of many companies that … Moore’s Law contributed to the downfall of com… 1.000000 0.940682 1.0 1.000000
4 Why did the creators of Viaweb choose to make … The creators of Viaweb chose to make their eco… [There were a lot of startups making ecommerce… The creators of Viaweb chose to make their eco… 0.666667 0.960447 1.0 0.833333
5 What suggestion from a grad student led to the… The suggestion from grad student Steve Russell… [McCarthy didn’t realize this Lisp could even … The suggestion from a grad student, Steve Russ… 1.000000 0.931730 1.0 0.916667
6 What makes paintings more realistic than photos? By subtly emphasizing visual cues such as the … [copy pixel by pixel from what you’re seeing. … By subtly emphasizing visual cues, paintings c… 1.000000 0.963414 1.0 1.000000
7 «What led Jessica to compile a book of intervi… Jessica was surprised by how different reality… [Jessica was in charge of marketing at a Bosto… Jessica’s realization of the differences betwe… 1.000000 0.954422 1.0 1.000000
8 Why did the founders of Viaweb set their price… The founders of Viaweb set their prices low fo… [There were a lot of startups making ecommerce… The founders of Viaweb set their prices low fo… 1.000000 1.000000 1.0 1.000000

Visualizamos las distribuciones estadísticas que salen:

results_df.plot.hist(subplots=True,bins=20)

Podemos observar que el sistema no es perfecto aunque hemos generado solamente 10 preguntas (haría falta generar muchas más) y también se puede observar que en una de ellas, la pipeline del RAG ha fallado en crear el ground truth.

Aun así podríamos sacar algunas conclusiones:

  • algunas veces no es capaz de dar respuestas muy veraces (faithfulness)
  • la relevancia de la respuesta es variable pero consistentmente buena (answer_relevancy)
  • el context recall es perfecto pero el context precision ya no tanto

Ahora aquí nos podemos plantear probar con distintos elementos:

  • cambiar el embedding utilizado por uno que podemos encontrar en HuggingFace MTEB Leaderboard.
  • mejorar el sistema de retrieval con estrategias diferentes a la por defecto
  • evaluar con otros LLMs

Con estas posibilidades, es viable analizar cada una de esas estrategias anteriores y escoger la que mejor se ajuste a nuestros datos o criterios monetarios.

Conclusiones

En este artículos hemos visto en qué consiste un RAG y cómo podemos evaluar un workflow completo. Todo esta materia está en auge ahora mismo dado que es una de las alternativas más eficaces y económicas para evitar el fine-tuning de los LLMs. 

Es posible que se encuentren nuevas métricas, nuevos frameworks, que hagan la evaluación de estos más sencilla y eficaz; pero en los próximos artículos no solo vamos a poder ver su evolución, sino también cómo llevar a production una arquitectura basada en RAGs.

Tabla de contenidos
  1. Componentes de un RAG
  2. Funcionamiento a Alto Nivel
  3. Evaluación de los RAG
  4. Métricas de Evaluación
  5. Conclusiones

Publicado en: Blog, Practices, Tech

  • « Ir a la página anterior
  • Página 1
  • Página 2
  • Página 3
  • Página 4
  • Página 5
  • Páginas intermedias omitidas …
  • Página 41
  • Ir a la página siguiente »

Footer

LegalPrivacidadPolítica de cookies
LegalPrivacy Cookies policy

Patrono

Patron

Sponsor

Patrocinador

© 2025 Bluetab Solutions Group, SL. All rights reserved.